If you are using Visual Studio Code (VS Code) and thinking about how to disable the automatic software updates of it and also how to disable the auto updates of its extensions as well then go through this article. In case you do not use the VS Code often and open the editor after a long gap and think to enable the auto updates back, this article also guides you to do it. Let us discuss in detail the different methods to enable or disable the auto updates of VS Code.
Method 1: Enable/Disable VS Code Auto Update Using Settings
Step 1: Open the VS code and at the bottom left corner, click on the gear-like symbol.
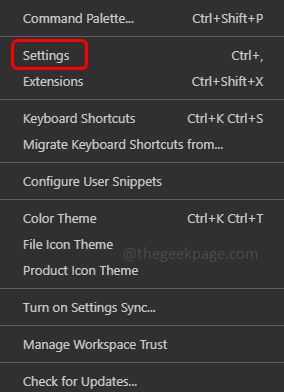
Step 2: In the appeared list click on Settings.
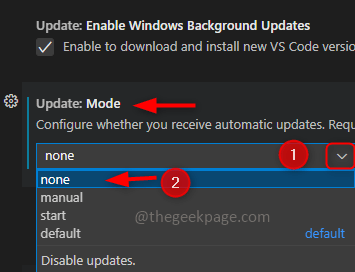
Step 3: In the search bar type update and hit enter. Find for Update: Mode
Step 4: In the dropdown select none to disable the auto updates.
Step 5: If you want to enable auto updates select default from the drop-down list.
Step 6: It will ask for a Restart click on restart.
Method 2: Enable/Disable VS Code Auto Update Using JSON File
Step 1: Open the VS code and at the bottom left corner, click on the gear-like symbol.
Step 2: In the appeared list click on Settings.
Step 3: On the top right corner click on File like icon which is called open settings JSON.
Step 4: This will open the settings.json file
Step 5: Search for update.mode in the file if found, check for its value. To disable auto updates change the value to none. If you did not find update.mode key then add the below code before the end of curly braces.
"update.mode": "none"
Step 6: To enable auto updates, change the value to default. If you did not find update.mode key then add the below code before the end of curly braces.
"update.mode": "default"
Step 7: Save the file using Ctrl + S keys together. And restart the system.
Method 3: Enable/Disable The Auto Update For VS Code Extensions Using Settings
Step 1: Open the VS Code and click on the gear icon which is in the left corner.
Step 2: Then click on Settings.
Step 3: In the search bar type update and in the filtered data find Extensions: Auto Check Updates
Step 4: To disable the auto updates uncheck the box beside it.
Step 5: To enable the auto updates the checkbox beside them must be ticked.
Step 6: You must also check for the Extensions: Auto Update option in the filtered data. In the dropdown select None to disable the extensions auto update
Step 7: To enable, select All Extensions from the dropdown.
Method 4: Enable/Disable The Auto Update For VS Code Extensions Using JSON File
Step 1: Open the VS Code and go to Settings, apart from clicking on the gear icon and then going to Settings you can also use Ctrl and, keys together (Ctrl +,) to open Settings.
Step 2: Click on file like symbol which is at the top right corner, to open the settings.json file.
Step 3: To disable auto update, find for extensions.autoUpdate key from the JSON file, if present change the value to false as below. If the extensions.autoUpdate key is not present then add the below code just before the closing braces.
"extensions.autoCheckUpdates": false

"extensions.autoUpdate": false
Step 4: To enable auto update, the value of extensions.autoUpdate must be true. If the extensions.autoUpdate key is not present add the below code just before the closing braces.
"extensions.autoCheckUpdates": true

"extensions.autoUpdate": true
Good To Know
Let me tell you that apart from completely disabling auto updates or enabling it to automatically update the software without any intervention VS Code has other options as well.
You can manually check for updates and then if required you can install them. – For this, you need to set the update mode to manual, from the drop-down list.
Check for updates only on the startup – Set the update mode to start from the drop-down list.
That’s it! Hope this article was helpful. Thank you!!


