Changing the IP address can help to keep your device secure while browsing. In most of the cases a user will try to change the IP address as a troubleshooting technique when he or she is facing some internet connection issues. Manually changing the IP address to static or again back to the dynamic mode, requires few steps to be followed. If you are performing this process frequently then why not think of automation? Yes it is possible to change the IP address automatically using a batch file. To do this, you just need to follow a few steps to create the batch file and its contents. You may feel the steps are more but it is a one time process and can be used as a single click for rest of the time. In this article let us see how to change the IP address automatically using the batch file in windows 10.
Check The Network Connection Device Properties
Step 1: Open the windows settings using Windows + I keys together
Step 2: Click on Network & internet
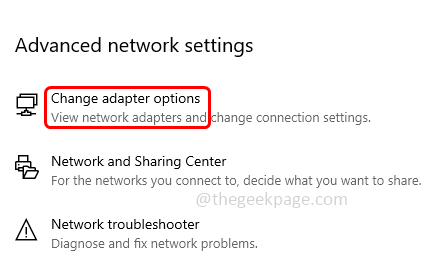
Step 3: By default, the status page will be opened. at the right side scroll down and click on change adapter options that are under advanced network settings
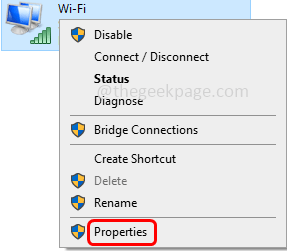
Step 4: The network connections window will open, right click on whichever connection you are using either wireless (Wi-Fi) or cabled (ethernet)
Step 5: Then click on the properties
Step 6: In the opened window, double-click on Internet Protocol Version 4(TCP/IPV4)
Step 7: Obtain IP address automatically option will be set that is it will be in dhcp mode
Step 8: If you want to change the IP address, then follow the below steps. If you create the batch file using below steps, the next time when you want to set the IP address, it will be very easy by just running the batch file.
Create The batch File To Change The IP Address – Static Address
Step 1: Open the command prompt as an administrator, to do this type cmd in the windows search and hold Ctrl + Shift keys together then hit enter
Step 2: A user account control window will appear, click on yes
Step 3: Copy the following command, paste it in the command prompt then hit enter. This will show the configuration information for interface
netsh interface ipv4 show config
Step 4: Copy the interface name for what you want to change the IP address (like ethernet, wifi etc) from the command prompt. Here I will copy the Wi-Fi name since I want to set its IP address
Step 5: Open the text file (.txt). To do that press Windows + R keys together to open the run prompt and type notepad in the run prompt then hit enter
Step 6: Copy the following three commands and paste it in the notepad. Replace the address name, dnsserver name [to understand better I have highlighted them in bold below] with the name copied from the command prompt (Step 4)
Step 7: Also change the IP address, mask, gate with the neccessary address of your choice
netsh interface ip set address name="Wi-Fi" source=static ^ address=10.10.0.15 mask=255.255.255.0 gate=10.10.0.1

netsh interface ip set dnsservers "Wi-Fi" static 8.8.8.8 validate=no

netsh interface ipv4 add dnsserver "Wi-Fi" address=8.8.4.4 index=2 validate=no
Step 8: Now save the notepad file with .bat extension. To do that, click on File then select save as
Step 9: From the save as type dropdown select the type to be all files
Step 10: Give the file a name of your choice with .bat as extension. Here I will specify the filename as ip_address.bat
Step 11: Browse the path or location where you want to save the file and click on save button
Step 12: Run the .bat file, for that right click on the .bat file select run as administrator
Step 13: There appears a user account control prompt click on yes. Then it will automatically run the commands and set the IP address
When you open the Wi-Fi properties you can see the IP address mentioned in the .bat file are appeared in the properties window.
Change The address To DHCP (Dynamic Host Configuration Protocol) Mode
If you want to switch back from static address to dhcp mode that is obtain an IP address automatically option using batch file then follow below steps.
Step 1: Open the text file (.txt). To do that press Windows + R keys together to open the run prompt and type notepad in the run prompt then hit enter
Step 2: Copy the following command and paste it in the notepad
Note: If you are changing the address for ethernet then instead of Wi-Fi you should mention the ethernet name [as explained in the previous steps]
netsh interface ip set address name="Wi-Fi" source=dhcp

netsh interface ip set dnsservers "Wi-Fi" source=dhcp

netsh interface ipv4 add dnsserver "Wi-Fi" source=dhcp
Step 3: Now save the notepad file with .bat extension. To do that, click on File then select save as
Step 4: From the save as type dropdown select the type to be all files
Step 5: Give the file a name of your choice with .bat as extension
Step 6: Browse the path or location where you want to save the file and click on save button
Step 7: Run the .bat file, for that right click on the .bat file select run as administrator
Step 8: There appears a user account control prompt click on yes. Then it will automatically run the command and set the option to obtain an IP address automatically that is dhcp mode.
The above steps are one time effort. Once done it can be used any time, when you need to change it again in future it is done in just a click or two.
That’s it! I hope the above information is useful. Thank you!!


