Are you tired of looking for cables and connecting and everything else whenever you want to transfer some files between your Android device and your Windows device? Well, you are not alone. It is definitely a tiresome process to transfer files between your Android and Windows if cables have to come into the picture. But what if we tell you that you can easily and conveniently transfer files without using cables, but using FTP over your WiFi? Well, nothing else sounds more exciting? Read on then, you are in for a treat!
Important Note: One major point that you have to keep in mind is, both your Android device and your Windows PC should be connected to the Internet over the same network connection. That is, if your Android device is connected to the Internet over Wi-Fi, your Windows PC should also be connected to the Internet over the same Wi-Fi connection. similarly, if you are connected to the Internet using cellular data on your Android device, then turn on the Mobile Hotspot and connect your Windows PC to the same network using the hotspot.
Section 1: How to Obtain the FTP Connection Details to your Android Device
So how do you access your Android files from your Windows PC using FTP? The answer is simple. Your Android device needs to act as the FTP server and your Windows machine will act as the FTP client. To enable the FTP server in your Android, we are going to make use of an application from the Play Store, WiFi Pro FTP Server. This is the FTP server we prefer, even though it is a paid application(payment charges are very minimal). You can check other FTP server applications that are available for free if you prefer a free application.
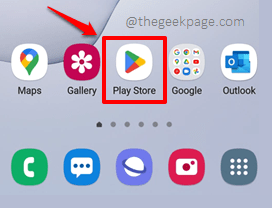
Step 1: Launch the Play Store application by clicking on its icon from the applications drawer.
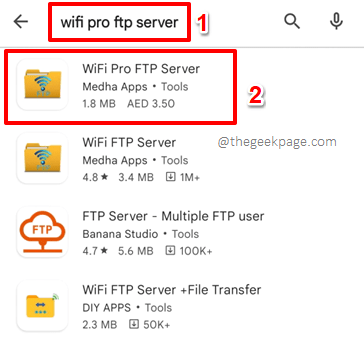
Step 2: Now on the Play Store search bar, search with the keywords WiFi Pro FTP Server. Click on the WiFi Pro FTP Server application from the search results.
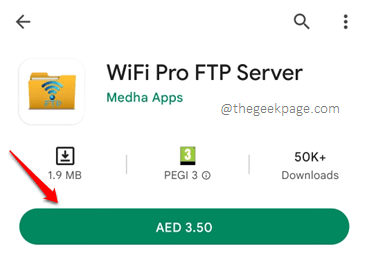
Step 3: When you land on the application page, you will see that a nominal fee needs to be paid to download and install the application. Click on the payment button to proceed. Choose a payment method of your choice and complete the payment.
Step 4: Once the payment is completed, the app will be downloaded and installed. Hit the Open button once the installation is done.
Step 5: When the application launches open, all you have to do is hit the START button to start the FTP server on your Android device.
Step 6: You will now have to click on the Allow Access button to allow the WiFi Pro FTP Server application, the access to your Android files.
Step 7: When the following confirmation window pops open, hit the ALLOW button.
Step 8: That’s it. FTP server is now enabled on your device and you can access your Android files from your Windows PC using the connection details that get displayed on the WiFi Pro FTP Server application’s home page.
We will mainly be using the Server URL, the IP Address, the Userid, and the Password to connect to your Android device. So keep a note of them.
Note: Keep the FTP Server running. If the server gets disabled, then you will not be able to access the Android files from your Windows using the methods detailed in Section 3.
Section 2: How to Modify the FTP Connection Configurations
In this section, let’s see how you can modify your FTP configurations easily.
Important Note: If you are changing any of the settings options, please remember to Stop the server and Start it again for the changes to take over. You can refer to Section 4 if you are confused about how to stop the FTP server.
Step 1: Launch the WiFi Pro FTP Server application from your applications drawer.
Step 2: When the application launches open, click on the Gear icon at the top, to view the Settings options.
Step 3: Now let’s see each of the settings options in detail below and you can decide which ones are beneficial for you.
- Port number: Port number is the port used by your WiFi Pro FTP Server application. In the connection made in Section 1 Step 8, the port number is the value present after the colon (:), after the IP address in the Server URL. You can change this port number (eg:2221) using the Port number settings option. But remember, if the port you enter is already in use, you will not be able to use it. You can use numbers 1024 through 65535.
- Anonymous Access: This option can be checked if you would like to allow anonymous access.
- Userid: Instead of android, you can give any other value for your FTP username using this field.
- Password: Just like the Userid field, you can change the FTP password using the Password field.
- Use FTPS: Enabling this checkbox would add more security to your file transfer.
- SSL mode: Here you get to choose your FTP transfer SSL mode. SSL is used for establishing a secure link between the server and the client.
- Root folder: This is the folder that will be shared via FTP. All the subfolders under this root folder will be accessible to your FTP client. So, choose wisely.
- Read only: If you enable this option, only Read access will be permitted to your FTP client, which is your Windows device in this case.
- Theme: This option is to select a theme (light or dark) for your WiFi Pro FTP Server application.
- Display password: Only if you enable this checkbox, will the password be displayed on the home screen of the application. You can keep this checkbox unchecked if you don’t want anyone to see your FTP password right when you open the WiFi Pro FTP Server application.
Section 3: How to Access your Android Files from your Windows
As mentioned in the introduction, there are 3 ways through which you can access your Android files from your Windows PC over FTP. Let’s now explore each of these methods in detail in the sections below. In all the methods, your FTP server will run on your Android device and with the help of different FTP client modes, we will access the Android files from your Windows PC.
Section 3.1: Access your Android Files Using a Web Browser and File Explorer
Step 1: Open any web browser of your preference. I have opened Mozilla Firefox as an example.
Once the browser is launched, type in the Server URL that you obtained from Section 1, Step 8. The Server URL should be complete. That is, it should start with the word ftp and end with the port number. Hit the Enter key once done.
Step 2: You will now be asked to choose an application to open the FTP link that you entered in the URL bar of your browser. The application explorer.exe (File Explorer) is the one to be chosen. If it is already listed, you can simply click on it, and jump straight to Step 4. If it is not listed, then click on the Choose button against the Choose other Application option as shown below.
Step 3: Now on the Another Application window that opens up, on the address bar, copy and paste the following address and hit the Enter key.
C:\Windows
On the window that you land at, scroll through and find the application named explorer.exe, click on it and click on the Open button at the bottom.
Step 4: Now explorer.exe will be listed under the Choose an application to open the ftp link window for sure. Click on it and then hit the Open Link button.
Step 5: That’s it. You will now straight away land on a window that has all your Android files. You can browse through them and copy them to your PC just like how you would normally copy files from one folder to another. Enjoy!
Section 3.2: Access your Android Files by Mounting your Android Device as a Network Drive
Though the first method is convenient and efficient, entering the FTP details every single time might be time-consuming and hence might not be everyone’s favorite. In that case, you can easily mount your Android device as a network drive on your Windows PC and make it way easier to access your Android files. Let’s see how this can be done.
Step 1: First launch File Explorer and on the left pane of the File Explorer window, click on This PC.
Now on the right window pane, under the section Devices and drives, right click on an empty space and then click on the Add a network location option from the right-click context menu.
Step 2: The Add Network Location wizard would now be open. Simply hit the Next button to proceed.
Step 3: On the window that follows, the option Choose a custom network location would be chosen by default. Hit the Next button at the bottom.
Step 4: You now need to enter the FTP Server URL under the Internet or network address field. This is the same URL that you obtained in Section 1, Step 8. Make sure the URL starts with the word ftp and ends with the port number.
Once the URL is entered, hit the Next button to proceed.
Step 5: You will now be at the Specify a User Name and Password if Required window.
The first thing to do is to uncheck the Log on anonymously option.
As next, under the User name field, enter the FTP server username. This is the same Userid value that you obtained in Section 1, Step 8. Hit the Next button once done.
Step 6: Now under the Type a name for this network location field, type in any name of your preference and hit the Next button.
Step 7: On the last step, make sure the checkbox is checked for Open this network location when I click Finish.
Once done, hit the Finish button.
Step 8: Now on the Log On As window, the FTP server URL and the User name fields would already be filled. You just need to fill in the Password field, and the password is the same Password in the screenshot given in Section 1, Step 8.
Once you have entered the password, hit the Log On button.
Step 9: That’s it. You can now access all your Android files right from your Windows PC. If you would like to see the mounted network drive, click on the This PC option from the left pane of the File Explorer window once again.
Step 10: Now, under the Network locations section, you can see your Android device, mounted as a network drive. You can double-click on this storage drive to access it. Sit back and enjoy!
Section 3.3: Access your Android Files from Windows Using an FTP Client
In this solution, we are going to download an FTP client named FileZilla. The FTP client would directly connect to the FTP server using the server’s login credentials. You can download any other FTP client, we have taken the example of FileZilla here and have used FileZilla to explain the steps in this solution.
Step 1: Open any web browser and search with the keyword FileZilla and hit the Enter key. From the search results, click on the link that says Download FileZilla Client.
Step 2: On the page that you land at, under the section Windows (64 bit x 86), click on the Download FileZilla Client button.
Step 3: You will now have the option to choose the edition of the FileZilla client that you want to download. Just click on the Download button associated with the basic version as shown in the screenshot below.
Step 4: The Save As window will now be open before you. Choose a location for your FileZilla executable file download, I have chosen the Downloads folder, and simply hit the Save button at the bottom of the window.
Step 5: Once the download is complete, double-click on the downloaded FileZilla executable file to start the installation process.
Step 6: On the Installation wizard, click on the I Agree button to agree to the license terms and conditions.
Step 7: As next, choose Only for me or Anyone who uses this computer (all users) against Who should this application be installed for?, as per your preference. Hit the Next button.
Step 8: Hit the Next button on the window that follows as well. If you want a Desktop icon, check the checkbox for Desktop Icon as well.
Step 9: Hit the Install button on the window that follows.
Step 10: By default, C drive is where the FileZilla client will be installed. If you want to choose a different location, use the Browse button and choose the location of your preference. Once you’re set, hit the Next button.
Step 11: That’s it. Your installation is now complete. Make sure the Start FileZilla now checkbox is checked and hit the Finish button to launch FileZilla right away!
Step 12: You will now get the following welcome message from FileZilla. Simply hit the OK button.
Step 13: You will now have the FileZilla client open before you just as shown in the screenshot below. You need to enter the FTP server details on your FTP client.
Now is the time to refer to the screenshot present in Section 1, Step 8 once again.
- On the Host field, type in the IP Address value that you got from the WiFi Pro FTP Server application home screen. The IP address is present in the same section as the START button.
- Type in the Userid value from the WiFi Pro FTP Server application in the Username field.
- Also, type in the Password value from the WiFi Pro FTP Server application in the Password field.
- Finally, type in the port number in the Port field. You can find the port value from the Server URL field from the WiFi Pro FTP Server application. The Port number is whatever is after the colon (:) after the IP address in the Server URL.
- When you are all done, hit the Quickconnect button to connect.
Step 14: Choose an option as per your preference on the Remember passwords window. We have chosen the Save passwords option. Hit the OK button.
Step 15: That’s it. On the left side of your FileZilla client, you can see your Windows files. And on the right side, you can see your Android files.
You can browse through your Android files easily, from the right side of the window.
Also, if you would like to download a file from Android to Windows or vice versa, navigate to the location where you want the file to be downloaded and simply right-click on the file and hit the Download button. It is as simple as that.
Section 4: How to Close the FTP Connection
When you are all done with the file transfer, you can close the FTP connection by disabling the FTP server on your Android device by following the steps below.
Step 1: Firstly, from the applications drawer, click on the WiFi Pro FTP Server application to launch it.
Step 2: Now, simply hit the STOP button to disable the FTP server. That’s it.
Please tell us in the comments section how easy your life turned out to be, because you don’t have to use cables anymore to transfer files between your Android and Windows!
Stay tuned for more amazing technical tips, tricks, how-tos, hacks, and solutions!


