Every time a major triple AAA title launches, NVIDIA releases new highly optimized game drivers for all their existing drivers. These updates are crucial for gamers to get the best out of the games as soon as they hit the store. But, sometimes you may notice this “GeForce Game Ready Driver Installation can’t continue prompt” error prompt in the GeForce Experience app. If you are experiencing this issue, follow these steps to manually install the latest driver.
Workarounds –
1. In the GeForce Game Ready Driver installation screen, when the error message is showing up, tap the “TRY AGAIN” option.
Now, GeForce Experience will attempt the installation again.
2. Close all the games, video-editing tools, or any program that can use GPU processes. You have to ensure there are any other installations going on your device.
Fix 1 – Close and retry again
The first solution we recommend is to close the GeForce Experience
1. When you notice the error message in the GeForce Game Ready Driver installation page opens up, tap “CLOSE“.
2. Now, close the GeForce Experience app.
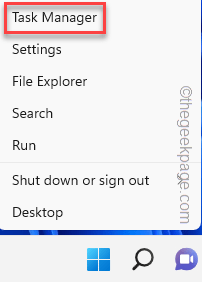
3. Next, right-click the Windows icon and tap “Task Manager“.
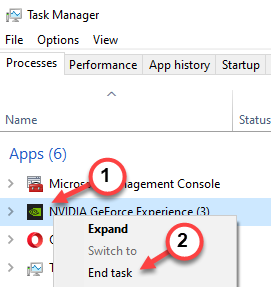
4. Here, in Task Manager, look for any GeForce Experience-related app running on the device.
5. If you can see any related app process, right-tap that and tap “End task“.
6. Now, open GeForce Experience.
7. Then, go to the “DRIVERS” tab.
8. Here you can view the latest graphics driver. Tap “DOWNLOAD” to download the driver.
Just let it download the latest version of the driver.
4. Once it is done, tap “Express installation“.
Just wait for the installation to finish. Check whether this helps or not.
Fix 2 – Perform a clean install
A clean installation of the graphics driver is recommended.
1. Open the GeForce Experience app.
2. Here, go to the “Drivers” page and click “Download” the driver.
3. Once the driver is downloaded, choose the “Custom installation” option.
4. This way, you can take full control of the installation process.
5. So, check these boxes –
Graphics Driver
HD Audio Driver
NVIDIA GeForce Experience
PhysX System Software
6. Check the “Perform a clean installation” box.
7. Finally, tap “INSTALL” to start installing the driver.
This type of installation will take a few minutes more than the usual way. Wait patiently until the driver is displayed.
Fix 3 – Download the driver manually
If nothing works, you can just download the latest graphics driver manually and install it on your computer.
1. Go to the NVIDIA Graphics Card driver page.
2. Upon reaching there, you will see several boxes to specify the graphics driver. Like, the type of GPU, your OS type (Windows 10 or 11), etc.
3. Then, tap “Search” to search for the latest available driver.
4. Now, tap “Download” to download the driver installer.
5. Once you have downloaded the file, double-tap the installer to start the installation process.
6. Next, select the “NVIDIA Graphics Driver and GeForce Experience“.
7. After this click once on the “AGREE AND CONTINUE” option to proceed.
8. Now here, you have two distinct options. You can choose any of these, but we recommend you select the “Custom (Advanced)” option.
Express
Custom (Advanced)
9. After this, tap “NEXT” to go to the next and final step.
10. Next tick all the boxes here. Then, tick the “Perform a clean installation” box on the installer page.
11. Finally, tap on “Next“.
As soon as you tap the ‘Next’ button, the display driver will start to be installed. It will take 15-20 minutes and your screen may appear unresponsive.
At the end of the process, you will see the ‘NVIDIA Installer has finished’ on your screen. This way, you can fix the problem.


