Many users prefer using the Google Chrome browser due to its advanced features and the easy to use functionality, however, the browser sometimes may return errors while you try to visit a website or after you updated the browser. One such error is the “ERR_ICANN_NAME_COLLISION” error. This error prevents you from accessing any website through the Chrome browser and returns the above error. You may also come across this error while trying to use the localhost .dev on Chrome.
The error may show up due to reasons like if the website you are browsing is randomly redirected to a totally different or a wrong proxy serve, or if there’s a glitch with the private namespace. The error message reads “The site can’t be reached, This site on the company, organization or school intranet has the same URL as an external website. Try contacting your system administrator. ERR ICAN NAME COLLISION.”
Fortunately, there are a couple of workouts that may help you fix the “ERR_ICANN_NAME_COLLISION” error on Google Chrome on your Windows 11/10 PC.
Method 1: Flush DNS
Step 1: Press the Win + R keys together on your keyboard to launch the Run command window.
Step 2: In the Run command search bar, type cmd and press the Ctrl + Shift + Enter keys together to open the Command Prompt window in admin mode.
Step 3: Next, in the elevated Command Prompt window, run the below commands one after another and hit Enter:
ipconfig/flushdns
ipconfig/renew
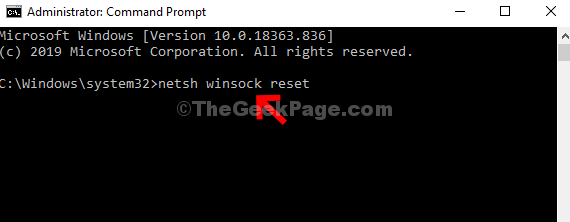
Step 4: Once you have renewed the Windows IP configuration, type the below command and hit Enter:
netsh winsock reset
Now, to complete the reset process, exit the Command Prompt window and restart your PC. You can now try browsing websites and you should not encounter the anymore.
Method 2: Through Registry Editor
Sometimes, when the traditional methods fail to work, tweaking the registry settings may help fix the “ERR_ICANN_NAME_COLLISION” error. However, before you proceed to make any changes to the registry data, make sure that you create a backup of the registry editor settings, so that, in case you lose any data during the process, you can recover the same easily. Let’s see how to edit the registry editor:
Step 1: Press the Win + R keys together on your PC to open the Run command.
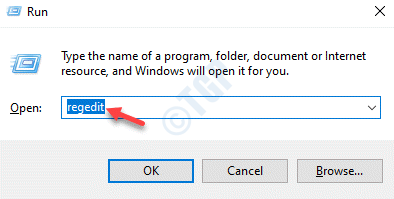
Step 2: In the Run command window that opens, type regedit in the search bar and press OK to open the Registry Editor.
Step 3: Next, copy and paste the below path in the Registry Editor address bar and hit Enter:
HKEY_LOCAL_MACHINE\SYSTEM\CurrentControlSet\Services\Tcpip\Parameters\Winsock
Now, go to the right side of the pane and double-click on the String value – Default.
Step 4: In the Edit String Value dialogue box, check if the Value data field is set as the below path:
C:\Windows\System32\drivers\etc
If not, then copy and paste the above path in the Value data field in the Edit String Value window.
Press OK to save the changes and exit.
Now, restart your PC and check if the issue is resolved.
Method 3: Check Integrity of Hosts File Via Command Prompt
Checking the integrity of the host file is another very important thing you an try out and see if it helps fix the Google Chrome error. Let’s see how:
Step 1: Go to the Start button, right-click on it and select Run to launch the Run command window.
Step 2: In the Run command search bar, type cmd and press the Ctrl + Shift + Enter keys simultaneously on your keyboard to open the elevated Command Prompt.
Step 3: Next, in the Command Prompt in admin mode, execute the below command:
sfc /scanfile=C:\Windows\System32\ieframe.dll
Step 4: Now, run the below command and hit Enter:
sfc \verifyfile=C:\Windows\System32\ieframe.dll
Step 5: Finally, type the below command and hit Enter:
assoc
Step 6: Now, run the below command and hit Enter again to run the check disk command:
chkdsk
Now, wait for the process to get over as the scan takes a while.
Once done, close thee Command Prompt window, reboot your PC and check if the “ERR_ICANN_NAME_COLLISION” error still persists while browsing on Chrome.
Method 4: Remove conflicting browser extension
The loads of Google Chrome extensions that you have been using all this while can be the root cause behind the error. The extensions sometimes interfere with the functioning of the browser returning the error while browsing. In such cases, it would be wise to remove the extensions that may be causing the issue. Here’s how:
Step 1: Launch Google Chrome, navigate to the three vertical dots on he upper right end of the browser, click on More tools and select Extensions.
Step 2: In the Extensions window, go to the extension that may be causing the error and click on Remove to delete it.
*Note – You can also choose to move the slider to the left to simply disable the extension and see if it helps fix the issue.
Now, restart your Chrome browser and check if you can browse through the websites without the “ERR_ICANN_NAME_COLLISION” error.
Method 5: Run SFC Scan and Chkdsk Utility to Refresh Bindings
If the above methods fail to work, you can try running a system file check scan and check your hard disk. Followed by this you can once again check thee hosts file integrity. Follow the below instructions to refresh bindings and possibly fix the error:
Step 1: Press the Win + R hotkeys to open Run command.
Step 2: In the Run command search bar, type cmd and press the Ctrl + Shift + Enter keys simultaneously on your keyboard to open the Command Prompt window with administrator rights.
Step 3: Next, in the elevated Command Prompt window, run the below command and hit Enter:
sfc /scannow
This scan process takes a while, so wait till it gets over. It will look up for any corrupt files and fix them on the spot if any found.
Step 4: Now, type the below command and hit Enter to check for any issues in the hard disk:
chkdsk
Step 5: Once done with the disk check, copy and paste the below command and hit Enter:
sfc /scanfile=c:\windows\system32\ieframe.dll
Step 6: Now, type the below command and hit Enter:
sfc /verifyfile=c:\windows\system32\ieframe.dll
The commands in the Step 5 and 6 will check for the host file integrity.
Now, close the command prompt window and restart your PC to check if the “ERR_ICANN_NAME_COLLISION” error still shows up.
Method 6: Check Proxy
Chances are, that the error shows up while browsing on your Chrome browser because you have added a proxy server manually. Changing the proxy settings to automatic may help fix the issue. Let’s see how to set the proxy server to automatic:
Step 1: Press the Win +I shortcut keys on your keyboard to launch the Settings app.
Step 2: In the Settings window, click on the Network & internet option on the left.
Step 3: Next, navigate to the right side, scroll down and click on Proxy.
Step 4: Now, in the Proxy settings window, go to the right side of the pane, make sure that the Use a proxy server option below the Manual proxy setup is off.
If not, then click on the Set up button next to it.
Step 5: Next, in the Edit proxy server window, go to Use proxy server and turn it off.
Click on Save to return to the Proxy settings window.
Step 6: Now, go to the Automatic proxy setup section and check if the Automatically detect settings option below is turned on.
If not, then move the slider next to it to the right to turn on the Automatic proxy setup.
Close the Settings window, restart your Chrome and now check if the issue still persists.
Method 7: Clear the Google DNS Cache
Follow the below instructions to remove cache from Google Chrome and possibly fix the issue:
Step 1: Launch your Chrome browser and copy and paste the below path in the address bar. Hit Enter:
chrome://net-internals/#dns
Next, in the Chrome DNS page, you will see the option, Host resolver cache.
Press the Clear host cache button next to it to flush DNS.
Step 2: Now, keeping this DNS window open, open a new tab and access the virtual host.
It will be in the format like “http:/api.localhost“.
For you it will be different, but the format will be same.
Step 3: This will pull up a new entry in the DNS window and you will see that under the Hostname field.
For example, localhost. (with the period in the end) and this will show an error next to it, in the Addresses column.
Step 4: Now, add this entry (example: localhost.) to your local host file.
*Note – Press Win + E keys together on your keyboard to open the File Explorer window.
Then, navigate to the below path to reach the local hosts file:
C:\Windows\System32\drivers\etc
Now, double-click on the hosts file t open it.
Step 5: Next, select to open it in Notepad.
Step 6: Now, add the entry, for instance, “localhost.” to it.
It should appear as something like below:
# localhost name resolution is handled within DNS itself.
# 127.0.0.1 localhost
Now, save and close the host file and try browsing on your Chrome and see if it has fixed the issue.
Alternatively, you can also try running a malware scan using the built-in Microsoft antivirus or a trusted 3rd party software to detect and quarantine any virus or malware that may be blocking the websites as you browse.


