Zoom app has become an essential tool for IT professionals, especially in this time, when everyone is needed to adhere to the social distancing protocols due to the pandemic. Now, in case if you have an important meeting with the clients and you suddenly noticed that webcam is not working, what to do? Don’t worry. Simply, follow these easy fixes and the problem will be solved in no time at all.
Fix-1 Check the camera permission-
1. Type “Camera privacy settings” in the Search box just beside the Windows icon.
2. Now, click on “Camera privacy settings” in the elevated search result.

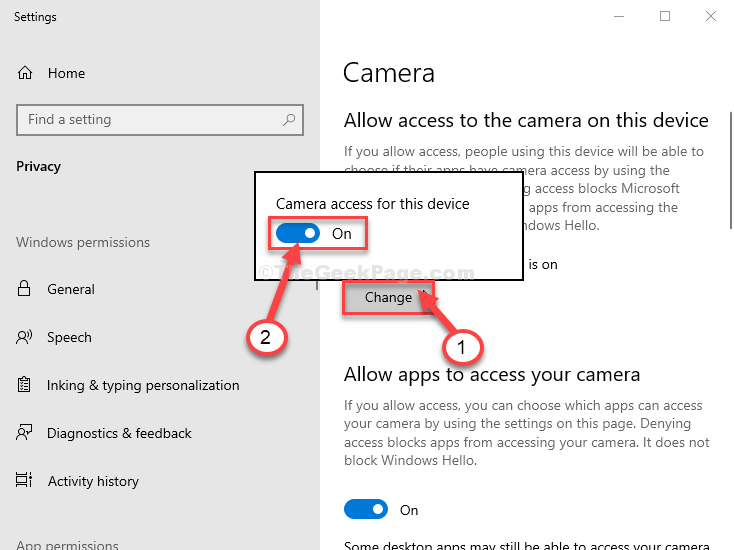
3. Under ‘Allow access to the camera on this device‘, click on “Change“.
4. Turn the ‘Camera access for this device‘ “ON“.

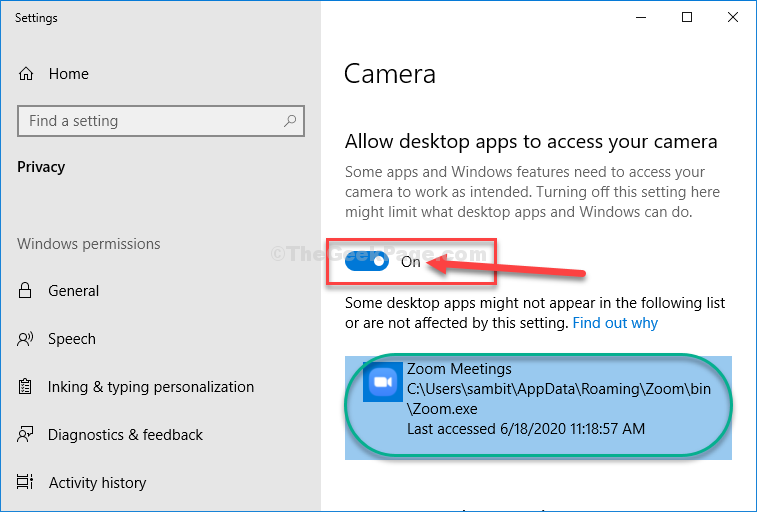
5. Scroll down in Settings, turn the ‘Allow desktop apps to access your camera‘ settings “On“.

Close Settings window.
Try to open the Zoom app and test the camera.
For Windows 11 Users
1 – Press Windows key + I key together to open settings.
2 – Now, Click on Privacy & Security from the left menu.
3 – Now, click camera from the right side.

4 – Turn On both camera access and Let Apps access your camera option.

5 -Also, make sure If zoom is in the list and its camera access is turned ON.
Fix-2 Reset Camera app-
1. Type “Camera” in the Search box just beside the Windows icon.
2. Now, right-click on the “Camera” application and then click on “App settings“.

3. In the Settings window, scroll down and then click on “Reset“.
4. Again, click on “Reset“.

Then, close the Settings window.
Launch the Zoom app and test the camera again.
Fix-3 Check if Zoom is using the right camera-
You have to check if Zoom is using the right camera or not.
1. Open the Zoom app on your computer.
2. On the left-hand side of the application, click on “New Meeting“.

A new video session will be started.
3. Now, on the bottom-left corner, click on “Stop Video“.
4. In the elevated panel, check if the Zoom app is using the right camera (If you are using a laptop there will be a tick mark beside “Integrated Webcam“).

5. To close the video session, click on “End“.

Re-launch the Zoom app and start a video session. Check if the camera is working.
Fix 4 – If you are using Zoom on Chrome
1 – Open Chrome browser.
2 – Go to chrome://settings/privacy
3 – Click on Site Settings

4 – Click on Zoom website url.

5 – Select Allow from Dropdown on Camera

6 – Now, refresh chrome browser, or close it and then again open it.
Fix-5 Use Zoom Troubleshooting-
1. Launch the Zoom app from your computer.
2. Click on the gear-shaped icon to open Zoom settings.

3. On the left-hand side click on “Video“.
4. Now, scroll down through the right-hand side of the same window, and click on “troubleshooting“.
5. Make sure that you have followed every instruction of that list minutely.
a. Make sure the webcam is plugged in (Not applicable if you are using a laptop).
b. Ensure the webcam is not used by another app (like Skype). If another app using the webcam, end it. Relaunch Zoom app.
c. If nothing is working, restart your computer.

If everything is ‘OK’ but the camera is still not working go for the next fix.
Fix-6 Modify Zoom video settings-
The problem may be in Zoom video settings.
1. Launch the Zoom app from your computer.
2. Click the settings icon on the top-right corner in the Zoom app.

3. In the Settings window, on the left-hand side, click on “Video“.
4. Then, click on “Advanced” in the bottom right corner.

5. Now, on the right side, check the option “Enable de-noise“.
6. Same way, check the “Enable acceleration for video processing” option.
7. Check the option “Enable acceleration for sending video“.
8. Check the option “Enable hardware acceleration for receiving video“.

9. Similarly, you have to set all the other three settings to “Auto“.

Once you have changed the settings successfully, close Settings.
Relaunch the Zoom app. The camera should be working properly.
Fix-7 Disable and Enable Webcam-
Disabling and enabling the webcam device has worked out for many users facing a similar issue.
1. Press Windows key+R to open Run window.
2. In the Run window, type “devmgmt.msc” and then hit Enter.

Device Manager window will be opened.
3. At first, expand the “Cameras” section.
4. Then, you need to right-click on “Integrated Webcam” and then click on “Uninstall device” to uninstall the camera from your computer.

5. Finally, click on “Uninstall” to confirm the camera device uninstallation.

The webcam driver will be uninstalled from your computer.
In the next steps, we are going to install the webcam driver again-
Method 1–
Reboot your computer. This will install the uninstalled camera driver.
Method 2–
If rebooting your computer didn’t install the camera driver then you have to install the driver yourself. Follow to install the driver manually-
1. At first, open the Device Manager.
2. Now, click on “Action“. Then you need to click on “Scan for hardware changes“.

After installing the webcam driver, open the Zoom app, and check if you are still facing the same problem or not.
NOTE–
You can update the webcam driver manually also.
1. Go to your laptop manufacturer’s website.
2. Find the latest webcam driver for your laptop and download it.
3. Install it by running the installer package you have just downloaded.
4. Reboot your computer.
Test the camera within the Zoom app. Your problem should be solved.