While installing a feature update from a stand-alone installer or re-installation of Windows 10 / 11 , you may see this error message “Windows Setup could not configure Windows to run on this computer’s hardware“. This message usually pops up after the installation stage ends. So, if you are facing this issue on your computer, there is no need to worry. Follow these easy fixes to solve the problem very easily.
Fix-1 Run msoobe.exe manually-
Microsoft Out of Box Experience (Msoobe.exe) is the application that ensures the activation of Windows.
1. Press Shift+F10 to open the Command Prompt window, while you are in the error screen.
2. In the Command Prompt window, copy-paste these commands sequentially and hit Enter at the end.
cd\
cd x.\windows\system32\oobe

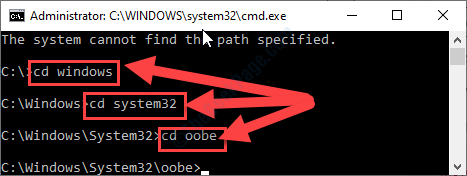
In case, if you see “The system cannot find the path specified.” error message, follow this step-
a. Execute these three codes in the CMD terminal.
cd windows
cd system32
cd oobe

3. Now, you have to execute msoobe.exe on your computer.
To do it, copy-paste this command and then hit Enter.
msoobe

Now, wait a while. Windows will complete the installation process normally.
Fix-2 Change SATA settings-
Modify SATA settings on your computer to IDE, RAID, ATA or AHCI.
1. Shut down your computer.
2. Start the computer.
3. Press the “F12” key to open boot settings on your computer.

4. When the BIOS setting opens on your computer, you need to go to the “Advanced“.
5. Now, press down arrow keys to highlight the “SATA Operation” setting, and hit Enter.

6. Now, change the settings to “IDE” or “RAID” and then hit Enter.
7. Now, press ‘Esc‘ key from your keyboard.
8. Finally, when the ‘Save configuration and reset‘ message pops up, select “Yes” and hit Enter.

Now, save and exit the BIOS settings on your computer.
Fix-3 Manually install the problematic driver-
Sometimes problematic drivers on your computer may cause this type of issue. Manually installing the latest driver may fix the issue on your computer.
NOTE– For this fix, you will need a separate laptop/ PC to download the latest driver for the problematic driver.
For most of the cases, the hard disk drive has been found to be the actual culprit.
Steps to do on the other computer–
1. Download the latest hard disk drive from the manufacturer’s website.

2. Store the driver package on a USB flash drive or an external drive.

Steps to do on your computer-
1. Plugin the USB device on your computer.
2. Initialize the system installation.
3. Now, you will notice the “Load driver” option. Click on the “Load driver“.
5. Now, choose the latest harddisk driver from the external drive. Wait for the installation to complete.
6. Now, advance with the installation of Windows.
This should solve your problem.
If you are facing the problem while installing a Windows Feature Update, try these fixes-
Fix-1 Run Windows Update Troubleshooter-
Windows Update Troubleshooter can determine the problem you are facing and solve the issue easily.
1. Open the Settings window.
2. Then click on “Update & Security“.

3. After that, you need to click on “Troubleshoot“.
4. Then, click on “Additional troubleshooters“.

5. Simply click on the “Windows Update” in the list of troubleshooters.
6. To start the troubleshooting process “Run the Troubleshooter“.

The troubleshooter will identify any hardware problem causing this issue.
Now try to install the update on your computer again.
For Windows 11 users
1 – Search troubleshoot settings in Search box and click on the search result.

2 – Now, Click on Other troubleshooters.

3 – Now, Run Windows update troubleshooter from there.
Fix-2 Download the Feature Update with MCT-
1. At first, you need to visit the Microsoft Software Download website.
2. To download the installation media, click on the “Download tool now“.
3. Click on “Save“.

4. Go to the hard drive location where you have downloaded the installer.
5. Then, double click on “MediaCreationTool2004” to access it.

6. To accept the terms and conditions, click on “Accept“.

7. What you need to do is to choose the “Upgrade this PC now” option.
7. After that, click on “Next“.

Media Creation Tool will download and install it on your device.
Reboot your computer.
Additional Tip–
If you are trying to overclock the CPU on your system, that may cause this problem.