Another day, another decade-old time bomb going off. The security certificates Microsoft baked into motherboards back in 2011 finally expired — and Secure Boot on a huge pile of Windows 11 machines started failing overnight. Your PC didn’t break. Its paperwork did.
Where This Comes From
Secure Boot is the firmware feature that checks Windows is genuine before letting it start. That check leans on certificates — digital signatures with expiry dates, like a passport. And the 2011 batch ran out.
So the check fails even though nothing on your PC is actually wrong. Great system. The cure is getting the replacement 2023 certificates onto the machine.
Sometimes Windows can install them itself — that’s Fix 1, and it’s the easy path. Sometimes the motherboard needs fresh firmware and a key reset, which is Fixes 2 through 4. Virtual machines get their own weird little dance in Fix 5.
Fix 1 – Let Windows Stage the New Certificates
Try this before any BIOS spelunking. Windows ships a built-in scheduled task that installs the 2023 keys — a registry value just has to tell it to run.
1 – Right-click the Start button and pick Terminal (Admin).
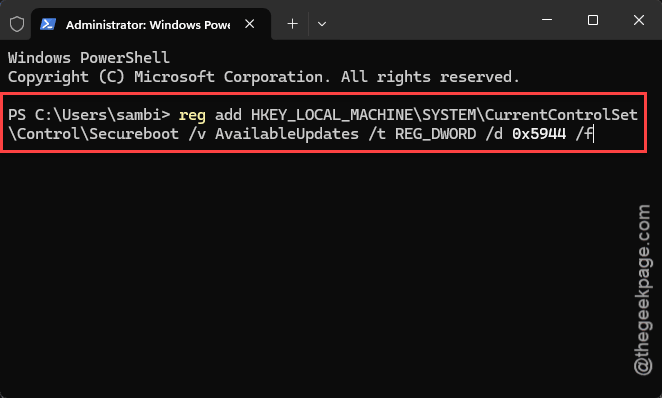
2 – Paste this and press Enter:
reg add HKEY_LOCAL_MACHINE\SYSTEM\CurrentControlSet\Control\Secureboot /v AvailableUpdates /t REG_DWORD /d 0x5944 /f
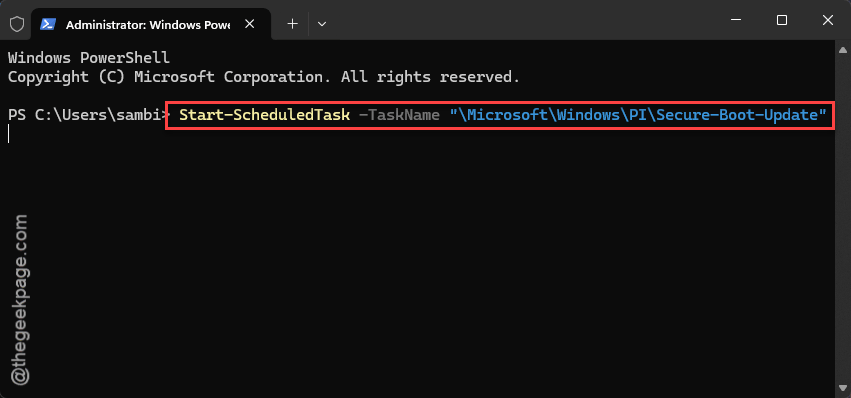
3 – Then run:
Start-ScheduledTask -TaskName "\Microsoft\Windows\PI\Secure-Boot-Update"
4 – Wait one minute. Literally a minute — the task needs time to chew.
5 – Restart the computer.
Works on regular PCs and VMware guests alike. No output after the commands? Normal. Silence is what success looks like here.
Fix 2 – Clear the Expired Keys in UEFI Setup
Didn’t take? Then the dead certificates have to go. This happens in the motherboard’s firmware screen — most people still say BIOS, UEFI is the modern name, same place either way.
1 – Restart your PC.
2 – As soon as it powers back on, rapidly tap the setup key — usually Del, F2, or F12. The window is about two seconds. Missed it and Windows loaded? Restart and try again. Everyone misses the first one.
3 – Once inside, find the Security or Boot tab along the top.
4 – Select Secure Boot.
5 – Click Clear Secure Boot Keys or Reset to Setup Mode — the wording varies by brand.
That wipes the 2011 certificates and drops the board into Setup Mode, a waiting state that accepts new keys. Scary-sounding menu. Completely reversible — the keys come back in Fix 4.
Fix 3 – Flash the Latest BIOS
The 2023 certificates arrive inside firmware updates, so your motherboard maker has to hand them over. That means a BIOS update.
1 – On any working computer, go to your motherboard or laptop manufacturer’s support page.
2 – Find your exact model and download the newest BIOS file.
3 – Copy the file onto a USB stick.
4 – Boot into UEFI setup like in Fix 2 and open the built-in flash tool. Every brand names it differently — Q-Flash, M-Flash, EZ Flash — but it lives somewhere obvious in the menus.
5 – Point the tool at the file on your USB stick and let it run. Takes several minutes with a restart or two.
Do not cut power mid-flash. Not for anything. A half-flashed BIOS turns a motherboard into a shelf ornament. And if it’s a laptop, plug it into the wall first.
Fix 4 – Restore Factory Keys and Re-enable Secure Boot
1 – Head back into UEFI setup, same route as Fix 2.
2 – Open the Secure Boot menu.
3 – Click Restore Factory Keys or Install Default Secure Boot Keys. This loads the fresh 2023 certificates you just flashed in.
4 – Change the Secure Boot state back to Enabled.
5 – Save and exit — F10 on most boards.
Want proof it worked?
After Windows loads, press Windows + R.
Typemsinfo32, and press Enter.
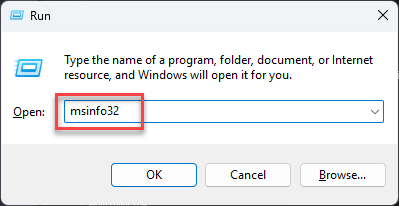
Look for Secure Boot State: On in the list.
Fix 5 – The Hyper-V Template Toggle
Running Windows 11 inside a Hyper-V virtual machine that refuses the new certificates? There’s a goofy but effective trick: flip its Secure Boot template away and straight back.
1 – Shut down the affected virtual machine.
2 – Open the VM’s Settings and click Security in the left list.
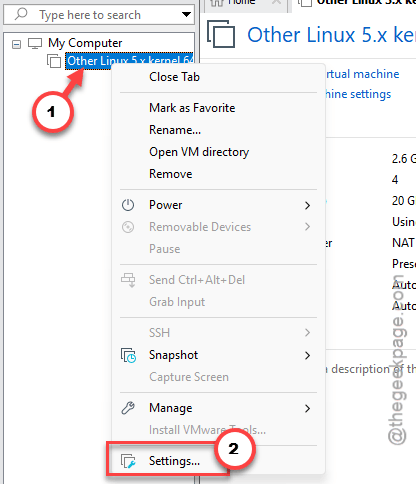
3 – Change the Secure Boot Template to Microsoft UEFI Certificate Authority and click Apply.
4 – Now change it back to Microsoft Windows and click OK.
5 – Start the VM.
The toggle forces Hyper-V to re-read the whole certificate chain. Why does it need forcing? No idea. It just does.
So This Doesn’t Bite You Again
– Check your motherboard maker’s site for firmware updates a couple of times a year. Certificate refreshes ride along inside them.
– Don’t “fix” this by leaving Secure Boot off permanently. That’s removing the lock on the front door because the key got stiff.
– Before touching firmware, have a Windows recovery USB somewhere in a drawer. You’ll probably never need it. Cheap insurance anyway.
Quick Answers
How do I fix a Windows 11 boot error?
Depends on the error. If it appeared when the 2011 Secure Boot certificates expired, updating the certificates and firmware sorts it. For unrelated boot failures, let the PC fail three times to trigger recovery, then run Startup Repair from the Troubleshoot menu.
Is it safe to leave Secure Boot disabled?
Short-term, your PC still runs. Long-term, it’s a bad plan — Secure Boot blocks malware that loads before Windows does, and some games and apps refuse to run without it. Treat disabling it as a diagnostic step, not a destination. Re-enable it once the certificates are fixed.