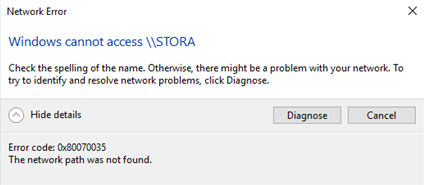
Of the many ways of exchanging files between 2 systems, one of the most comfortable options is to share files between 2 systems connected to the same network. However, a few users have reported the following error while trying to share resources:
Error code 0x80070035 The network path was not found.
Cause
There are many reasons causing this error, One of the reason being the name of the computer (With which you are trying to connect) is too long. Try renaming the computer you want to connect to a shorter one and try again. If it does not work, follow methods given below.
Fix 1 – Enable SMB V1.0
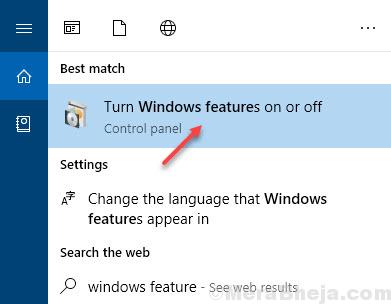
1. Search Windows Feature in Windows 10 search.

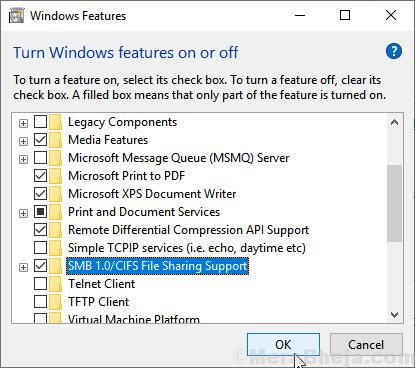
2. Locate SMB 1.0/CIFS File sharing support, check it and Click OK. Now try again.

Fix 2 – Make sure sharing is enabled on the folder
1. Right click on the drive on the target computer.
2. Click on the sharing Tab and then click on Advanced sharing.

3. Check the option share this folder. Finally click on OK and Apply.

Fix 3 – Using Registry editor
1 – Search Registry editor in Windows search and click on registry editor from the search result.

2 – Now, Browse to the following path from the registry editor.
HKLM\SYSTEM\CurrentControlSet\Services\LanmanWorkstation\Parameters
3 – Now, in the right side Locate AllowInsecureGuestAuth and change its value data to 1
Note: – If its does not exists in the right side , Just right click on any empty space in right side and Create New > Dword (32bit)

4 – Name it AllowInsecureGuestAuth
5 – Double click on AllowInsecureGuestAuth and change its value data to 1.

Restart PC, then try again.
Fix 4 – Add reliable multicast protocol
1. Press Windows key + R key together from your keyboard to open run.
2. Type ncpa.cpl in it and click OK.

3. Right click on your Ethernet and Choose properties.

4. Click on Install

5. select protocol and click on add.

6. Select Reliable Multicast Protocol and Choose OK.

Fix 5 – Using Credential Manager
1. Open control panel.
2. Now, click on view by large icons.
3. Click on Credential manager

4. Now, click on Windows credentials.
5. Create new Windows credential for the computer\NAS where your share is.

Note that, you have to use the credential of a user on that computer having administrative permission on the share.
Fix 6 – Using gpedit.msc
1. Search gpedit.msc in windows search box to open Local Group Policy editor.
2. Browse to the following location in Local group Policy Editor.
Local Policies -> Security Options -> Network security: LAN Manager authentication level.

3 – Now, In the Local security settings Tab, Just select Send LM & NTLM-use NTLMv2 session security if negotiated from the dropdown and then click on Apply and OK.

Note:- If it does Not work try the steps given below.
1. Search gpedit.msc in windows search box to open Local Group Policy editor.
2. Browse to the following location in Local group Policy Editor.
Local Computer Policy > Computer Configuration > Administrative Templates > Network > Lanman Workstation
3. Enable insecure guest logons

Note:- If it does Not work try the steps given below.
1. Search gpedit.msc in windows 10 search box to open Local Group Policy editor.
2. Browse to the following location in Local group Policy Editor.
Local Computer Policy > Computer Configuration > Windows settings > Security Settings > Security Options
3. Just Disable Microsoft Network client: Digitally sign communications(always)

Now, Try again. If it does not work try the next method.
Fix 7 – Disable the antivirus and Firewall temporarily
The procedure to disable the antivirus software varies with the brand of the antivirus application. In general, we open the antivirus application
ion and pause the process. We could also disable it temporarily.
To disable the Windows Defender Firewall, the procedure is as follows:
1] Press Win + R to open the Run window and type the command control panel. Press Enter to open the Control Panel window.
2] Among the list of options, click and open Windows Defender Firewall.
3] On the list on the left-hand side, click on Turn Windows Defender Firewall on or off.

4] For both Private and Public network settings, select the radio button at Turn off Windows Defender Firewall (not recommended).
5] Click on OK to save the settings and restart the system. Check if it helps with the issue or not.
Fix 8 – Reinstall network adapters including the hidden adapters
Connect your computer to the internet hard-wired.
1] Press Win + R to open the Run window and type the command devmgmt.msc. Press Enter to open the Device Manager.
2] Click on the View tab in the Device Manager window and check Show hidden devices.
3] Now when you expand the list of Network adapters, the hidden adapters would show with light-colored translucent icons.
4] Right-click on all the drivers and uninstall them.
5] Reboot the system and check if it resolves the issue.
Fix 9 – Enable NetBIOS over TCP/IP
1] Press Win + R to open the Run window and type the command ncpa.cpl. Press Enter to open the WiFi properties.
2] Right-click on your WiFi network and select Properties.
3] Double-click on Internet Protocol Version 4 to open its properties.

4] Click on Advanced and go to the WINS tab.
5] In the NetBIOS setting column, choose the radio button at “Enable NetBIOS over TCP/IP.”
6] Click on OK to save the settings and then restart the system.
Fix 10 – Turn ON Network Discovery
1] Press Win + R to open the Run window and then type the command control panel. Hit Enter to open the Control Panel window.
2]Click on Network and Sharing Center to Open the Network and Sharing Center.
3] From the menu on the left-hand side, choose Change Advanced Sharing settings.
4] Shift the radio button to the option Turn on network discovery and check the box which says Turn on automatic setup of network connected devices.
5] Reboot your system and check if it helps with the issue.
Fix 11 – Delete all Windows credentials
1] Press Win + R to open the Run window and type the command control panel. Press Enter to open the Control Panel window.
2] Select the Credential Manager from the options.
3] In the Windows Credential section, remove all the credentials and restart the system.
4] click on Add a Windows Credential on the same page and add the credentials manually.
Fix 12 – Modify the Network Security settings
1] Press Win + R to open the Run window and type the command secpol.msc. Press Enter to open the Local Security Policy window.
2] Navigate to the path Local Policies >> Security Options.
3] On the right-pane, double-click and open the properties for Network security: LAN Manager authentication level.
4] From the drop-down menu, select Send LM & NTLM-use NTLMv2 session security if negotiated.
Fix 13 – Using Command Prompt
1] Press Win + R to open the Run window and type the command cmd. Press Enter to open the Command Prompt window.
2] Type the following command one-by-one and press Enter:
ipconfig /release

ipconfig /flushdns

ipconfig /renew
Reboot the system and check it it helps. If not, try the following command on Command Prompt:
ipconfig /flushdns

nbtstat –r

netsh int ip reset

netsh winsock reset
Restart the system and check if this resolves the issue.
Fix 13 – Connect to the target computer using IP
1. Open Command prompt in Target computer.
2. Run the command given below in Command prompt window.
ipconfig /all

3. Note down your IP from IPv4 Address line.

4. Now, Press Window key + R together from your Keyboard and Open run command box.
5. Type \\IPv4 Address\the drive you want to access in it and click OK.
For example if my Ip address is 192.168.12.131 and Drive i am accessing is C, then i will try:-\\192.168.12.131\c

Hope it helps!
