File Explorer is the most important section on Windows 11, 10. But, what if you face this annoying error prompt “Please insert the last disk of the multi-volume set and click OK to continue” while trying to access the File Explorer? This error is associated with the compressed folders. It is a case of a single misconfigured .zip compressed folder in the root folder of a currently active drive. Removing the .zip file from the drive should fix the system and the File Explorer should start to operate normally.
Workarounds –
1. Just delete the entire folder that contains the problematic file. This will solve the problem.
2. Restarting the device once may help.
Fix 1 – Format the external drive
If you have plugged in an external drive, that drive may contain that corrupted file.
NOTE – Make sure that you have a backup of all the important data from the external drive before you format it.
1. At first, open the File Explorer.
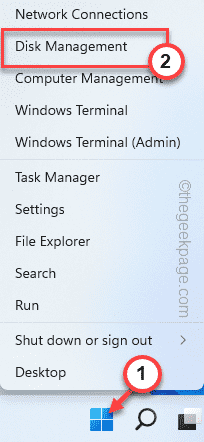
2. Then, right-click on the Windows icon and tap on the “Disk Management“.
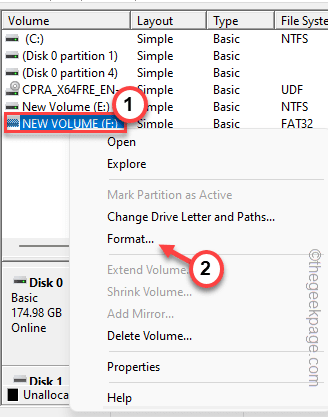
3. After that, right-tap on the USB disk drive and tap on “Format…” to format the drive.
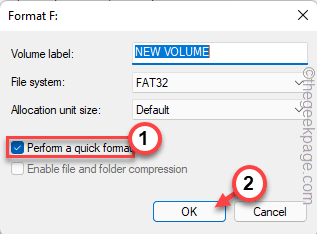
4. Now, check the “Perform a quick format“.
5. Then, tap on “OK“.
Wait for Windows to complete the formatting process. Now, again check if this works out for you.
Fix 2 – Update the USB controllers
You can reinstall the USB controller on your system.
1. At first, press the Windows key+X keys together.
2. Then, tap on the “Device Manager” to access it.
3. When the Device Manager opens up, tap on the “Universal Serial Bus controllers”.
4. After that, right-click on the “Standard Enhanced PCI to USB Host Controller” and tap on “Update driver“.
5. Now, click on the “Search automatically for drivers” to let Windows download and install the update.
After this, close the Device Manager and restart the machine.
Now, while updating the driver, you may see this statement –
The best drivers for your device are already installed.
If you notice this, follow these steps.
1. Just, right-click on the host controller again and tap on “Uninstall device“.
2. After that, tap on “Uninstall” to uninstall the driver from your system.
Close the Device Manager. Then, restart your system just once to let Windows reinstall the uninstalled driver.
Fix 3 – Remove the hidden folders
The problematic compressed file or folder may be hidden in the File Explorer.
1. At first, open the File Explorer on your system.
2. Then, click on “This PC” on the left-hand pane.
3. After that, tap on the “View” on menu bar.
4. Then, tap on “Show>“.
5. Further, just make sure that the “Hidden items” option is checked.
This will show the hidden files and folders.
6. Now, you have to access each drive one by one and look for any semi-translucent files appended with a “.zip” extension.
If you can find one such file, just delete it from your system.
7. Now, repeat this same step with every other drive on your system (including the external ones) in the File Explorer.
This way, ultimately make sure that there is no such file present on any of the drives.
Now, restart your computer once. Once the system reboots, check you are still seeing the Compressed (zipped) Folders error.
Fix 4 – Run the Search and Indexing troubleshooter
Try running the Search and Indexing troubleshooter to identify and fix the issue.
1. At first, open the Settings window.
2. Then, tap on the “System” on the left-hand pane.
3. After that, click on the “Troubleshoot” to access it.
4. Then, tap on “Other troubleshooters“.
5. After that, look for the “Search and Indexing” troubleshooter.
6. Next, tap on “Run” to run it.
Let Windows scan for search and indexing options. This should fix your problem.


