Some NVIDIA Studio driver users have recently reported an issue with seeing the “NO DC” watermark on the Adobe Premiere Pro application. Some users have also reported seeing the “YES DC” watermark as well. But, don’t worry. This is all due to a corrupted bin file in the NVIDIA core files. So, just locate the file in the File Explorer and remove the corrupted file, and restart to fix the issue. Or, you can just restore the default NVIDIA 3d settings. Follow these fixes to quickly solve the issue.
Fix 1 – Remove the NVIDIA bin file
Follow these steps to remove the nvdrssel.bin file from your system.
1. Close the application where you are seeing the “NO DC” watermark.
2. Once you have closed it, press the Windows key+E keys together.
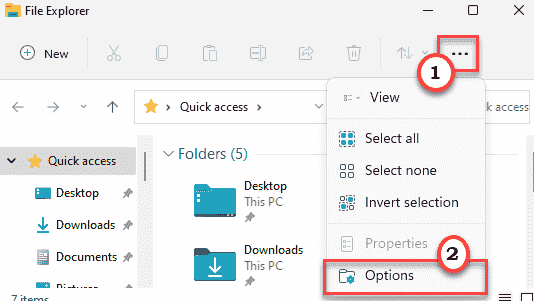
3. In the File Explorer screen, click on the (⋯) option on the menu bar.
4. Then, tap on the “Options“.

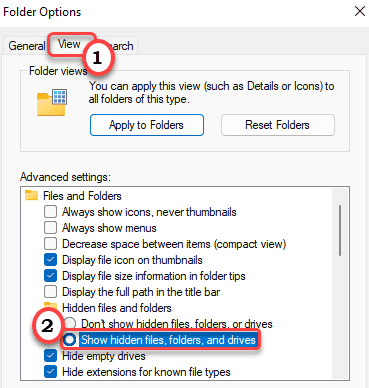
5. Now, in the Folder Options window, go to the “View” section.
6. Next just check the “Show hidden files, folders, and drives” option.

7. You can save these changes, tap “Apply” and “OK“.

8. Now, you can easily navigate this way –
C:\ProgramData\NVIDIA Corporation\Drs
9. In the Dr’s folder, you will find several NVIDIA GeForce driver files.
10. Look for the “nvdrssel.bin” file. Select it and tap the ![]() icon to remove the file from your system.
icon to remove the file from your system.
Close the File Explorer.
Now, launch the application where you were seeing the “NO DC” watermark. If you are still seeing the watermark, restart your computer once and then re-open the app again. The watermark won’t be there.
Fix 2 – Restore the 3D settings
If you can’t find the “nvdrssel.bin” file on your computer, this can offer a good alternative solution.
1. Press the Windows key+S keys together and type “NVIDIA Control Panel“.
2. Then, tap “NVIDIA Control Panel” to access it.
3. When the NVIDIA Control Panel opens up, expand the “3D Settings“.
4. Later, select the “Manage 3D settings” from the left-hand pane.
5. After that, on the right-hand pane, tap “Restore” to restore all the modifications that you have managed.
6. You will see a warning message. Tap “Yes” to confirm your step.
After that, close the NVIDIA Control Panel. Now, launch the app and check whether the “NO DC” is showing up or not.
This way, you can easily solve your problem. Check if this solves your problem.
