Keeping the record of call history is as important as making just another call. Starting from the present day to forever, in the past, if you just dig enough through the call history, you should find everything. But, what happens when you can’t track the call history on your Android phone? You won’t be able to identify a certain call or the duration of that specific call. We have accumulated some easy solutions to fix this issue permanently.
Fix 1 – Permit the Call Log permission
Grant the Call Log permission to the Phone app on your phone.
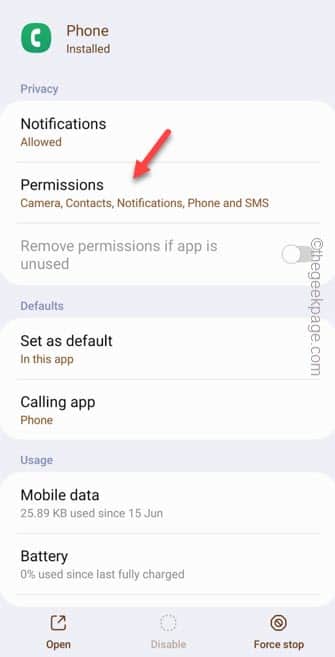
Step 1 – Just hold the Phone (or the any other Dialer app you are using) and tap the small “ⓘ” button to open the Phone permissions.
Step 2 – On the Phone information page, go to the “Permissions” tab.
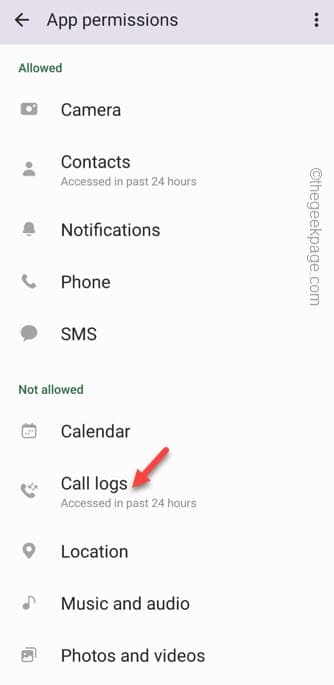
Step 3 – On the Permissions, check whether the Call Log permission is denied.
Step 4 – If that is the case, tap the “Call Logs” permission to edit that.
Step 5 – Choose to “Allow” so that Call logs permission is provided to the Phone app.
Make some calls from on your phone and see the list of calls on your phone to track the Call History.
Fix 2 – Clear the Call log app cache
You won’t find the Call Log app easily. It is a system app.
Step 1 – So, you have to open the Settings, first.
Step 2 – Scroll down until you see the “Apps“. Open that up.
Inside there you should see all the apps that you have installed. But, none of the system apps will show up.
Step 3 – To do that, tap the “drop-down” icon.
Step 4 – Then, turn on the “Show system apps“.
Step 5 – Now, either use the search box on the top or scroll to find the “Call Log Backup/Restore” app. Open that up.
Step 6 – Just go down and open the “Storage” of this app.
Step 7 – Finally, you just have to use the “Clear cache” to clear the Call log cache.
Quit all the windows.
Try to view the call history once more.
Fix 3 – Force stop the Phone app
Force-stop the Phone app on your device and then try to check the Call History.
Step 1 – You can do this from the Phone settings. So, swipe up and open the “Settings“.
Step 2 – Then, go to the “Apps” to find all the applications.
Step 3 – After getting into the Apps page, scroll down to find the “Phone” app.
You have to open the other Dialer app (like ODialer, Samsung Dialer) if you are using one.
Step 4 – Tap the “Force Stop” to force stop the Phone app.
Step 5 – After force stopping the app, open Phone app.
Step 6 – Once you have opened the Phone dialer, touch the ⋮ and tap the “Call history“.
Now you should find the complete call history on your phone.
Fix 4 – Clear the cache of the Phone app
If force-stopping the Phone app doesn’t reveal the Call History, you should try to clear the Phone app cache.
Step 1 – Quickly press & hold the Phone icon.
Step 2 – Then, touch the “ⓘ” button to open the Phone properties page.
Step 3 – Go directly to the “Storage” settings.
Step 4 – Going to the next page, use the “Clear cache” option to clear the Phone cache of your device.
Close the Phone settings. Clearing the cache should bring back the Call History option.
Fix 5 – Use the system default Dialer
If you are facing some trouble reading the Call History on an alternative Phone app, use the system default Dialer to troubleshoot this issue.
Step 1 – Before you do anything, open the Settings.
Step 2 – Then, go to the “Apps” one more time.
Step 3 – Open the “Phone” app.
Step 4 – When the Phone app opens up, you will find the “Calling app” setting. Open that up.
Step 5 – On the Default phone app screen, choose the app which shows (System Default) to set the Phone app.
After this, open the system default Phone app.
Step 6 – Once you have opened the Dialer app, tap “Allow” when you are asked for permission.
Try to use the Call History on your phone.
Fix 6 – Use Google Dialer
Instead of using the regular, default Dialer app, use the Google Dialer.
Step 1 – Launch the Play Store.
Step 2 – Search for the “Phone” app. Open the Phone app by Google.
Step 3 – Tap “Install” to install the Phone app.
Step 4 – Open the new Phone app.
Step 5 – Choose the “Set as default” to set the Phone app as the default dialer app.
Step 6 – Finally, coming to the main default apps screen, choose the new “Phone” app as the default Dialer.
Step 7 – Come back to the Google Phone app dialer.
Allow all the permissions it asks (like Contacts, Call Logs, etc. ) one-by-one.
Now, you can use this Phone app to check the Call History as well.
Fix 7 – Set the Automatic Date and time
You should use the automatic date and time settings on your phone.
Step 1 – Tap the “⚙️” to open the Settings.
Step 2 – On the next tab, go to the “General management” tab.
Step 3 – On the following page, touch the “Date & time” settings.
Step 4 – On the Date & time page, toggle the “Automatic date and time” and “Automatic time zone” settings to “On” mode.
Close the Date and time settings.
Fix 8 – Reset all the app preferences
Reset all the app preferences on your phone.
Step 1 – To reset the app preferences, open the “Settings“.
Step 2 – Then, open the “Apps” one more time.
Step 3 – If you look on the top-right corner, you will see the “⋮” icon. Tap that and choose “Reset app preferences” to reset all the app preferences.
Step 4 – A standard prompt will open up. Tap “Reset“.
After resetting app preferences, you should be able to view the complete list of Call history in the Dialer app.


