The error message is lying to you. Your graphics card has plenty of memory. What’s actually happening is your processor tripping over itself during shader loading, and Unreal Engine 5 blames the wrong part. So you get a scary “out of video memory” popup on a PC that should run this game fine.
What’s Actually Going On
Wondering why a 16 GB card would run out of memory? It doesn’t.
When Wukong starts, it compiles shaders (little programs that tell your GPU how to draw things). That job hammers the CPU. And on a lot of Intel 13th and 14th Gen chips, hammering the CPU makes it spike its voltage way past safe. The chip stumbles for a split second. Unreal Engine sees a failed memory request, panics, and throws the video memory error.
Not on Intel? Windows can still cause a smaller version of this by bloating the game’s memory request at launch. Fix 3 covers that.
Fix 1 – Update Your BIOS for the Intel Microcode Patch
If you have a 13th or 14th Gen Intel processor, your motherboard maker released a BIOS update with Intel’s microcode patch, and it stops the voltage spikes for good. Every fix above is a workaround until you do this.
Nervous about BIOS updates? Fair. Go slowly and don’t turn the PC off mid-update.
1 – Press Windows + R.
2 – Type this code, and press Enter.
msinfo32
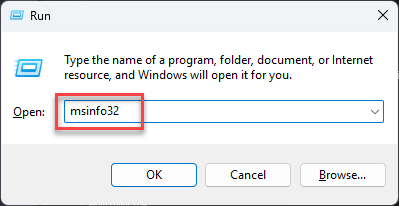
3 – In the list, find BaseBoard Manufacturer and BaseBoard Product. Write both down.
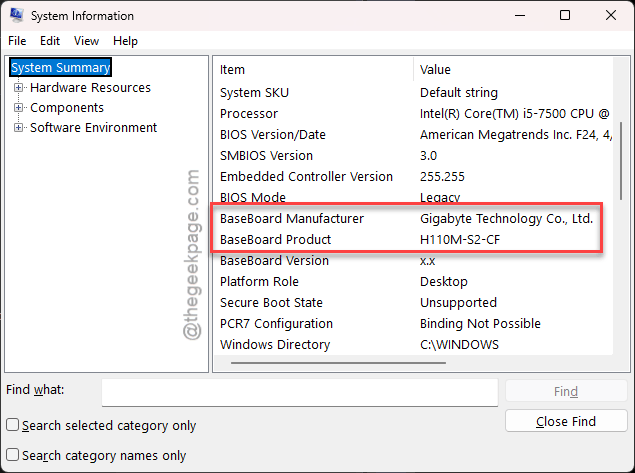
4 – Now, reach to that manufacturer’s support website (ASUS, MSI, Gigabyte,etc.)
5 – Then, search for your exact board model.
6 – Now, load up the Support or Downloads section and download the newest BIOS. The notes should mention Intel microcode.
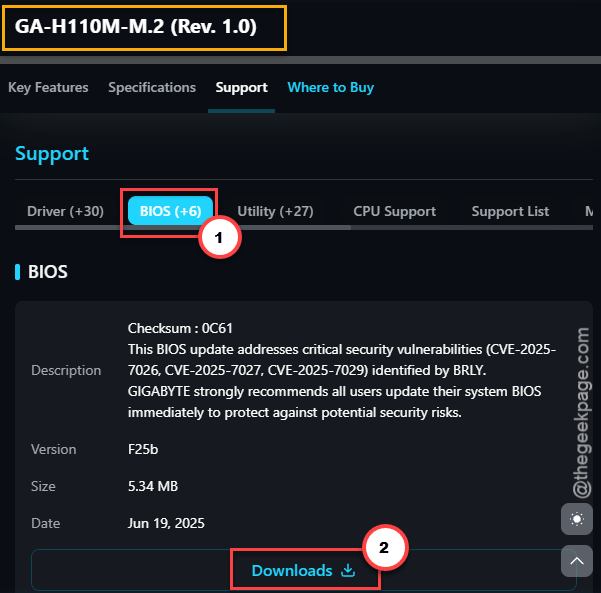
6 – Then, what you need to do is to extract the file onto a USB flash drive formatted as FAT32.
7 – Restart the PC and tap Del or F2 as it boots to enter the BIOS.
8 – Use the built-in flash tool (called EZ Flash, M-Flash, or Q-Flash, depending on the brand) to pick the file from the USB drive.
9 – Your computer will finish, and it will be restarted again. Do not touch anything until you’re back at the Windows desktop.
Afterward, remove the -dx11 launch option and undo the XTU change. The patched chip shouldn’t need either. And keep the BIOS current from here on, because Intel has pushed more than one microcode revision for this.
Fix 2 – Launch on the Power Saver Plan
This is the odd one. Try setting the power saver plan settings.
1 – Open the Start menu and type Control Panel.
2 – Click Control Panel.
3 – Click Power Options. If you don’t see it, change View by in the top right to Small icons.
4 – Select Power saver. Click Show additional plans if it’s hidden.

5 – Launch Black Myth: Wukong and let it sit at the shader compilation screen until it finishes. That can take five to fifteen minutes.
6 – Quit the game.
7 – Go back to Power Options and switch to your normal plan (usually Balanced or High performance).

Play normally after that. If a game patch triggers another shader compile, just repeat this once. Keep Power Saver handy for that day.
Fix 3 – Force DirectX 11
Sound too simple? It does bypass the whole DirectX 12 shader pipeline, which is where the crash lives.
1 – Open Steam.
2 – Right-click Black Myth: Wukong in your library.
3 – Click Properties.

4 – On the General tab, scroll down to Launch Options.
5 – Type in the box.
-dx11
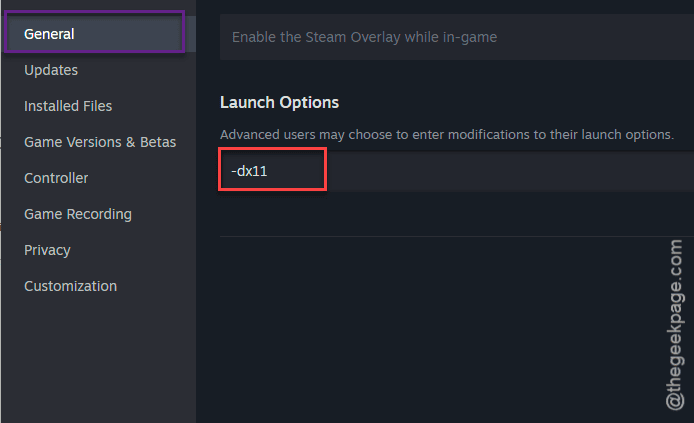
6 – Close the window and launch the game.
You lose a few DX12-only effects, and frame pacing may feel a bit different. But a game that runs beats a prettier game that crashes at the loading screen. Delete the launch option later if the BIOS fix (Fix 5) sorts things out.
Fix 4 – Turn Off Fullscreen Optimizations
Windows 11 quietly wraps fullscreen games in a borderless layer.
1 – Open File Explorer.
2 – Now, go to your Steam library folder (C:\Program Files (x86)\Steam). Follow this path next –
steamapps/common/BlackMythWukon
3 – Right-click the game’s main .exe file.
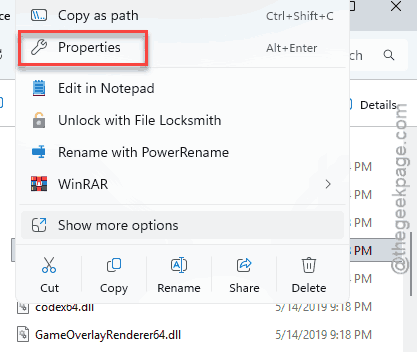
4 – Click Properties.
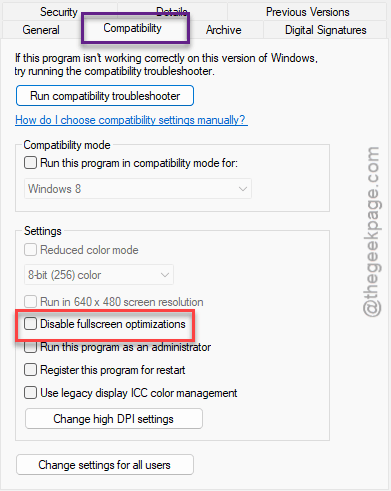
5 – Click the Compatibility tab.
6 – Check Disable fullscreen optimizations.
7 – Click Apply, then OK.
Worth doing on every new game you install, honestly. It causes more trouble than it prevents.
Fix 5 – Pull the CPU Back a Notch With Intel XTU
Intel chip? This directly stops the voltage spikes. You lower the speed of the performance cores by a tiny amount (about 3 percent), and the crash stops.
1 – Download Intel Extreme Tuning Utility from Intel’s website and install it.

2 – Open the app.
3 – Click Advanced Tuning in the left sidebar.
4 – Find Performance Core Ratio.
5 – Lower the multiplier by 2. If it says x55, set it to x53.
6 – Click Apply.
7 – Launch the game.
XTU resets to default after a restart unless you save a profile (the Save button sits at the top). Save one so you’re not redoing this every morning.
People Also Ask
How much VRAM does Black Myth: Wukong need?
The official minimum is a 6 GB card, and 8 GB is comfortable at 1080p. Cards with 12 GB or more handle higher settings and ray tracing without trouble. So if you see an out of memory error on a card like that, VRAM isn’t the cause. It’s almost always the CPU spiking during shader loading.
Why is Black Myth: Wukong so badly optimized?
It’s more the engine than the game. Unreal Engine 5 compiles shaders on the CPU at launch, which is brutal on unstable Intel chips. Add Windows fullscreen optimizations and DirectX 12 quirks, and you get crashes that look like the game’s fault. The game runs well once shaders are built and the CPU behaves.