The File Sharing feature between the Windows devices same network was never really smooth or error-free. But, with each iteration of Windows, this cool feature has improved a lot, making it more accessible to the users. Still, users are complaining about the File sharing feature not working properly. If you are facing the same kind of issue on your system, don’t worry. Just enact these fixes one by one and you will be sharing your files in no time at all.
Fix 1 – Enable SMB 1.0 feature
You need to enable the SMB 1.0 optional feature.
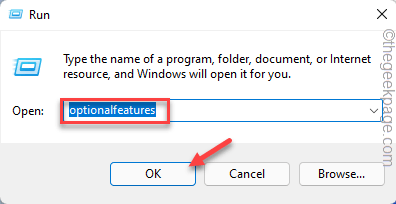
1. At first, press Windows key+R to access the Run terminal.
2. In the Run window, type this code and then, click on “OK“.
optionalfeatures
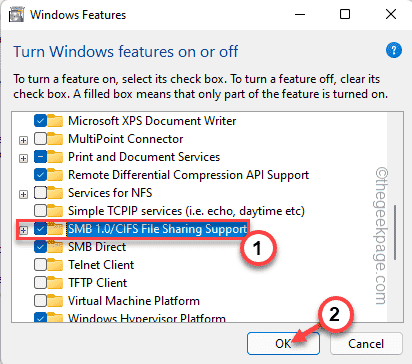
This will open up the Windows Features.
3. Now, go down through the optional features list and tick mark the “SMB 1.0/CIFS File Sharing Support”
4. Next, tap on “OK“.
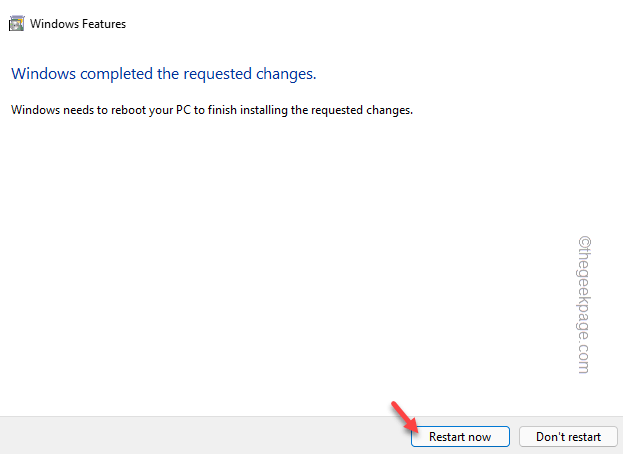
Windows will enable the feature.
5. Finally, tap on “Restart now…” to restart your system.
Once your system restarts, you can use the file-sharing feature once more.
Fix 2 – Automate the FDRP service
There are certain services that are required to run so that File Sharing works smoothly.
1. At first, press the Windows key+R keys together.
2. Then, type “services.msc” and click on “OK“.
3. When the Services window opens up, scroll down and look for the “Function Discovery Resource Publication” service.
4. Double-click on the service to access it.
5. Now, set the ‘Startup type:’ to “Automatic“.
6. Then, tap on “Start” to start the service.*
7. Finally, click on “Apply” and “OK“.
Thereafter, close the Services window.
8 – Now, Right click and Restart the Function Discovery Resource Publication service

After restarting try to share the files again.
*NOTE –
When you tap on the ‘Start’ button, you may see this error message –
Windows could not start the service on Local Computer. Error 1079: The account specified for this service differs from the account specified for other services running in the same process.
In that case, follow these steps.
1. Open the Services app again.
2. Now, right-click on the “Function Discovery Resource Publication” service and tap on “Properties“.
3. Now, go to the “Log On” tab.
4. Just tap on “Browse” beside the ‘This account’ option.
5. Then, tap on “Advanced...” to access it.
6. Now, tap on “Find Now“.
7. Then, select your account from the list of users and groups. [Example – In our system, the account name is ‘Sambit Koley’.]
8. After that, tap on “OK“.
9. Finally, tap on “OK” to save the changes.
10. Coming back to the FDRP Properties, tap on “Apply” and “OK” to save the changes.
After that, again try to share a sample file. Test whether this works.
Fix 3 – Enable File and Printer Sharing feature
If the file-sharing feature is not turned on for the network you are using, you may face this issue.
1. At first, press the Windows key+R keys together.
2. Next, copy-paste this line and click on “OK“.
control.exe /name Microsoft.NetworkAndSharingCenter
3. Now, tap on the “Advanced sharing settings“.
4. Then, expand the “Private” network settings.
5. Here, toggle the “Turn on file and printer sharing” option.
6. Finally, tap on “Save changes“.
Close the Control Panel window. Then, restart the system once.
[NOTE – You should turn on the File and printer sharing only for your own private network, not in the Public/Guest or All network type. Moreover, always share your files only when you are on a private network.]
Fix 4 – Edit the Registry
You can allow any authorized guest user access using the Registry Editor.
Warning –
Try this approach only if you are on your home network and none but yourself have access to that network.
1. At first, press the Windows key+R keys together.
2. Then, type “regedit” and click on “OK” to open the Registry Editor.
NOTE –
You are going to add a new value to your system. This may cause some issues in the system. So, if you don’t have a backup of your keys, you can create one following these steps –
a. After opening the Registry Editor, tap on “File” in the menu bar and then, click on “Export…“.
b. Save this backup in a secure place.

3. In the Registry Editor opens up, go to this location –
HKEY_LOCAL_MACHINE\SYSTEM\CurrentControlSet\Services\LanmanWorkstation\Parameters
4. On the right-hand pane, look for a value named “AllowInSecureGuestAuth“.
5. If you can’t find the value, you have to create it –
a. On the right-hand pane, right-click on the space and tap on “New>” and click on “DWORD (32-bit) Value“.
b. Name the value as “AllowInSecureGuestAuth“.
6. Now, double-tap on the value to modify it.
7. In the ‘Value data:’ box, set the value to “1“.
8. Further, tap on “OK” to save the changes.
Then, close the Registry Editor and reboot your system.
Once you have rebooted the system, try to send a dummy file and test whether the file-sharing feature is working or not.
Fix 5 – Turn ON the Advanced Sharing feature
You can not share a folder without turning on the advanced sharing features.
1. At first, open the File Explorer.
2. When the File Explorer opens up, go to the folder you are trying to share.
3. Then, right-click on the folder you are trying to share and tap on “Properties“.
4. In the Properties window, go to the “Sharing” tab.
5. Now, tap on “Advanced Sharing…” in the ‘Advanced Sharing’ section.
6. Next, check the “Share this folder” box.
7. After that, tap on “Apply” and “OK“.
This will let you share the folder over the network.
Back in the Properties window, you will notice that the folder is ‘Shared’. You will also see the path along which the folder is shared.
Fix 6 – Disable the IPv6 protocol
Disabling the IPv6 protocol system may solve this issue.
1. At first, press the Windows key+R keys together.
2. Then, type “ncpa.cpl” and click on “OK” to open the Network Connections window.
3. In the Network Connections window, right-click on the network adapter you are using and tap on “Properties” to access it.
4. Then, uncheck the “Internet Protocol Version 6(TCP/IPv6)” box.
5. Finally, tap on “OK” to save the changes.
Close the Network Connections window.
Then, restart your computer. Once you have rebooted the system, try to transfer a file from your device to another.
Fix 7 – Disable the password protected sharing feature
If the password-protected sharing is turned on, disable it and retry.
1. At first, press the Windows key+R keys together.
2. Next, paste this line and hit Enter to access the Network and Sharing Center.
control.exe /name Microsoft.NetworkAndSharingCenter
3. On the left-hand corner, tap on the “Advanced sharing settings“.
4. Then, tap on the “All Networks” section to expand it.
5. Further, go to the ‘Password protected sharing’ section. Then, toggle the “Turn off password protected sharing” option.
6. Finally, tap on “Save changes” to save the changes.
Close the Control Panel. Retry the file transfer once more. Now, the files can be transferred without any more errors.
Fix 8 – Alter the File Sharing connection types
If you are using an older device that doesn’t support 128-bit encrypted transfer, try this solution.
1. At first, press the Windows key and the R keys together.
2. Then, type “control” in the Run panel and hit Enter.
3. Then, tap on ‘View by:’ and select the “Small icons” from the drop-down.
4. Next, click on the “Network and Sharing center” to access it.
5. Then, tap on the “Advanced sharing settings” on the left-hand side.
6. Then, expand the “All Network” settings.
7. Here, locate the ‘File sharing connections’ settings and toggle the “Enable file sharing for devices that use 40 or 56-bit encryption“.
8. Finally, tap on “Save changes“.
Close the Control Panel. Then, test whether you can transfer the files or not.
Fix 9 – Edit the Firewall settings
Sometimes the firewall itself can block the transfer of the files in the firewall settings.
1. Press the Windows key+R keys together.
2. Then, type “firewall.cpl” and click on “OK“.
This will open up the Windows Defender Firewall.
3. Now, on the left-hand side, tap on “Allow an app or feature through Windows Defender Firewall“.
4. Then, tap on “Change settings” to alter the settings.
5. Now, scroll down to the “File and Printer Sharing“.
6. Make sure that the ‘Private’ box is checked.
7. Finally, tap on “OK” to save the changes.
After that, close all the windows. Now, you should be able to send files again.


