Are you unable to access Steam from your PC as it is throwing up an error message ‘Failed to load steamui.dll’. Clearly, you can anticipate that the steamui.dll, one of the key files in the Steam root directory has gone corrupt due to any reason. You can solve this problem either by re-registering the steamui.dll or clearing out the Steam download cache from the root directory.
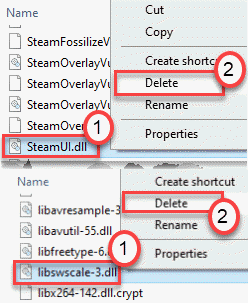
Fix 1 – Delete libswscale-3.dll and steamUI.dll
The most prominent and useful solution to this issue is to delete the corrupted dll files.
1. Press the Windows key+E.
2. After that, just go to the location where Steam is installed on your computer. It is generally is in this location –
C:\Program Files (x86)\Steam\
3. Once you are in there, look for the “libswscale-3.dll” and “steamUI.dll” files in the folder.
4. Right-click on each of these files and click on “Delete” to remove them from your system.

If you can not find libswscale-3.dll , just delete steamUI.dll.
Note: If you can’t delete these files, just press CTRL + SHIFT + ESC keys together and right click and end Steam task running in Task manager. Then try to delete again.
5. Now, click on Steam.exe located in same folder and it will update automatically.
Close the Steam folder.
Now, run steam again without any trouble.
Restart your computer. After rebooting your computer try to launch the Steam application on your computer.
Steam will look for any pending update and detect the missing dll files in the due process and fix it accordingly. Wait patiently for a while.
This will solve your issue surely.
Fix 2 – Try to run steam in compatibility mode
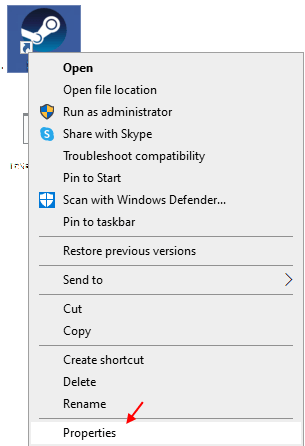
1.Right click on Steam icon and click on properties.
Note: If you can’t find steam icon on desktop, search steam in windows 10 search box, click on open file location and then right click and click properties.

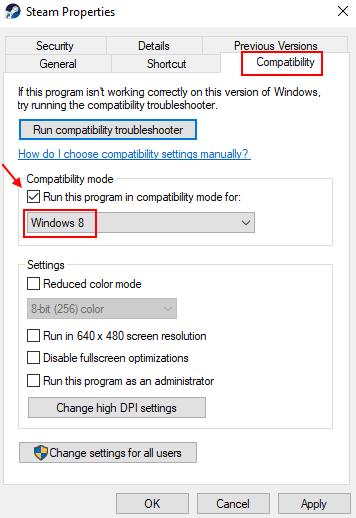
2.Click on compatibility tab.
3. Check Run this program in compatibility mode for option.
4. Select windows 8 from the dropdown.

5. Click on apply and OK.
Now, run steam again.
Fix 3 – Delete steam folder from %appdata%\ local
1. Search %appdata% in windows 10 search box. Click on %aappdata% to go to Appdata folder.

2. Now, click on Appdata from the address bar and then click on Local folder

3. Now, Delete Steam folder.

Restart your PC and run steam again
Fix 4 – Flush the default configuration of Steam
Flushing the original configuration of Steam will fix this steamui.dll issue for sure.
1. Press the Windows key along with the “R” key.
2. After that, paste this code in the Run window. Then, click on “OK“.
steam://flushconfig

After that, re-launch Steam on your system.
Try the voice chat further.
Fix 5 – Re-register the steam dll file
Re-registering the dll file in the CMD screen.
1. Click on the search box and start to write “cmd“.
2. Further, right-click on the “Command Prompt” and click on “Run as administrators“.

3. Type this command and then hit Enter.
regsvr32 steamui.dll

After executing this command, reboot your computer once and check further.
Fix 6 – End the running Steam processes
Steam processes already running in the background can cause this issue on your computer.
1. At first, you need to right-click on the Windows icon on the bottom left corner.
2. After that click on the “Task Manager“.

3. Once the Task Manager screen appears, check the Steam services (Like- Steam WebHelper, Steam Client Service, etc).
4. Right-click on the “Steam” services one by one.
5. Then, click on the “End task” to terminate the processes sequentially.

After ending all the Steam processed, close the Task Manager.
Try to launch Steam again.
Fix 7 – Modify the Steam exe
Try modifying the steam shortcut with some cmd line arguments in the Target box.
1. Go to the location where Steam is installed on your computer. It is generally is in this location –
C:\Program Files (x86)\Steam\
Note-
If you can’t find the actual Steam directory, try these steps –
a. Type “Steam” in the search box.
b. After that, right-click on the “Steam” application and click on “Open file location“.
2. Once you have located the directory, right-click on “Steam.exe” and click on “Create Shortcut“.

3. Right-click on the “Steam-shortcut” and click on “Properties“.

4. In the Properties screen, go to the “Shortcut” tab.
5. Here, place this argument at the end of the path mentioned in the ‘Target‘ box.
-clientbeta client_candidate
Target will look like this –
“C:\Program Files (x86)\Steam\Steam.exe” -clientbeta client_candidate

6. Click on “Apply” and “OK” to save this modification on your computer.

Once you have done so, try to run the Steam from the shortcut you have just created.
Fix 8 – Remove the Steam Beta
[Applicable for only Steam beta users]
1. Right-click on the Steam icon on your desktop and click on “Properties“.

2. After that, click on the “Shortcut” section.
3. Thereafter, click on “Open file location” to access the location.

4. Double click on the “Package” folder to access it.

5. In the Package folder, select the “beta” folder and press the ‘Delete‘ key from your keyboard.

After deleting the beta folder, close the directory and restart your computer.
Try to launch Steam normally after rebooting.
Fix – 9 Uninstall and re-install Steam
Try uninstalling and re-installing the Steam app from your computer.
1. Pressing the Windows keys+R keys together will open up the “Run“.
2. Then you need to type “appwiz.cpl“. Click on “OK“.

3. Then, right-click on the “Steam” application and then click on “Uninstall“.

4. After that, click on “Uninstall“.

Steam will be uninstalled easily.
5. Once Steam is uninstalled from your system, click on “Close” to close the setup window.
Steps to install –
1. Just go to the Steam website.
2. Then, click on “Install Steam” to download the installer package.
The Steam setup file will download.
3. After the Steam setup has finished downloading, double click on the “SteamSetup.exe” on your computer.

Follow the on-screen instructions to install the Steam application.
4. Once the installation process is complete, click on “Finish“.

This way you have just installed the latest version on your computer.
Additional Tips –
1. You can copy the ‘steamUI.dll’ from a friend’s computer and paste it on your computer. But you need to check some boxes before you do –
a. You need to have the same Windows versions (Windows 10 or Windows 8, whichever it is that should same for both).
b. Both the systems need to have similar architecture type (32-bit or 64-bit).
Copy the ‘steamUI.dll’ from your friend’s computer to a USB stick.
Put the USB to your computer.
Now, copy-paste the dll file from your USB drive to this directory –
C:\Program Files (x86)\Steam\
This should solve your problem.