Windows installation process has a good feature where users can create, format, or delete partitions on their own directly from the Windows Setup page. But trying to format a particular partition on their systems, some users have reported an error message “Failed to format the selected partition. Error: 0x8004242d Windows cannot be installed to this disk“. This problem is associated with the UEFI Boot Support system, disabling it may help resolve the issue.
Fix 1 – Disable the UEFI Boot Support
Disabling the UEFI Boot Support should help you resolve this problem.
1. You have to close the Windows Setup page. This will restart the system automatically.
2. Make sure Windows 11 installation disk/ bootable USB drive is plugged into the system.
3. When your system is starting back up, keep pressing the boot key* to access the BIOS setup.
*This boot key usually depends upon the manufacturer and it varies one from another. Quickly and carefully notice which button is associated with the Boot key. It can be any one of these keys –
F2, Del, F12, F1, F9, F2, Esc

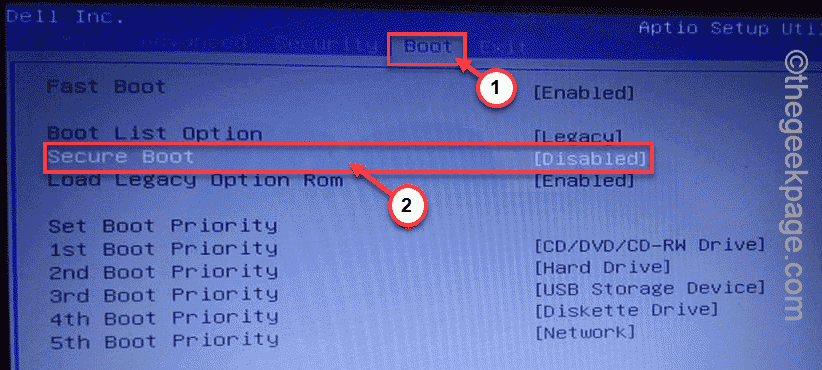
5. Once the BIOS page opens up, advance to the “Boot” tab.
6. In this section, you will find several boot-related options. Use the arrow key and select the “UEFI Boot Support“.
[If you can’t see this UEFI Boot Support, look for the “Secure Boot” mode.]
7. Then, hit Enter to access the settings. Set it to “Disabled” settings.
8. Now, press the particular key to save & exit the Boot page. Your device will restart automatically.
Once it does, proceed to the installation of Windows and format the partition once more. It will work normally.
Fix 2 – Use diskpart in Troubleshooter mode
If the UEFI Boot mode doesn’t work, try cleaning the particular disk from the command line in troubleshooter mode.
1. Restart the system while the installation disk/bootable drive is plugged into your system.
2. When you see the “Press any key to boot from CD…” message on your screen, tap a key to boot from the installation media.
3. Once the Windows Setup page appears on your screen, select your keyboard and language and tap “Next“.
4. On the next page, click on the “Repair your computer” in the left-hand corner.
5. On the next page, you will find several options, tap “Troubleshoot“.
6. Then, tap on “Advanced options” to explore more troubleshooting options.
7. When the Command Prompt terminal appears, copy-paste these codes one by one and press the Enter key to access the Diskpart tool and enlist the drives on your system.
diskpart
list disk
8. Now, you have to select the disk where you are trying to install it. To do that, execute this code*.
select disk drive number
*Replace this “drive number” in the code with the number that you have noted before.
Example – The disk is “Disk 0“. So, the code is –
select disk 0
9. You can verify the HDD with another command.
det disk
10. Finally, it is time to wipe out the drive. Now, just execute this code –
clean all
Finally, once you are done, close the Command Prompt window.
Now, restart the system and try to create a new partition, and install the OS. This should help you resolve the issue.
Fix 3 – Delete the partitions
You can delete all the partitions of the disk from the Windows Setup.
1. Plug in the bootable installable device and turn on the system.
2. Once you see the “Press any key to boot from CD…” message on your screen, tap a key to boot from the installation media.
This will start up the Windows Setup process.
3. Now, if you want you can change the ‘Language to install:’ and other parameters on the first screen.
4. Now, tap “Next” to proceed.
5. Now, just tap “Install Now“.
6. Now, tap “I don’t have a product key” to proceed to the next step.
7. Choose which version of Windows you are installing and tap “Next“.
8. When you see the ‘Where do you want to install Windows?’ page, you will find the disk drives along with their subordinate partitions.
9. Select the first partition and tap the “Delete” icon to remove it.
If you are asked to remove it for further confirmation, tap “Yes“.
10. This way, following the same process, select all the partitions one by one and delete those.
Once you have deleted all the partitions, you will find unallocated space. Using this unallocated space, try to create new partitions.
This way, you can complete the installation without any further issues or error messages.
Fix 4 – Run a disk checking scan
Corrupt sectors on a hard drive may cause this obstruction. Repair it with a disk checking operation.
1. Reboot the system while the bootable USB drive is plugged in.
2. When the Windows Setup process opens up, choose the keyboard input method and language and tap “Next“.
2. Coming to the main installation page, press the Shift+F10 keys together.
This will launch the Command Prompt terminal.
3. On the Command Prompt terminal page, run this command to commence a disk checking operation.
chkdsk c: /r
This will now run the disk checking operation. Windows will scan the whole disk drive for any fault and eventually repair it.

