Are you seeing an “A fatal error occurred during installation. Error code 1603” message while installing a new application on your computer? Don’t worry. This error can occur due to many reasons. If you want to sort out this issue very fast, just follow up with these easy solutions on your system.
Workarounds –
1. Make sure that no antivirus is running in the background. Close all the applications and unnecessary utilities. Try the installation again.
2. Check for Windows Updates.
Fix 1 – Modify the group policy settings
You can modify the group policy settings which is maybe restricting the installation process.
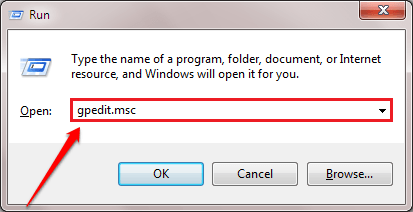
1. To access the Run window, press Windows key+R.
2. After that, type “gpedit.msc“. Click on “OK“.

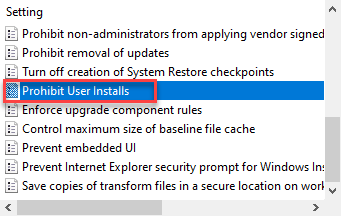
3. When the list of policies appears, navigate to this particular policy location-
Computer Configuration > Administrative Templates > Windows Components > Windows Installer >
4. After this, double click on the “Prohibits User Installs” policy.

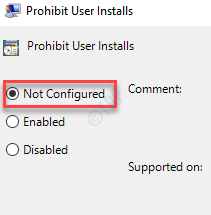
5. Set the policy to “Not Configured“.
6. Then, click on “Apply” and “OK“.

Close the Group Policy Editor screen. Try to install the application again on your computer.
Fix 2 – Consider changing the installation folder
You should consider the choice of installing the package to a different location, especially on another drive. Usually, the packages are set to install in the C:/Program Files (x86) folder location.
Try to install the software on the D: drive or E: drive on your system.
Fix 3 – Empty the Temp folder
Sometimes the corruption in the Temp folder may cause this problem.
1. At first, press the Windows key along with the ‘R‘ key.
2. When the Run terminal pops up, write “%temp%“.Just click on “OK” and the Temp folder will appear.

3. Once the Temp folder appears, press ‘Ctrl+A‘ together. All the folders and files inside the Temp folder will be selected.
4. After that, press the ‘Delete‘ key to empty the Temp folder.

Once you have cleared the Temp folder, try to run the installer once more.
Fix 4 – Modify a particular registry key
There is a chance that Short file creation is disabled on your computer.
1. Right-click on the Windows icon and click on the “Run“.
2. In the Run terminal, write “regedit” and click on “OK” to access the Registry Editor screen.

NOTE –
Once you have opened the Registry Editor, click on “File“. Then click on “Export” to make a new backup on your computer.

If anything goes out of hand while altering the registry, you can easily retrieve the registry back to normal.
3. Once the Registry Editor opens up, proceed to this location on the Registry Editor screen –
Computer\HKEY_LOCAL_MACHINE\SYSTEM\CurrentControlSet\Control\FileSystem
4. Then, double click on the “NtfsDisable8dot3NameCreation” on the right-hand side pane.

5. Here, just alter the registry value to “0“.
6. Click on “OK” to save the changes.

Once you have changed the value, close the Registry Editor. Restart your computer once to let this change work. Try to install the package once more.
Fix 5 – Give full permission to your System account
The drive where you are trying to install the package may not have sufficient permission to modify or edit.
1. Open the File Explorer on your computer. Click on “This PC“.
2. Right-click on the drive where you want to install the folder and click on “Properties“.
(Example – We want to install the application in the Local disk C. So we are going to modify the properties of the “C:” drive)

3. Click on the “Security” tab to access it.
4. Then, click on “Edit” to modify the permissions.

5. Next, check out for the “System” in the Group or user names section*. Select the group
6. After that, check the “Allow” box of ‘Full control‘ permission.
This will give full control of this file to the System account.

7. Then, click on “Apply“. After that, click on “OK“.

8. Coming back to the Properties screen, click on “Apply“.
9. Then on “OK“.

*NOTE–
There is a chance you won’t notice ‘System’ in the Group or user entries. Simply follow these steps to add the ‘System’ group.
1. Once you have opened the Properties window, click on the “Add“.

2. Then, you need to write “SYSTEM” in the ‘Enter the object name to select:’ box.
3. Just once click on “Check Names” to perform a check if its correct.
4. Finally, click on “OK“.

5. Click on “Apply” to save it.
6. If you see a warning message, simply click on “OK“.

7. Just click on “Apply” and “OK” to save this change.

After this, do the steps mentioned in this fix to give full control of the folder.
Fix 6 – Re-register the installer service
Sometimes re-registering the installer service may work out for you.
1. At first, press “Windows key+X“.
2. After that, click on “Windows PowerShell (Admin)“.

3. Once you have opened the PowerShell window, type this set of commands one after another and hit Enter to execute these on the terminal.
msiexec /unreg
msiexec /regserver

This will unregister and re-register the service on your machine.
Close the PowerShell screen. Try to install the package once more.
Fix 7 – Use Program install and uninstall troubleshooter
Microsoft has developed a tool that can troubleshoot the installation issues of the MSI packages.
1.First of all, go to the MicrosoftProgram_Install_and_Uninstall.meta on your computer.
2. Next, click on “Download” to download it on your computer.

3. Next, go to the location on your computer where you have just downloaded the file.
3. After that, double click on “MicrosoftProgram_Install_and_Uninstall.meta” to run the troubleshooter.

4. In the Program Installer and Uninstaller window, click on “Next” to run the troubleshooter on your computer.

5. Here you will be asked “Are you having a problem installing or uninstalling a program?“, just click on “Installing“.

The troubleshooter will check various places like the registry for patch-related issues. Wait for a while.
6. After that, in the “Select the program you trying to install” window, select the program you are facing this problem with, and then click on “Next“.
(If you can’t find the application, select “Not listed”.)

Follow the suggestions of the troubleshooter. Your problem will be solved in no time and you will be able to install the program.
Fix 8 – Adjust Windows Service behavior
1. Press the Windows key+R keys together to open up the Run terminal.
2. After that, hit Enter.

3. Simply, scroll down to find the “Windows Installer” service.
4. Now, double click on that service to modify it.

5. When the Windows Installer Properties window prevails, click on the drop-down beside the option ‘Startup type:‘ and set it to “Manual“.
6. After that, click on “Start” to start the service.

7. Then, click on “Apply” and then click on “OK” to save the changes on your computer.

Close the Services window.
Fix 9 – Use Windows Cleanup Utility
Windows cleanup utility can clear any previous instances of the application you are trying to install now.
STEP-1 Download and install the Cleanup tool
1. At first, click on this link.
2. Just, click on the “Download” to download the tool on your system.

Once you have downloaded the tool, minimize the browser window.
3. Then, navigate to the location where you have downloaded the file.
4. Here, you have to right-click on the “msicuu2.exe” and then click on the “Run as administrator” to install the tool on your computer.

5. When a prompt appears, click on “Run” to run the installation.

6. In the Windows Installer Clean Up Setup window, click on “Next“.

7. Simply check the option “I accept the License Agreement“.
8. Then, click on “Next“.
9. Finally, you have to click on “Next” to initialize the installation process.

The installation process will be completed in a while.
Once it is installed, close the installer window.
STEP- 2 Remove software using the cleanup Tool
Follow these steps to clean up any installer issues.
1. Press Windows key+S and then type “Windows Install“.
2. In the elevated result, click on the “Windows Install Clean Up“.

3. In the Windows Install Clean Up window, scroll down through the list of the apps.
4. Select the application you want to remove and click on “Remove” to remove any previous version of the application.
This should fix your issue. Try to install the application again.
Your problem will be solved.
Additional Tip –
If the application is already installed on your computer, follow this guide to uninstall it first. Then, try to install it on your computer.