When you try to download a game or an application from Microsoft Store, do you encounter an error message which reads as below
Something happened and your purchase can’t be completed.
Error code : 0x87E10BD0
A majority of Windows users have encountered a similar error message due to various underlying reasons like not logging into their Microsoft account, a glitch in their Microsoft Store, or maybe a Windows Store cache error. If you are currently dealing with this error and do not know what to do, this article helps you in resolving this issue where we jotted down the best fixes that worked for many users.
Fix 1: Sign in to your Microsoft Account
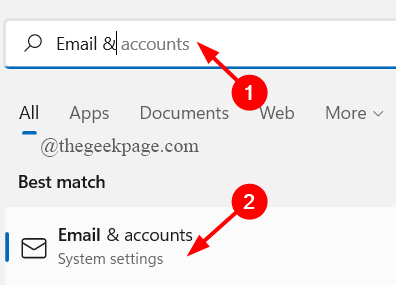
Step 1: In the taskbar Search box, type Email & Accounts and click on it.
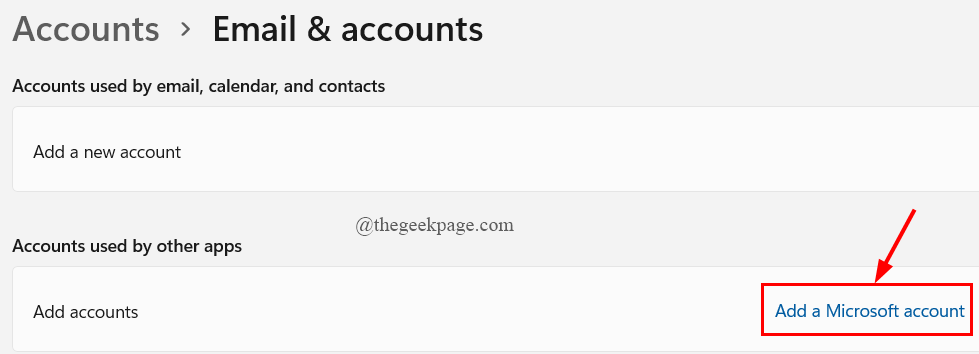
Step 2: In the appearing screen, click on Add a Microsoft Account.
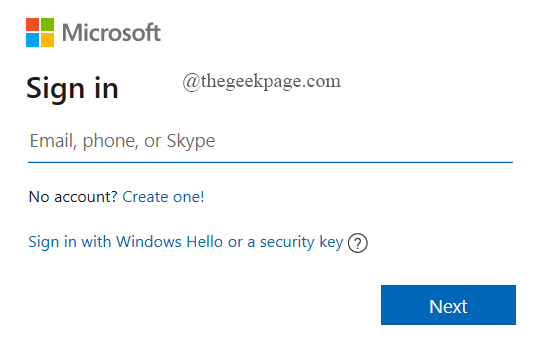
Step 3: Now, sign in with your email id ( or Phone or Skype id) into your Microsoft account by following the on-screen instructions.
NOTE: If you do not have a Microsoft id, click on Create One.
Step 4: Restart your system.
Step 5: Now open Microsoft Store and download a game to see if the error is solved.
If not move down to the next fix.
Additional Tip: If you are already logged in to your Microsoft Account, firstly log out of that account and again Sign-in as stated above.
Fix 2: Recreate AUInstall Agent Folder
A corrupted or missing AUInstall Agent Folder can cause this error in your system.
Step 1: Press the Win + R keys to open the run window.
Step 2: Type %windir% and hit Enter.
Step 3: Next, scroll down to search for the AUInstall Agent folder and delete it.
NOTE: If you are not able to find the AUInstall Agent folder, directly go to Step 4 to create a new one.
Step 4: Now, right-click anywhere in the folder and click on New > Folder.
Step 5: In the appearing window, click on Continue.
Step 6: UAC will ask for permission, click on YES.
Step 7: Name the new folder as AUInstall Agent.
Step 8: Restart your system.
Step 9: Open Microsoft Store and try installing the app to see if the error is resolved.
If not move down to the next fix.
Fix 3: Reset Windows Store Cache
Sometimes, a corrupted Windows Store Cache folder can lead to this error.
Step 1: Press the Win + R keys to open the run window.
Step 2: Type wsreset.exe and hit Enter.
Step 3: Command Window will run to reset your Windows Store Cache.
Step 4: Wait for the reset operation to complete for the Windows Store to open.
Step 5: Check to see if the error is resolved by downloading an application.
Fix 4: Reset the Microsoft Store
Step 1: In the taskbar search box, type Apps & Features and hit Enter.
Step 2: Scroll down to select Microsoft Store.
Step 3: Click on the 3-dots and click on Advanced Options.
Step 4: Now, go down and click on Reset.
Step 5: Restart your system and download a game in the Store to see if the error is resolved.
Fix 5: Download some other application first
This is more of a workaround solution rather than a tested fix. This was used by many users facing this issue and have successfully resolved the error code 0x87E10BD0
Step 1: Press Win+R keys to open the run window.
Step 2: Type ms-windows-store://home and hit Enter.
Step 3: In the search box, either type Netflix or Xbox Insider Hub or Deep Rock galactic. ( These three applications were mostly used by many users in this workaround)
Step 4: Now click on Get.
Step 5: Once the application is installed, use the search box again to Get/Install your required game or application.
If the error still persists, get down to the next fix.
Fix 6: Perform a clean boot
Step 1: Press Win+R keys to open the run window.
Step 2: Type msconfig and hit Enter.
Step 3: Go to the Services tab, tick the box against Hide all Microsoft services and click on Disable All.
Step 4: After all the services are disabled, click on Apply.
Step 5: Now, go to the Startup tab, click on Open Task Manager.
Step 6: Under the Startup tab, click on each application one after the other and click on Disable.
Step 7: Close the Task Manager.
Step 8: Restart your system to perform the clean boot.
Step 9: Now, open the Microsoft Store and download the application.
That’s all.
Your problem should be solved.
Hope this article is informative.
Thanks for Reading.


