Recently, there have been reports of seeing an error code ERR_SOCKET_NOT_CONNECTED on the Google Chrome browser while trying to open any webpage. As indicated by the error message, this is an issue mainly related to the system sockets which act as an endpoint for data communication among any two processes over a network.
Possible causes for this error are
- Corrupt sockets
- Incompatible Java version
- A problem in reaching the DNS server
- Issues with Chrome itself
If you are annoyed seeing this error on your Google Chrome, you have reached the right post. In this article, we have outlined some solutions suggested by users who have used them to solve this problem on their PC.
Fix 1 – Flush the Socket Pool
1. Launch Google Chrome.
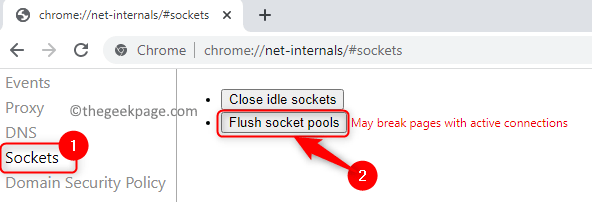
2. Type chrome://net-internals/ in the navigation bar of Chrome and hit Enter.
3. On the left, choose the Sockets option.
4. Now, click on the Flush socket pools button on the right side of the window.
5. Relaunch Chrome and check whether it fixes the error while trying to open the concerned webpage.
Fix 2 – Reset Google Chrome
1. Open Google Chrome.
2. Type chrome://settings/reset in the navigation bar to go to the Reset and clean up Settings in Chrome.
3. Click on Restore settings to their original defaults on the right side.
4. When prompted to confirm the reset, click on the Reset settings button.
5. The reset will reset settings, shortcuts, disable extensions and remove all temporary data in Chrome. Wait for some time till this process completes.
6. Restart your browser and check if the websites are accessible now.
Fix 3 – Install Latest Java Version
1. Press Window + R to open Run.
2. Type ms-settings:appsfeatures to open the Settings page for Apps & features.
3. In the search box below the App list, type java to look for Java installed on your PC.
4. Click on the three dots related to the Java version installed and choose Uninstall.
5. Click on Uninstall to confirm the uninstallation process.
6. Once Java is removed from your system completely, follow the steps in this link to install the latest version of Java on your system.
7. Now open Run (Windows + R) and type control to open Control Panel.
8. Type java in the Control Panel’s search box at the top right corner.
9. Click on Java to open the Java Control Panel.
10. Go to the Java tab.
11. Click on the View… button to manage the Java Runtime versions and settings on your PC.
12. In the Java Runtime Environment Settings window, click on the Add button at the bottom to add the location of all the Java installations in your system.
13. Enter the path for the Java installation folder in the Path column.
14. Click on OK and exit the Java Control Panel.
15. Reboot your PC and see whether Chrome still raises the error code.
Fix 4 – Modify DNS Settings
1. Open the Run dialog using the Windows and R keys simultaneously.
2. Type ncpa.cpl to open Network Connections.
3. Right-click on the current network adapter (WiFi or Ethernet) being used and choose Properties.
4. In the Networking tab, double-click on Internet Protocol Version 4 (TCP/IPv4) in the list of items used by the connection.
5. In the TCP/IPv4 Properties window, select the radio button associated with Use the following DNS server addresses.
6. Set the Preferred DNS server to 8.8.8.8 and Alternate DNS server to 8.8.4.4 respectively.
7. Click on OK to exit the window after saving the changes.
8. Reboot the system and see if the problem is resolved.
Fix 5 – Clear Browser Data and Cache
1. Open Chrome.
2. Type chrome://settings/clearBrowserData and hit Enter.
3. Go to the Advanced tab in the Clear Browsing Data window that pops up.
4. In the dropdown next to the Time range, select All time.
5. Check the boxes associated with all the options related to browsing and download history, cookies, and cache files.
6. If you are logged in to your Google account, click on the sign-out link at the bottom if you want the browsing history to be only deleted from the current device and not the Google account.
7. Then click on the Clear data button to remove all the browser data and cache.
8. Restart your browser and check if the issue is fixed.
Fix 6 – Reinstall Google Chrome
1. Just hold the Windows and R keys together to open the Run dialog.
2. Type ms-settings:appsfeatures to open the Apps & features.
3. Locate Google Chrome in the list of apps.
4. Click on the three vertical dots next to Google Chrome and choose Uninstall.
5. In the confirmation prompt, click on Uninstall button.
6. Wait for Chrome to be uninstalled from your PC.
7. Using any other browser on your system, go to the Official Chrome Download page.
8. Click on the Download Chrome button to download the latest available version of Chrome.
9. Complete the installation using the downloaded executable.
10. Once Chrome installs check if you are able to access any website.
That’s it!!
We hope this article helped you to overcome the ERR_SOCKET_NOT_CONNECTED error code on Chrome. Comment and let us know the fix that worked for you.


