Google Docs has become popular in school and work environments as it provides all the functionality that is expected from a word processor. Using Google Docs, you can create documents, resumes, and project proposals and also work simultaneously with other users around the world.
You may notice that Google Docs does not include all the features that come with Microsoft Word but it provides the ability to customize your documents. Using the right font can change the look of your document and make it appealing. Google Docs provides a large number of fonts from which you can choose anyone based on your liking.
If you are looking to add custom fonts to Google Docs, then go ahead and read this article. In this article, we have discussed two methods that will help you in adding custom fonts to Google Docs.
Method 1 – Add New Custom Fonts to Google Docs
In this method, you will be adding fonts that are offered by Google Docs. The advantage is that you can choose from a large number of fonts available in Google Docs.
1. Open your web browser and type docs.google.com in the navigation bar to navigate to the Docs homepage.
You will need to sign in to your Google account.
2. You can choose any document that is already present by clicking on the required file in Recent documents.

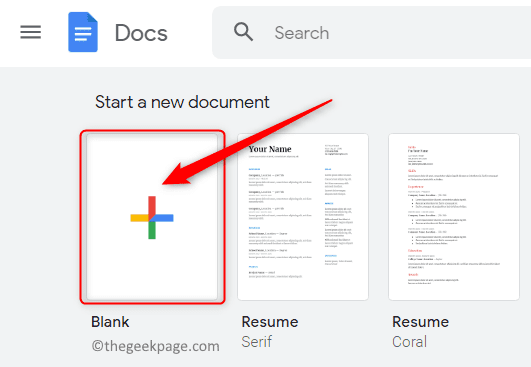
Or, create a new blank document by clicking on the plus (+) sign.
You can also create a new document using any of the templates offered by Google Docs.
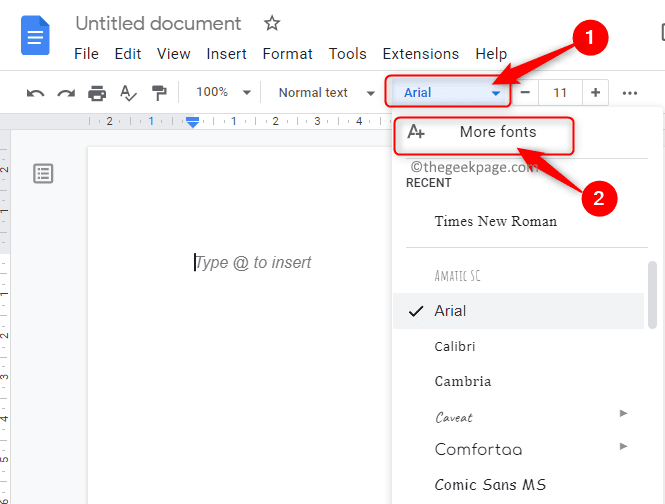
3. After the document is open, you will see a box that shows the font which is currently being used on the toolbar at the top.
Click on the downward arrow in this box to open the drop-down menu. This menu displays all the other fonts that are available for use.
The fonts displayed here are the ones downloaded from the fonts offered by Google Docs.
4. In the drop-down menu, click on the first option More fonts.
This opens up the Fonts window.
You can see all the fonts that are available with Google Docs but have not been downloaded by you on the left side of this Fonts window.
Whereas, the right side shows the fonts that are downloaded.
5. In the Fonts window, you can filter and sort the fonts based on your choice.
- Filter based on Scripts like Arabic, Greek, Hebrew, and so on. Click on the Scripts button to change the script for the font.
- Filter based on typography (i.e. look of your font) like Monospace, handwriting, and so on. Click on the Show button to see the fonts based on typography.
- Sort the fonts based on their popularity, date added, alphabetical, etc. To display the most popular fonts in the font list, click on the Sort button and choose the option Popularity.
6. You will now see all the fonts based on your chosen criteria. Click on the fonts that you want to add to the list.
After adding the fonts, click on OK.
7. These new fonts will now be visible in the dropdown box in the Font toolbar.
These can fonts can now be used anywhere in your Google Docs document.
Method 2 – Add New Google Docs Fonts Using Extensis Fonts Add-on
In this method, we will install an extension/add-on named Extensis Fonts to Google Docs to find new fonts that can be used.
1. Go to the Google Docs homepage as in Step 1 above.
Open either a new document or an existing one as indicated in Step 2 in Method 1.
2. At the top of the page, click on the Extensions tab next to Tools.
In the menu that is displayed, select Add-ons and then choose Get add-ons.
3. In the Google Workspace Marketplace window that opens, you can look for the required add-on.
In the search box at the top of the Add-ons window, type Extensis Fonts.
Tap on Extensis Fonts in the search result that is displayed.
4. On clicking, a page opens up that shows the details regarding this add-on.
On this page, click on the Install button at the top to install this add-on.
Click on Continue in the dialog that appears asking for install permissions.
Sign in to the Google account that is being used to access Google Docs.
After you sign in, give Extensis Fonts access permissions to your Google account by clicking on the Allow button.
5. A dialog appears indicating that Extensis Fonts has been installed. Click on Next.
Finally, click on Done to start using the add-on in Google Docs.
Exit this window and return to your document in Google Docs.
6. Now, click on the tab named Extensions to start using the add-on.
A menu opens with Extensis Fonts in it. Click on Extensis Fonts and then choose Start.
A panel opens up on the right side of the window which gives a preview of all the Extensis Fonts.
7. As mentioned in Method 1 above, fonts in this panel can be filtered and sorted out.
Use the Show option to filter fonts based on typography.
You can use the Sort option to sort the fonts based popularity, trending and so on.
At the bottom of this font panel on the right, there is a slider to adjust the font size.
8. To apply the font, first choose the text in the document to which the font needs to be applied.
Then, click on the font in the list to apply it to the text in your document.
That’s it!
Thanks for reading.
We hope this article has helped you in customizing and controlling the appearance of your document in Google Docs by installing Custom Fonts. Comment and let us know your thoughts and opinions with regard to installing custom fonts in Google Docs.


