Control Panel is the main control center of your Windows 10 & Windows 11 computer. From the Control Panel, you can easily control your Windows 10/11 components, advanced settings of the essential parts, and many more. What if the Control Panel starts to go unresponsive on your PC? Don’t worry. We are going to demonstrate how to solve this issue with simple steps.
Workarounds–
1. Restart your computer. Further, check if this is working or not.
2. Check if there are any Windows update is pending.
3. Run a full scan of your system to detect and solve a potential malware-related issue that may have caused this issue.
Fix 1 – Disable particular policy
Disabling a particular policy on your computer should re-enable your access to Control Panel.
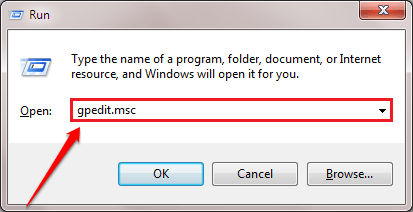
1. Just by pressing the Windows key+R you can open up a Run terminal.
2. In the particular terminal, write this simple code and then hit Enter.
gpedit.msc

The Local Group Policy Editor will appear in a while.
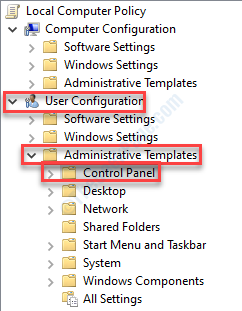
3. Once you see that the Local Group Policy Editor window has appeared on your screen, go here-
User Configuration > Administrative templates > Control Panel

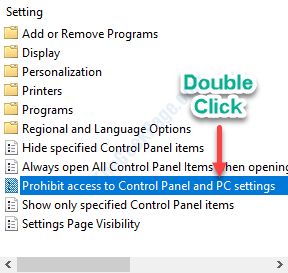
4. On the right-hand side, double click on the “Prohibit access to Control Panel and PC settings“.

5. In the window, select “Not Configured“.

6. Now, click on “Apply” and then click on “OK“.

After doing this, close the Local Group window.
Check if this fix works or not.
Fix 2 – Alternative Control Panel access
This is an alternative approach to access the Control Panel.
1. Go to your desktop on your computer.
2. Right-click on “New>” and then click on “Folder“.

3. After this set the name of the folder as-
Everything.{ED7BA470-8E54-465E-825C-99712043E01C}

4. Now, double click on the “Everything.{ED7BA470-8E54-465E-825C-99712043E01C}“.

5. Here you will notice a list of options that are available in the Control Panel.
You can access them just like the way you do in the Control Panel.

This can be a workaround for your problem.
Fix 3 – Try opening control panel via appwiz.cpl
1 – Open file explorer.
2 – Go to C:\Windows\System32
3 – Now, Search appwiz.cpl from the search box.
4 – Click on it to open appwiz.cpl.

5 -Now, click on control panel from its address bar.

Fix 4 – Delete particular registry
Deleting two key headers from your registry should fix the issue on your computer.
Warning-
Registry Editor is a very sensitive area on your computer. Any mistake while making changes except our steps will cause irreversible damage to your system. So, before going on ahead, always back up the registry.
After opening the Registry Editor window, click on “File” and then on “Export“.

1. Type “regedit” from the search box.
2. Then click on the “Registry Editor“.

3. When the Registry Editor opens up, go to this area~
HKEY_CURRENT_USER\SOFTWARE\Classes\Local Settings\Software\Microsoft\Windows\Shell
4. Now, right-click on the “BagMRU” key header and then click on “Delete“.

5. Similarly, you have to right-click on the “Bags” key and then click on “Delete“.

After deleting these key headers, you need to restart your computer.
Fix 5 – Check if the Software Protection service is running
Check if the Software Protection service is running or not.
1. Press Windows key+R.
2. Then, type this code and then click on “OK“.
services.msc
3. When you see the Services window, look for the “Software Protection” service.
4. You have to double click on it to access it.
5. After that, click on “Start” to start the service.

6. Finally, click on “Apply” and “OK“.

Try to access the Control Panel again.
Fix 6 – Run SFC scan
1. Type “Command Prompt” in the search box.
2. Then just press ‘Enter‘ from your keyboard.

3. Once the Command Prompt appears on your window, to run a System File Checker (SFC) scan, write this command and hit Enter.
sfc /scannow

4. Running a DISM scan is very simple. Copy-paste this command and then hit Enter.
Dism /Online /Cleanup-Image /RestoreHealth

Once both the scans are complete, reboot your device and check if this works.
Fix 7 – Clean boot your device
Clean booting will restrict the third-party applications on your computer.
1. You need to search for the “System Configuration“.
2. Then you have to click on the “System Configuration“.

3. When the System Configuration window opens, go to the “General“.
4. Simply after that, select the “Selective startup” option.
5. After that step you have to check the box beside the “Load system services.

6. Then, go to the “Services” section.
7. Since that, click on the “Hide all Microsoft services“.
8. Finally, click on “Disable all“.

The third-party systems will be disabled.
8. Simply, click on “Apply” and “OK”.

Restart your system.
Try to access the Control Panel again.
Fix 8 – Set Scale and Layout to 100%
For some users setting scale and layout to full has fixed the issue.
Case 1 – For Windows 10
1. Press Windows key+I.
2. Then, click on “System“.

3. When the System settings open up, click on the “Display” on the left-hand side.
4. After that, scroll down to find the ‘Scale and layout’. Set the “Change the size of text, apps, and other items” to “100% (Recommended)“.

Try to access the Control Panel once again.
Case 2 – For Windows 11
1 – Press Windows key + I key together to open settings.
2 – Now, Click on System from the left menu.
3 – Now, click on Display from the right side.
4 – Now, set Scale to recommended settings.

Fix 9 – Clear Temp folder
Clearing the Temp folder may resolve the situation.
1. Right-click on the Windows icon.
2. Then, click on “Run“.
3. When the Run terminal pops up, type “%temp%“. As soon as you click on “OK“, the Temp folder will appear.

4. When the Temp folder opens up, press ‘Ctrl+A‘.
All the folders and files inside the Temp folder will be selected.
5. After that, press the ‘Delete‘ key to clear everything from the Temp folder.

Your problem should be solved for sure.