Chrome is one of the most used browsers across the world due to its range of features, free extensions, and the ease of use. But, every good thing comes with its own downsides and so does Chrome. You may often notice that Chrome hangs or freezes while you are browsing the web or watching videos.
Well, that’s a very common and a nagging issue with Chrome that simply frustrates you to the end. You try refreshing web pages, restarting Chrome, and even reboot your PC, but nothing works. However, there’s still hope and we found that there are a few fixes that do work. Let’s how to fix the issue of Chrome freezing or crashing.
Method 1 – Rename User Data Folder
Try this method , if you are unable to open Chrome.
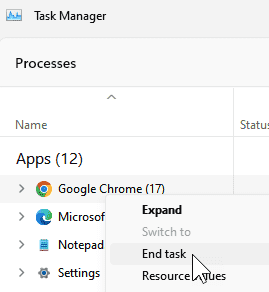
1 – Press CTRL + SHIFT + ESc keys together to open Task manager
2 – Now, locate Chrome in the list. Right click and choos end task

3 – Now, Open File explorer
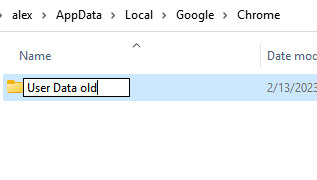
4 – Go to C:\Users\%username%\AppData\Local\Google\Chrome
5 – Rename User Data folder to something else like User Data Old

Open Chrome again
Method 2: Through Advanced Settings
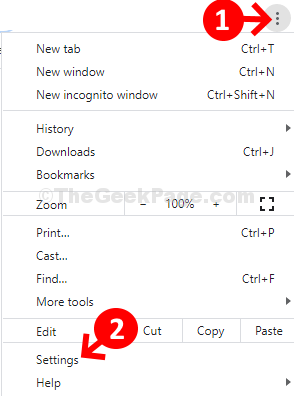
Step 1: Click on the three vertical dots on the extreme upper right corner of your Google Chrome window and select Settings from the context menu.

Step 2: In the Settings window, scroll down and click to expand the Advanced section.

Step 3: Under the Advanced section, scroll down, and under the System section, turn the slider off for Use hardware acceleration when available. This will help Chrome to stop using hardware acceleration.

Now, restart your Chrome browser and it should work normally. But, if it doesn’t and still loads slow or crashes, try the 2nd method.
Method 3 – Disable all chrome extensions
1. Open Chrome browser.
2. Go to chrome://extensions/
3. Disable all extensions.
4. Now, restart Chrome browser.

Method 4 – reset chrome
1. Open Chrome browser.
2. Go to chrome://extensions/
3. Click on Advanced in left menu.
4. Now, click on reset and clean up.

Method 5: Using Chrome Beta
Step 1: Go to Google and search for download Chrome beta. Select the official download page web link to open the download page.

Step 2: On the official download page, click on the Download Chrome Beta button in blue to download the beta version.

Now, simply install the beta version of the browser and there’s no lagging problem anymore. In fact, you can uninstall the normal Chrome version and reinstall it and it will work flawlessly. Even if you go back to the normal version from the beta, the problem will still be gone. You can also try the alternate download as per the 3rd method.
Method 6: Using Google Canary
Step 1: Go to Google and search for Google canary. Click on the result which is official web page link for the download.

Step 2: On the official web page for the download, click on the Download Chrome Canary button in yellow to start downloading the version.

Now, once the installation is complete, your web pages shroud load faster and everything should work normally. You can then uninstall the normal version of the Chrome and reinstall it like you did for the bet version above, and he normal version of Google should be back to normal.