Chrome autofill is a super convenient feature that automatically fills your payment information, passwords and addresses while browsing online. It makes filling up details much easier and not take the pain to remember so many details. However, at times, the Chrome autofill may stop working for all or certain websites, thus, making it a difficult situation. From broken Chrome updates or incorrect autofill settings to damaged user profiles, there can be quite a few reasons, why Chrome autofill may not work. While changing the browser can be a quick option, there are a few ways you can fix the Chrome autofill is not working issue in your Windows 10 and windows 11 PC. Let’s see how.
Method 1 – Delete Login Data and Login Data-journal
First of all close chrome browser
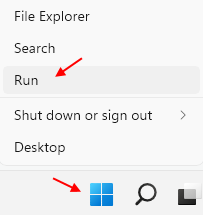
1 – Right click on start button and click RUN.

2 -Now, copy and paste the path given below in run command box and press OK button.
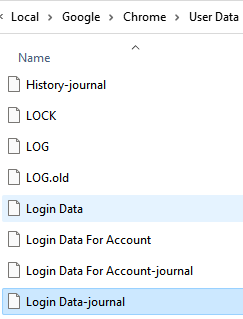
%UserProfile%\AppData\Local\Google\Chrome\User Data
3 – Now, Go inside Default folder.
4 – Now, Delete Login Data and Login Data-journal files.

Open chrome and try again to check if it works.
Note: – To fix other Profiles on chrome, Just go inside Profile or Profile1 etc. instead of Default folder as stated in step 3 above and repeat the same steps.
Method 2 – De-Sync and Re-Sync again
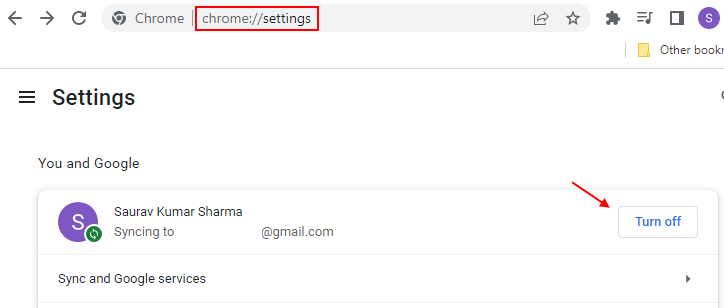
1 -Go to chrome://settings/ in chrome browser.
2 – Click on Turn Off Button to Stop Syncing.

3 – Now, Select Clear Bookmarks, history and Passwords and more from this device option.
Now, click Turn Off button again.

4 -Close Chrome browser.
5 – Now, Login again into your account.
Method 3: By Updating Chrome
Step 1: Launch Google Chrome and click on the three vertical dots (Customize and control Google Chrome) on the upper right of the browser.
Now, select Help and then select About Google Chrome.

Step 2: In the About Chrome settings page, Windows will automatically start looking for the latest build.
If any latest update available, it will automatically update Chrome to that build.

Once updated, re-launch Chrome and the autofill feature should start working now.
Method 4: Enable Autofill Settings
Step 1: Open Chrome and click on its menu (three vertical dots) on the upper right side of the browser.
Select Settings from the menu.

Step 2: In the Settings window, scroll down and look for Autofill section.
Here, click on Passwords.

Step 3: In the Passwords section, make sure that both Offer to save passwords and the Auto Sign-in options are turned on.

Step 4: Now, back under the Autofill section, click on Payment methods.

Step 5: In the Payment methods window, turn on both Save and fill payment methods and Allow sites to check if you have payment methods saved.

Step 6: Again, go back to the Autofill section and select Addresses and more.

Step 7: In the Addresses and more page, go to the Save and fill addresses and turn it on.

Exit the settings window and try filling an online form on Chrome to check if the auto-fill is working now.
Method 5: Rename Default Folder
Step 1: Press the Win + E keys together on your keyboard to open the File Explorer window.
Step 2: In the File Explorer window, navigate to the path below:
%localappdata%\Google\Chrome\User Data
Now, look for the Default folder.

Step 3: Rename the Default folder as Backup Default.

Now, launch Google Chrome and a fresh Default folder will be created automatically as the browser opens. This should now resolve the issue autofill not working in your Windows 10 PC.
Method 6: Enable your Sync Settings
Step 1: Open Google Chrome and go to the three vertical dots on the upper right side of the browser.
Here, select Settings from the menu.

Step 2: In the Settings window, click on Sync and Google services.

Step 3: In the next page, under the Sync section, click on Manage what you sync.

Step 4: In the Manage what you sync window, select the radio button next to Customize sync.

Step 5: Now, scroll down and turn on the Passwords, Addresses, phone numbers, and more, and the Payment methods and addresses using Google Pay options.

Now, exit Settings and the Chrome autofill feature should be working now.
Method 7: By Turning Off Extensions
Step 1: Go to the Customize and control Google Chrome (three horizontal dots) on the upper right side of the Chrome browser and select More tools.
Then select Extensions.

Step 2: Here, you can turn off any/all extensions you want.
Once you are done, restart your Chrome browser and now check if the auto-fill feature is working.
Method 8: Clear Browsing Data
Step 1: Launch Chrome browser and go to the three vertical dots (Customize and control Google Chrome).
Now, select Settings.

Step 2: In the Settings window, scroll down and under the Privacy and security section, click on Clear browsing data.

Step 3: In the Clear browsing data window, go to the Advanced tab, and select All time from the Time range field.
Now, check the boxes next to Cookies and other site data and Cached images and files and click on the Clear data button below.

Once completed, close the Settings tab and you should now see the auto-fill feature working.
Method 9: Never Saved Exceptions
Step 1: Open Chrome and go to the upper right side of the browser. Now, click on Customize and control Google Chrome (three vertical dots) and select Settings.

Step 2: In the Settings window, scroll down and under the Autofill section, click on Passwords.

Step 3: In the Passwords window, scroll down and go to the Never Saved section.
Here, check for the website you are browsing and for which you want the data to be filled automatically. If it shows up here, click on the X button to delete it from the Never Saved list.

Step 4: Relaunch Chrome and open the website.
You will now see a pop up asking to Save data. Click on Save and the autofill feature should be working now.
Method 10: Reset Google Chrome
If none of the above method works, you can reset the Google Chrome browser to its default settings. Let’s see how.
Step 1: Open Chrome and go to the three vertical dots on the upper right side of the window.
Select Settings from the context menu.

Step 2: In the Settings window, scroll down and expand the Advanced section.

Step 3: Under the Advanced section, scroll down and under the Reset and clean up section, click on Restore settings to their original defaults.

Step 4: In the Reset Settings prompt, click on the Reset settings button.

This will reset the settings for the Chrome profile you are logged in and the changes will also apply to all devices you are signed in with this Chrome profile.
You can now browse the website you are having the autofill problem and it should be working now.
Alternatively, you can also try checking if the autofill feature for the specific website is working in the incognito mode.