Windows users can use the Check Disk utility to scan and repair file errors on disk drives. Usually, a system administrator may manually initiate the disk checking tool to scan a particular drive and this scan has different modifiers. But what if the ChkDsk tool starts to automatically run at every startup? If this check is occurring on every startup, it will be definitely annoying for you. So, just follow these solutions to find and implement the solution quickly.
Fix 1 – Modify the Registry Editor
Editing a particular value on your system may help you resolve the issue.
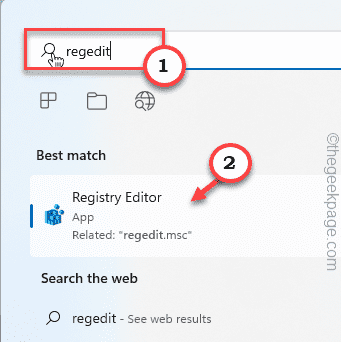
1. Just press the Windows key and type “registry” in the search box.
2. Now, you can click on the “Registry Editor” in the search results.
Warning – You are going to remove a particular value in the Registry Editor. It usually doesn’t lead you to any issues, test if this works. So, before you do anything else, you should create a new registry backup.
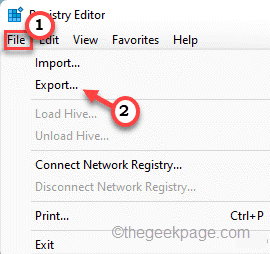
a. Once you have opened the Registry Editor screen up, tap on “File” from the menu bar.
b. Then tap “Export” to make a new registry backup.

Just store this backup in a discrete location.
3. On the right-hand side, go here –
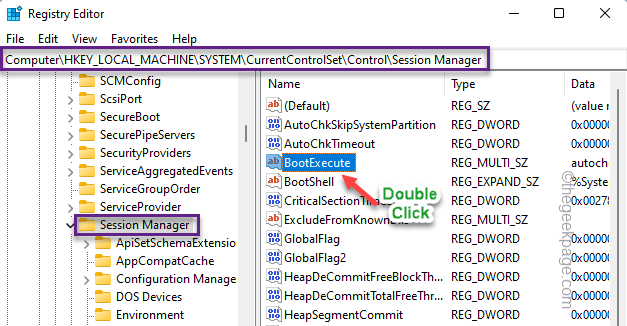
Computer\HKEY_LOCAL_MACHINE\SYSTEM\CurrentControlSet\Control\Session Manager
4. Then, on the right-hand side, double-click the “BootExecute” multi-string to access it.
5. On the Edit Multi-String window, you may see some lines. Remove all the lines from there.
6. Then, just input this line in the box.
autocheck autochk *
7. Finally, click “OK“.
After that, close the Registry Editor screen. Then, you have to restart the system once to witness the change. During startup you won’t see the disk checking scan.
Fix 2 – Let it run
Some disk checking scans (like the ones on the system drive) only begins at the time of a system reboot. It is the normal case and it is suggested that you don’t interfere with disk checking scan. If you force-restart the system while Windows is still performing a disk check, the disk checking may reappear at the next startup.
Fix 3 – Cancel the scheduled scan
If a disk checking scan is already scheduled to start at the next system startup, you can undo that with a command.
1. Press the Windows key from the keyboard and type “cmd“.
2. Now, right-click on the “Command Prompt” and tap “Run as administrator“.
3. You can perform a query check over the drive. So, input this command in the terminal and hit Enter.
fsutil dirty query drive letter
[
Replace the “drive letter:” with the drive letter of the drive.
Example – If the drive letter is “F:”, the command is –
fsutil dirty query F:
]
4. After running the query check, you have to run this command not to run the disk check operation at the next system startup.
CHKNTFS /X drive letter:
[
Replace the “drive letter:” with the drive letter of the drive.
Example – If the drive letter is “F:”, the command is –
CHKNTFS /X F:
]
Now, Windows won’t run the disk checking tool on the drive at the system startup. This should have solved your problem.


