How to change default New folder name scheme in Windows 10: – When you create a new folder or new text document in your Windows 10, it is named as New folder and New text document respectively by default. Simple plain text values! But who wants plain, let alone default? You are given the power to change the folder/file naming scheme of Windows 10 and yet you are ready to go with the default. Read on, to learn how to hack this simple trick of customizing the default folder/file naming scheme of Windows 10 using a program called regedit. Give your system a bit of your own touch.
Also read: – How to turn boring folder icon to awesome images
STEP 1
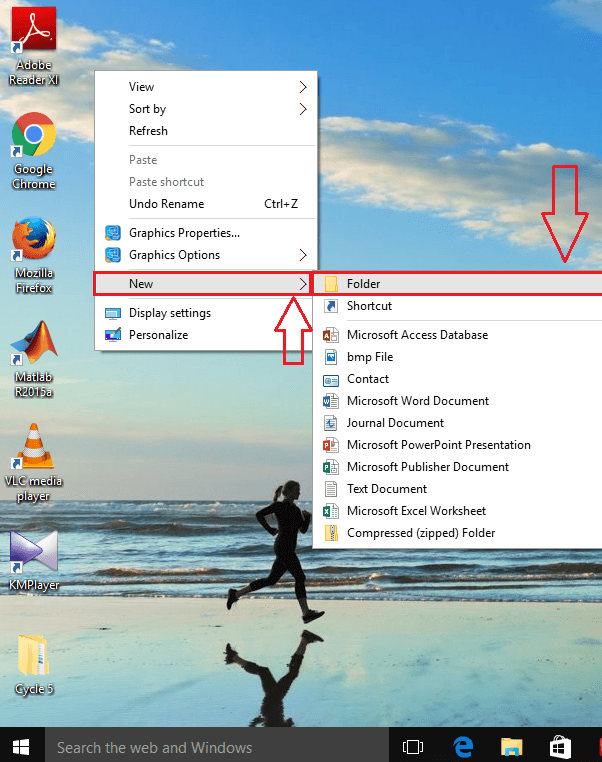
- First of all, let’s have a look at the default folder naming scheme of Windows 10. For that, simply create a new folder by right clicking on an empty space in your desktop and then by clicking on New and then on Folder.
STEP 2
- Now if you have a look at the name of the newly created folder, it will be New folder by default. But yeah, you are definitely not required to go with the Windows default behavior. You can indeed change this bit of Windows as well.
STEP 3
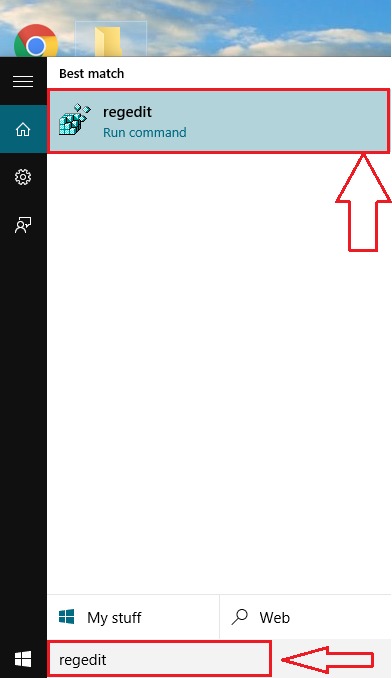
- For that, type in regedit into your Cortana Search Box. It will list the search results and choose the program regedit as shown in the screenshot.
STEP 4
- Now you need to navigate to the following path, from the left pane of the window named Registry Editor.
HKEY_CURRENT_USER\SOFTWARE\Microsoft\Windows\CurrentVersion\Explorer\NamingTemplates
- If you can’t find the key named NamingTemplates under Explorer, do not worry. You can just create one. Simply right click on the Explorer, then on New and then on Key. If you face any difficulties, refer to the screenshot below.
STEP 5
- Label the newly created key as NamingTemplates.
STEP 6
- As next, right click on NamingTemplates, then on New and then on String Value.
STEP 7
- The newly created subkey should be labelled as RenameNameTemplate.
STEP 8
- Now execute a double click on RenameNameTemplate. This will result in the opening of a new window named Edit string. You will now see a text filed named Value data. You can give a name of your choice in this text field, such that every time you create a new folder or file, it will automatically be created in this name. In the below screenshot, I have chosen the name Super New! as my default folder/file name. Once you are done, click on OK button.
STEP 9
- Let’s check whether the effect has taken over. For that, simply create a new folder. There it is! You can definitely see the change, can’t you?
STEP 10
- Let’s check the same with a new text document as well. Simply create a new text document to see that the default naming scheme has changed.
STEP 11
- Now, what if you don’t want a fixed name for each and every newly created file/folder of yours? Well, there is a solution for that too. Simply open the window Edit string just like before. In the Value data field, type in text %s, where text can be any text of your choice. %s part is the windows default name for folder/file. When you are done, click on OK. In this given example, I have used the text valueNew.
STEP 12
- Let’s check the effects. Simply create a new folder and a new text document. Of course, the effect has taken place.
STEP 13
- You should remember not to use any of the following special characters while entering the value in Value data field.
\ / ? : * ” > < | ” ‘ *
If you use any of the above said characters, you might be faced with an error message like the one shown in the screenshot below. To solve the problem, go back and remove unwanted characters from Value data field.
STEP 14
- Reverting back to the default Windows behavior is as easy as breathing. You just need to right click on the NamingTemplates key and choose delete from the context menu.
That’s it. Now your system has a bit of your own touch in it. It should feel great to leave a mark always. Hope you found the article helpful.


