If while connecting to a Internet on a Windows 10 PC, you get the error saying Can’t connect to this network, you do not need to worry as with the help of this article you can easily fix this error. Just Follow the Fix Given below.
Fix 1 – Reinstalling WiFi Driver
1. Search Device manager in Windows 10 Taskbar Search
2. Now, Click on Device Manager to Open Device manager.

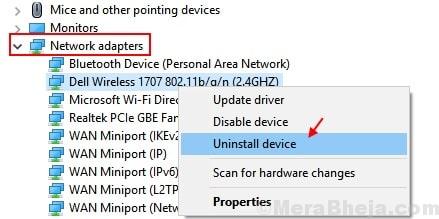
3. Now, Expand Network Adapter by Clicking on it.
4. Now, Right Click and Uninstall the driver which you are using.

5. Now, Restart Your Computer. Windows 10 Will automatically reinstall the best Driver for your PC.
Fix 2 – Network Reset
1. Press Windows Key and I Together to Open Settings.
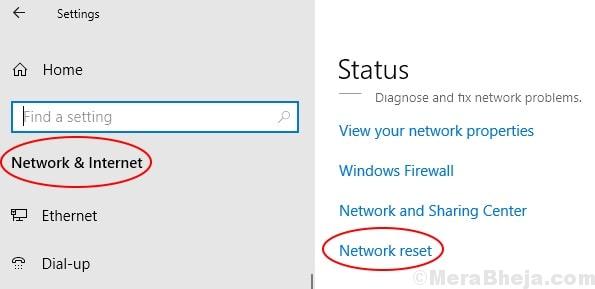
2. Now, Go to Network & Internet
3. Click on Network Reset to Reset your Network.

Fix 3 – Forget the WiFi Network
1. If you are using WiFi then right Click on the WiFi and Choose forget.

2. Now, Reboot your PC.
Fix 4 – Set Network to Auto
1 – Search and click on View Network connections from the taskbar search box

2 – Now, Right click on your WiFi adapter and click on Properties

3 – Now, Select Internet Protocol Version 4 (TCP/IPV4) and click Properties

4 – Select Obtain an IP address automatically and also Select Obtain DNS server address automatically and click OK

Now, Try again
Note: If this also do not solves your issue, then try this.
Right click on your WiFi adapter and click Disable.

Wait for few seconds .
Now, again do a right click and click on Enable.

Now, connect again to the WiFi.
Fix 5 – Reinstall Network adapter
1. Go to Search and type Device manager in Windows Taskbar Search box.
2. Now, Click on Device Manager to Open Device manager.

3. Now, Expand Network Adapter by Clicking on it.
4 – Now, right click on your wireless adapter and click on Update driver

5 – Click on Browse my computer for drivers

6 – Click on Let me Pick from a list of available drivers

7 – If there are more than One Driver, Choose the driver different than the current one and click on Next.
If there is only one , select that one only and click Next
 Now, Check again.
Fix 6 – Using Command Prompt
1. Search CMD in Windows 10 Search bar.
2. Now, Right Click on the Command Prompt and Choose Run as Administrator.
3. Once the Command Prompt Window Opens Up, Run the Commands Given below One By one.
netsh winsock reset

netsh int ip reset

ipconfig /release

ipconfig /renew

ipconfig /flushdns
4. Close the Window and Reboot your Computer.
Fix 7 – Run Network Troubleshooter
1. Search Network Troubleshooter in Windows 10 Taskbar Search.

2. Click and Run Windows Network Diagnostics Troubleshooter.
3. Follow On Screen Instructions.
Fix 8 – Disable 802.1 1n mode
1. Search Device manager in Windows 10 Taskbar Search
2. Now, Click on Device Manager to Open Device manager.
3. Now, Expand Network Adapter by Clicking on it.
4. Now, Right Click on your Network Adapter Driver which you are using and Click on Properties.
5. Go to Advanced Tab
6. Select 802.1 1n Mode
7. Set the Value to Disabled.
Fix 9 – Disable IPV6
1. Press Windows Key + R together to Open RUN Command Window.
2. Now, Write ncpa.cpl and Click OK.

3. Now, Right Click on your Network and Choose Properties.
4. Uncheck Internet protocol Version 6.

5. Click OK and Close the Window.
6. Reboot your PC.