Many Windows 11 users have encountered an error message “A driver cannot load on this device (ene.sys)” that prevents drivers from loading on the system and is flagged as vulnerable. However, this issue has been reported mostly by users who have upgraded their PC to Windows 11. This error is closely associated with drivers and files that are corrupted due to a problem with the update of the system’s operating system.
If you are confronting this “ene.sys” error every time you turn on your Windows 11 computer after an update, then go ahead and read this post. Here, you will find some troubleshooting methods that can be used when you see this error on your PC.
Fix 1 – Install the Optional Updates
Step 1. Open the Run box using the Windows + R key combination.
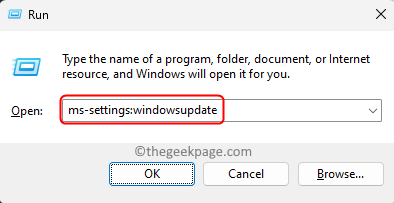
Step 2. Type ms-settings:windowsupdate and hit Enter to open the Windows Update page.
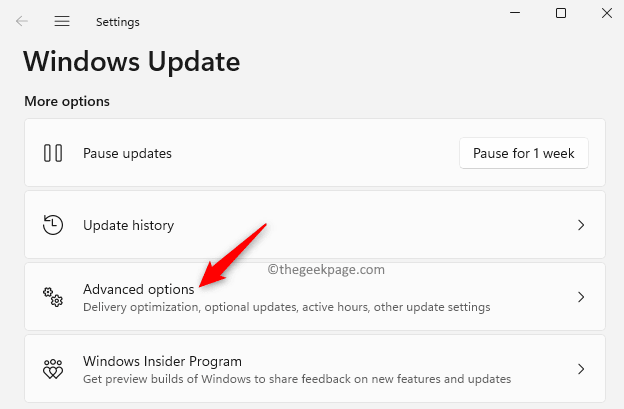
Step 3. On this page, click on Advanced options in the More options section.
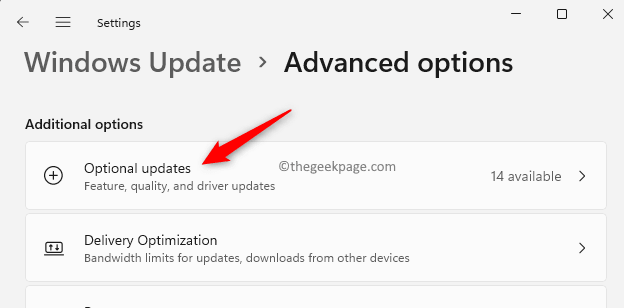
Step 4. Click on the box labeled Optional updates in the Additional options tab.
Step 5. If there are any updates available you will see Driver updates here.
Click on Driver updates.
Step 6. Check the boxes next to the updates that you want to install.
Step 7. Then, click on Download & install button.
Step 8. Once the updates have been installed, reboot your PC to check if the ene.sys error is resolved.
Fix 2 – Rename ene.sys File
Step 1. Open File Explorer (Windows + E).
Step 2. Go to C:\Windows\System32\drivers to locate the ene.sys file.
Step 3. Right-click on this file and select the Rename option.
Step 4. Now, rename this file to anything like ene.sys.old.
Step 5. After renaming the file, restart your computer.
Step 6. Check if the error is fixed after the system starts up.
Fix 3 – Disable Memory Integrity
Step 1. Hit the Windows key on your keyboard and type device security in the search box.
Step 2. In the search results, click on Device Security.
Step 3. Now, click on Core isolation details in the Core isolation section.
Step 4. On this page, toggle off the option Memory integrity.
Step 5. After the memory integrity feature is disabled, close Settings.
Step 6. Restart your computer and check if the error is fixed.
Fix 4 – Rollback the OS Update
Step 1. Just press the Windows + I keys to open the Settings app.
Step 2. With the System tab selected in the left pane, scroll down and click on Recovery on the right side.
Step 3. If you see the Go back button in the Recovery options section is not greyed out, you can roll back the Windows OS update and fix any issue you are facing with the current update.
Step 4. Click on Go back to start the rollback of the OS update by uninstalling the latest updates.
Step 5. Choose a reason for going back to the previous build.
Click on Next.
Step 6. Then, click on No thanks when you are asked to check for updates.
Step 7. Click on Next in the What you need to know window.
Step 8. In the window with the heading Don’t get locked out, click on Next if you know the password to sign in.
Step 9. Lastly, click on Go back to the earlier build.
Step 10. Wait for the rollback of the update to complete.
Sign in to your PC and check if the error still exists or not.
Fix 5 – Run the Program Compatibility Troubleshooter
Step 1. Press Windows + R to open the Run dialog.
Step 2. Type ms-settings:troubleshoot and hit Enter to go to the Troubleshoot page.
Step 3. Here, click on Other troubleshooters.
Step 4. In the list of troubleshooters displayed, scroll and look for Program Compatibility.
Step 5. Click on the Run button associated with the Program Compatibility Troubleshooter.
Step 6. Select the option Yes to give permission to run the diagnostics and steps to fix the problem.
Step 7. Then, select the application you want to troubleshoot.
Step 8. Once you have selected the app, choose the problem you are facing with the application.
Wait for the troubleshooting process to run and detect any problems.
Step 9. Click on Yes to apply the recommended compatibility settings.
Step 10. Check if the error ene.sys is resolved or not.
That’s it!
We hope the fixes in this article were helpful in resolving the “A Driver Cannot Load on this Device (ene.sys)” error on your Windows PC. If you found this article useful in fixing the issue, then comment below to let us know the fix that worked for you.


