Be in on numerical values, be in on text strings, having commas at the wrong places can indeed turn annoying even for the biggest Excel geeks. You might even know how to get rid of the commas, but the method you know might be time consuming for you. Well, whatever be your problem, if it’s related to having commas at the wrong places in your Excel sheet, we can tell you one thing, all your problems are going to be solved today, right here!
Dive into the article to learn how you can easily get rid of the commas from numerical and text values with the simplest of the steps possible. Hope you enjoy reading. Oh, and don’t forget to tell us which method caught your eye the most!
Section 1: How to Remove Commas from Number Values
There can be 2 scenarios when numerical values contain commas. One is that they actually contain commas and the other is that the commas are visible only because of formatting options. Both the scenarios are covered in this section.
Section 1.1: By Changing the Format Options
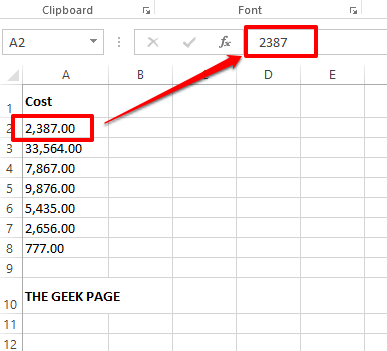
Click on one of the cells where a comma is visible on a number value. Now, if you look at the text preview bar at the top, you can see that no commas are visible there. It means that the comma is visible only because of formatting options and that if we change the formatting, the commas will be gone.
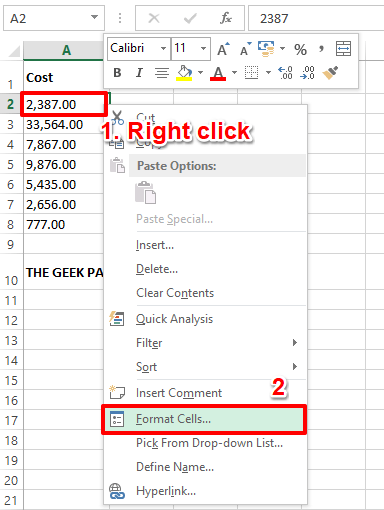
Step 1: Right click on the cell that contains comma(s) and then click on the Format Cells option from the right click context menu.
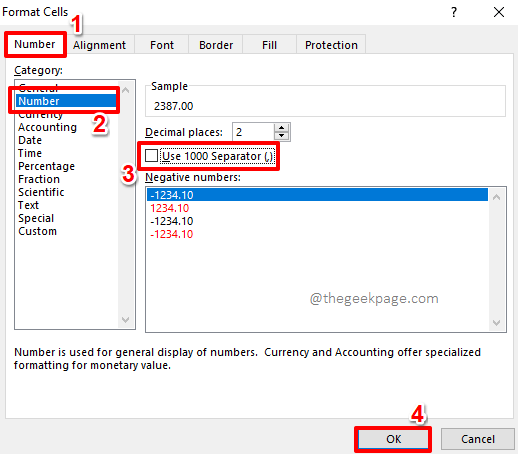
Step 2: On the Format Cells window, click on the Number tab at the top. Now under the Category options, click on the Number option.
On the right side of the window, make sure to uncheck the checkbox corresponding to the option Use 1000 Separator (,).
Hit the OK button finally.
Step 3: If you now look at your Excel sheet, you can see that the comma is no longer visible.
You can apply the same formatting to other cells as well. For that simply click on the cell that you just formatted and then hit the HOME tab at the top.
As next, click on the Format Painter button.
Step 4: As next, simply drag and select all the cells that you want to apply the same formatting to. This will automatically remove the commas from the selected cells.
Also read: How to Format a Cell and Apply the Same Formatting to Other Cells in MS Excel
Section 1.2: By Using an Inbuilt Formula Function
If you click on a cell containing comma(s), and you can see the comma present on the number even on the text preview bar, it means that the comma is actually present on the number. In such cases, formatting the cell wouldn’t solve your issue. Instead, let’s use an inbuilt function to remove the commas from your numerical values.
Step 1: Double click on the cell where you want to display the number value without commas and then type in or copy and paste the following formula.
=NUMBERVALUE(A2)
Note: If the number containing the comma is in a different cell and not in the A2 cell, then please remember to replace A1 with that particular cell id.
Step 2: That’s it. The function would now return the number without any commas. You can apply the same formula to all the cells underneath it by simply clicking and dragging down the small square shape present at the bottom right corner of the cell containing the formula.
Step 3: You can see that the formula is now applied to all the cells underneath.
Section 2: How to Remove Commas from Text Values
Just like numerical values, text values could also have commas in them. There are multiple ways using which you can get rid of the commas in text strings. Let’s explore some of them in the sections below.
Section 2.1: By Using the Find and Replace Method
This is a very simple method where we get rid of all the commas present in the entire sheet, using the traditional Find and Replace feature.
Step 1: Press the keys CTRL + F together to bring up the Find and Replace window.
As next, click on the Replace tab.
Now in the Find what field, type in a comma.
Leave the Replace with field empty. Or if you want to replace the commas present in your worksheet with a specific character, instead of leaving this field empty, you can type in that character.
Finally, hit the Replace All button to get rid of all the commas.
Step 2: You will now be able to see a dialog box saying that the replacements have been made. Hit the OK button to proceed.
Step 3: That’s it. If you now look at the Excel sheet, you can see that all the commas are gone.
Section 2.2: By Replacing All Instances of Commas Using the Substitute Function
In this method, we make use of an inbuilt formula function named Substitute. The Substitute function can take 4 arguments, where the 4th argument is optional. The first argument is the source string, the second argument is the character(s) that needs to be replaced, 3rd argument is the new text that will come in the place of the old text. Finally, the 4th argument is the instance number of the character(s) that needs to be replaced.
In this section, we are going to ignore the 4th argument and leave it empty. In section 2.3, we will explain in detail how you can make the best use of the Substitute function using the 4th argument as well.
Step 1: Double click on the cell where you want the comma removed text to be displayed. Now copy and paste the following formula onto the cell.
=SUBSTITUTE(A2,",","")
Please remember to replace A2 with the cell id of the cell containing your source string. The second argument is “,” and the third argument is “”.
Step 3: If you hit the Enter key or click elsewhere, you can see that the commas are now successfully removed.
As always, you can drag the formula down to the cells underneath. For that, click on the square shaped icon at the corner of the cell and drag it down.
Step 4: The formula is now applied to all the cells. Enjoy!
Section 2.3: By Replacing Specific Instances of Commas Using the Substitute Function
Let’s say you have more than one comma in your source string and that you want to replace only one of them. That’s when the 4th argument of the Substitue function comes into picture. The 4th argument of the Substitute function takes in the instance number of the character(s) that you want to be replaced. Only this instance would be replaced.
Step 1: In the example below, my source string has 2 commas, and I want to replace only the last one with a hyphen. So my formula should look like as follows.
=SUBSTITUTE(A2,","," -",2)
Note: If you want to replace the first comma instead of the second one, then the last argument in your Substitue function should be 1 instead of 2.
Step 2: Hitting the enter key would instantly give you the result, the perfect way how you wanted it to be.
Now, as usual, click on the square icon and drag it down to apply the formula column wide.
Step 3: Now that the formula is applied column wide, you can finally relax.
Section 2.4: By Using Flash Fill
This is one very simple method and it is very efficient. Through the flash fill method, you can basically teach Excel the patterns that you want it to learn. Let’s see how the flash fill method can come into rescue here.
Step 1: Simply type in the string without commas in the first row of the resultant column. Just to be on the safer side, type the comma removed string in one more row.
Now, click on the first row and then press the keys CTRL + E simultaneously.
Step 2: Magic! The flash fill learns the pattern and automatically fills the rest of the columns instantly.
Also read: How to Autofill Data Based on Patterns Using Flash Fill in Excel
Please do tell us in the comments section which method is your favorite. Our favorite is the flash fill method as it really super cool.
Stay tuned for more amazing technical articles on your favorite topics.


