PowerShell is a good and advanced cross-platform task automation solution. It is usually very easy to create and run a PowerShell script on a Windows system. But, you may be obstructed with the “Running scripts is disabled on this system.” error message if you run a script on your system. If the system administrator has placed a policy to block any unauthorized scripts from running on the system, you will see the specified error message. You have to unblock the policy or tweak the registry and you may run any scripts.
Fix 1 – Tweak the PowerShell
You can run a code bypassing the current execution policy. So, you don’t have to tamper with it but you can run your script.
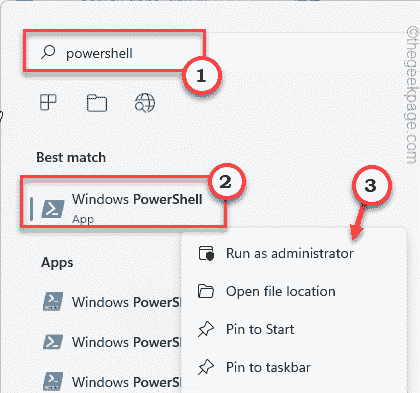
1. After pressing the Windows key+S keys together, type “powershell“.
2. Then, right-tap on the “Windows PowerShell” and tap “Run as administrator“.
3. When the Windows PowerShell screen appears, type this code and alter it accordingly, and hit Enter to execute it.
powershell -ExecutionPolicy ByPass -File nameofthescript.ps1
[
Just replace the “nameofthescript.ps1” with the name of the script you are trying to run.
Example – Suppose, the name of the script is “myscript“, the command will be –
powershell -ExecutionPolicy ByPass -File myscript.ps1
]
This way you can run any script without altering the current script execution policy. But, if you are mass-executing scripts or creating an automated script, this won’t work.
You have to look to the next fix for that.
Fix 2 – Alter the Execution Policy
You can change the current execution policy settings if you prefer.
1. Again press the Windows key and type “powershell“.
2. Later, right-click on the “Windows PowerShell” and tap “Run as administrator” to open the terminal with administrative rights.
3. When it does open up, type this command to alter the execution policy according to your choice.
Set-ExecutionPolicy RemoteSigned
[
You can set the script Execution Policy to four different modes. These are –
Restricted – The default mode where PowerShell doesn’t allow any script to be run on the system.
AllSigned – Only the signed and authorized scripts shall be allowed to run in this mode.
RemoteSigned – In this mode, all the scripts that you have downloaded must have a signature of a trusted signature.
Unrestricted – You can run any script you prefer. No boundaries on trusted signature or trusted publisher.
Example – Suppose, you want to set the policy settings to ‘RemoteSigned’, the command will be –
Set-ExecutionPolicy RemoteSigned
]
After that, press “Y” and hit Enter.
4. If you face any error message, just run this command.
Set-ExecutionPolicy RemoteSigned -Scope CurrentUser
Again, write “Y” and hit Enter.
Once you have done that, you can easily run the script as you prefer.
Test by running the script.
NOTE –
The scripts execution policy is usually restricted because misconfigured or bad scripts can do fatal damage to the system. So, once you are done running the script, you can set the execution policy to the ‘Restricted’ mode again.
1. Access PowerShell with administrative privileges.
2. Now, just execute this single code to restrict any policy from running on the system.
Set-ExecutionPolicy Restricted
3. Again, write “Y” and hit Enter.
After that, close the PowerShell window.
Fix 3 – Using Group Policy editor
1 – Press Windows + R key to open run
2 -Type GPEDIT.MSC in the text field provided and click OK
3 – Now, go to the location as shown below
Computer Configuration -> Policies -> Administrative Templates -> Windows Components -> Windows PowerShell

4 – Choose enabled
5 – Select Allow local scripts and remote signed scripts
6 – Click apply

Fix 4 – Edit the Registry
If you are facing any error message while altering the execution policy, you can edit the Registry Editor.
1. Just write “regedit.msc” in the search box on the taskbar.
2. After that, tap “Registry Editor” to access it.
Warning – You are going to tweak your registry. As Registry Editor is a very important part of your system, you should make a registry backup beforehand.
When the Registry Editor opens up, tap on “File“. Then tap “Export” to create a new registry backup on your system.

Later, you can use this backup if things go wrong.
3. Now, expand the left-hand side this way –
Computer\HKEY_LOCAL_MACHINE\SOFTWARE\Microsoft\PowerShell\ShellIds\ScriptedDiagnostics
4. Then, double-tap the “ExecutionPolicy” binary value.
5. Just, write “Unrestricted” in the ‘Value Data:’ box.
6. Then, tap “OK” to save this change.
After this, close the Registry Editor. Once you have closed the Registry Editor, restart the system.
After rebooting your computer, you can easily run a script of your choice.

