Adding new users to your Windows device is usually very easy and there are multiple ways to do that. But, while trying to add a particular user, a handful of users have seemed to face difficulty. According to these users, they couldn’t add a new user account to their systems. If you are experiencing the same issue, follow these fixes to solve your issue.
Fix 1 – Using the Netplwiz
You can use the User Accounts feature to create a new account very easily.
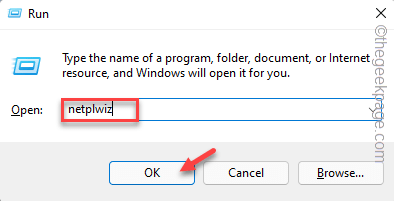
1. At first, press the Windows key+R keys together.
2. Then, type this command and click on “OK“.
netplwiz
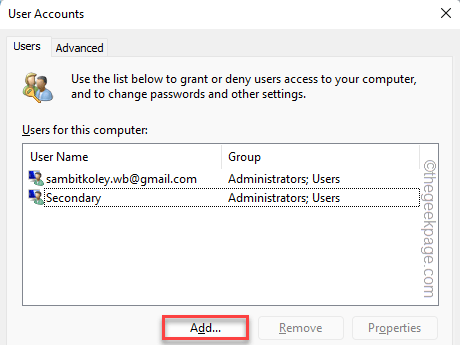
3. When the User Accounts window appears, tap on “Add…” to add a new account to your system.
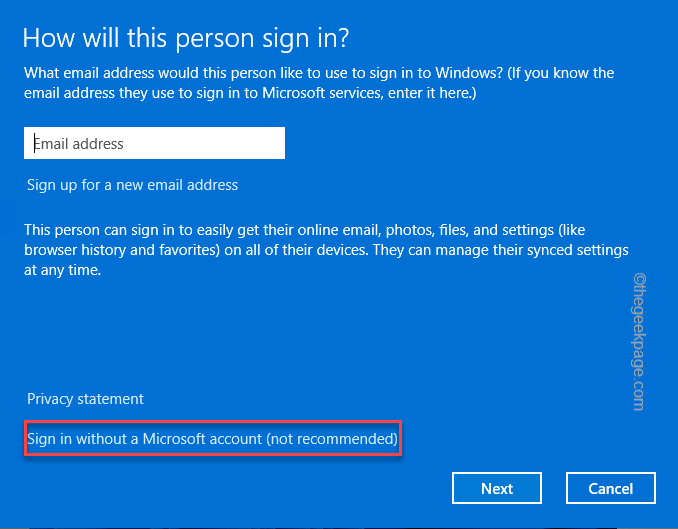
4. Now, here you have two choices. If you already have a Microsoft-associated Gmail ID, you can put that Email address and tap on “Next“.
5. Otherwise, you can create a local account. To do that, tap on “Sign in without a Microsoft account (not recommended)“.
We are creating a new local account.
6. Now, tap on the “Local account” option to create a new local account on the system.
7. Now, fill in the “User name“, “Password“, “Confirm password” boxes according to your preferences.
8. Finally, tap on “Next” to proceed further to the final step.
9. Finally, tap on “Finish” to complete the whole process.
This way, you have successfully created a new local account on your system.
Fix 2 – Create a new user account using CMD
The easiest and fastest way to add a new account to your system is using the CMD terminal.
1. At first, click on the search box and write “cmd“.
2. Then, right-click on the “Command Prompt” and tap on “Run as administrator“.
3. When the terminal appears, copy-paste these codes and hit Enter.
net user accountname /add
[
Just replace the “accountname” with the account name you want.
Example – Suppose you want to create an account named as ‘Colin’, the command will be –
net user Colin /add
]
Once you see the ‘The command completed successfully‘ message has appeared, the account is created.
Now, in this process, you have created an account without a password.
4. If you want to create a new account with a password, modify and run this code.
net user accountname password /add
[
Again, replace the “accountname” and “password” according to your choices.
Example – Suppose the account name is Colin and the password is 1234. The command will be –
net user Colin 1234
]
After that, close the Command Prompt. Now, you can sign out from your system and login using the new credentials.
Fix 3 – Using the Computer Management
There is another way you can use Computer Management to create a new user account on your system.
1. At first, right-click on the Windows icon and tap on “Computer Management” to access it.
3. When the Computer Management opens up, select the “Local Users and Groups” on the right-hand pane.
4. After that, right-click on the “Users” and tap on “New Users…“.
5. Now, type your user name, full name. Then, put your password and confirm the password.
6. After that, tap on “Create” to create a new account.
7. After that, double click on the “Users” folder on the left pane.
8. Here, you will find the list of users on the right-side pane. Here, you will see your new account.
This way, you have successfully created an account.
Fix 4 – Disable running services
You can disable all the running services and restart your system. Then, try to add a new account.
1. At first, press the Windows key+R keys together.
2. Then, type this command and hit the Enter key.
msconfig

3. In the System Configuration window, click on the “General” tab.
4. After that, toggle the “Selective startup” option and then check the “Load startup items” option.
5. Next, head on to the “Services” section.
6. Here, you have to check the “Hide all Microsoft services” option in the list.
7. After that, click the “Status” of the service. This will show up all the ‘Running’ services from the top.
8. Just, check all those running services and tap on “Disable all“.
You have just removed all the running apps from starting up automatically.
9. After that, click on the “Startup” tab.
10. Now, click on “Open Task Manager“.
Task Manager will open up.
11. Simply, right-click on the apps one by one and tap on “Disable” to disable all unnecessary apps from starting up.
Once you have disabled all the apps, close the Task Manager.
12. Don’t forget to tap on “Apply” and then on “OK“.
Almost immediately system will send you a prompt to restart the system.
13. Just, click on “Restart” to reboot your system immediately.

Once the system restarts, try to add an account from the Settings, normally. This should solve your problem.
Fix 5 – Replace corrupt Default folder
This error may also happen due to a corrupt Default folder in your PC.
In another PC just go to C:\users\ and copy the Default folder from there.
Now, in the computer you rae facing this issue, Just replace it with this Default folder. Do not forget to take a backup of Default folder before replacing it.

Also, make sure files are not hidden on your Windows PC before doing it.


