Quick Access is always displayed when you open your File Explorer which displays the files accessed by you recently as well as those folders that are used frequently by you. This list changes over time as you access different folders. Many users have reported that they have been not been able to use the Quick Access Menu in Windows. The main problem in this issue is the items in the Quick Access Menu are not visible. Also, some users have reported that when they try to click or expand this Quick Access menu they are displayed an error.
If you are one of them confronting this issue with your Windows PC, then you have reached the correct location. In this article, we have listed some solutions that have been used by others to fix this issue.
Fix 1 – Remove the contents in Quick Access Folders
AutomaticDestinations and CustomDestinations are two folders that have data files, that help in keeping the Quick Access Menu in a working state. Many users have reported that deleting the files present in these two folders has helped them reinitiate the Quick Access Menu.
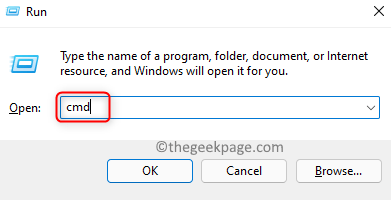
1. Open the Run dialog using the Windows and R keys on your keyboard.
2. Enter cmd and hold the Ctrl + Shift + Enter keys simultaneously to open the Command Prompt as an administrator.
3. If you are prompted by User Account Control then click on Yes.
4. Enter the commands below and execute them one after another.
del /F /Q %APPDATA%\Microsoft\Windows\Recent\AutomaticDestinations\*

del /F /Q %APPDATA%\Microsoft\Windows\Recent\CustomDestinations\*
5. Exit the command prompt.
6. Reboot your PC. Check if the problem is fixed.
Fix 2 – Change the File Explorer’s Privacy Options and Clear the History
1. Press Windows + E to open the File Explorer.
For Windows 10
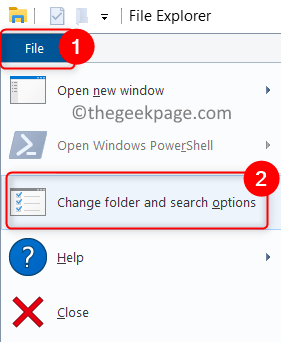
2. Click on the File menu at the top left.
3. Choose the Change folder and search options in the menu list. Go to Step 4.
For Windows 11
2. Click on the three horizontal dots on the command bar at the top.
3. Choose Options in the list that appears.
4. In the Folder Options window, select the General tab.
5. Under the Privacy section, check the boxes associated with the two options Show recently used files in Quick access and Show frequently used folders in Quick access.
6. Now click on the Clear button at the bottom to clear the File Explorer history.
7. Click on Apply and then on OK to save the changes.
8. Reboot your computer and check if the Quick Access menu is functioning as expected.
Thank you for reading.
We hope this article has been informative to help resolve this issue on your PC. Comment and let us know the fx that helped you.


