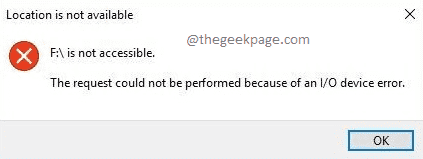
One very frustrating error that many Windows users keep on reporting is the I/O device error. I/O stands for Input/Output. So an I/O device error means there is an issue with reading/writing from/to your hard disk. This error shows up on devices like USB, external hard disk, HDD, SDD, DVD, CD etc. Once this error shows up, you will not be able to copy data to or from this device.
There are many reasons why you could be getting an I/O device error. Try out the methods listed one after the other to fix your issue.
Method 1: Change Driver Letter
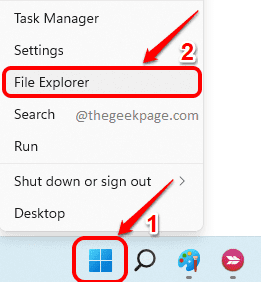
Step 1: Right click on Windows icon and then click on File Explorer option.
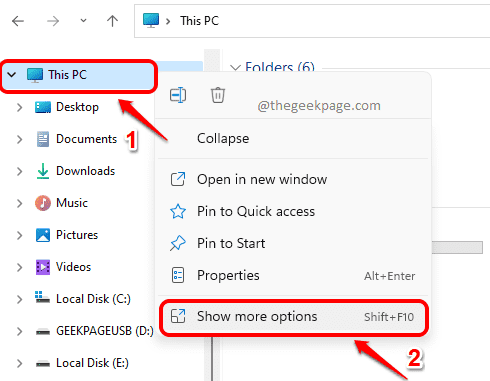
Step 2: Right click on This PC from the left pane of the window first and then click on Show more options.
Step 3: From the menu that expands out, click on Manage option.
Step 4: As next, under Storage tab, click on Disk Management option.
In the right window pane, find the Disk section for your hard disk and right click on it. From the right click context menu, click on the option that says Change Drive Letter and Paths.
Step 5: As next, click on the Change button in the window that follows.
Step 6: Click on the drop down menu associated with the radio button Assign the following drive letter and choose a new letter for your drive. Click on OK button once done.
Method 2: Run Disk Repair Scan
Step 1: Click on the Search icon in the taskbar.
Step 2: In the search window that follows, type in cmd and click on the Run as administrator option.
Step 3: As next, copy & paste the following command and hit Enter key to run the CHKDSK scan.
chkdsk /f <Drive_Letter_of_Hard_Disk_Drive>:
Note: Please don’t forget to replace <Drive_Letter_of_Hard_Disk_Drive> with the actual drive letter of your hard disk drive that is showing error.
Method 3: Update Device Driver
Step 1: Launch the Run window by pressing the keys Win and R together. Type in devmgmt.msc and hit the OK button.
Step 2: When the Device Manager window opens up, expand the section Disk drives and right click on your hard disk drive.
From the right click context menu, click on the option Update driver.
Step 3: In the window that follows, click on the option that says Search automatically for drivers.
That’s it. Wait for the process to finish and check if your issue is resolved after that.
Method 4: Reinstall Device Driver
Step 1: Just like in the previous method, launch the Device Manager through the Run window.
For that, open Run window by pressing Win + R keys together. Once it opens up, copy & paste devmgmt.msc and hit Enter key.
Step 2: In the Device Manager window, expand the section Disk drives. Right click on the hard disk drive and click on Uninstall device option.
Step 3: When the Uninstall confirmation window comes up, click on the Uninstall button.
If you are still facing troubles on this, drop us a message in the comments section. Thank you for reading.


