Games are most enjoyable when you play them in full-screen mode. But, sometimes you may have noticed black bars appearing on the top and bottom parts of the game screen. The black bars are resultant of just aspect ratio mismatch. Go through these workarounds and main solutions to understand the issue and quickly resolve it.
Workarounds –
1. There are the mainstream aspect ratios of 16:9 and 4:3, 18:6. Usually, in-game cinematics and some older games have a different aspect ratio that leaves two horizontal black bars on the top and bottom part of the screen. It is completely normal and you can’t do anything about it.
2. Restarting the game may help you resolve the black bar issue.
3. Press the Ctrl+Alt+F11 keys together while playing a game to make it full screen. This does affect all the other items on the screen as well as the resolution of the entire system gets changed.
Fix 1 – Check the monitor resolution
The monitor resolution is the most vital while you are playing games.
1. You can check and reset the monitor resolution from the Settings page.
2. So, you have to press the Win key+I keys together.
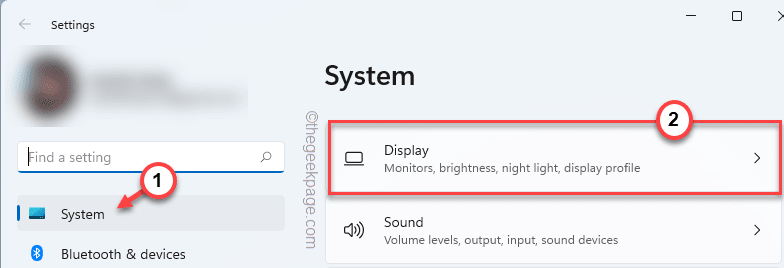
3. When you reach the Settings page, click on the “System“.
4. Now, click on the “Display” from the right-hand pane.
5. On the right-hand pane, if you scroll down you will find display settings.
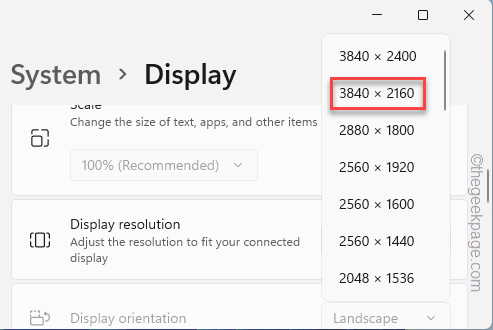
6. So, click on “Display resolution” and set it either to the maximum resolution allowed or just opt for the recommended resolution.
[In this case, it is “3840*2160p“.]
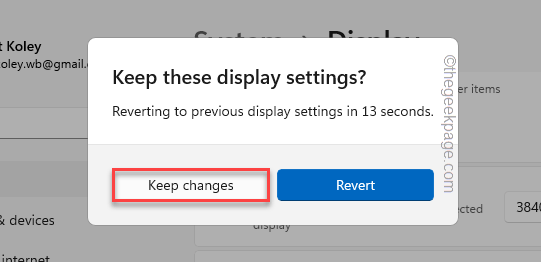
7. You will see this prompt ‘Keep these display settings?’, tap “Keep changes” to confirm the resolution change.
8. Orientation of your screen also plays a part in the aspect ratio.
9. Generally, it is set to “Landscape” mode. If you are using the monitor upside down, set it to the “Horizontal” mode.
Once you have altered the resolutions and other settings, launch the game in which you were facing this problem. This game will expand to cover the full screen of your screen.
Fix 2 – Rectify in-game resolution settings
If setting your screen to the recommended resolution doesn’t launch the game without black bars, you have to tweak the in-game settings to do so.
1. Launch the game.
2. Once the game launches, go to the “Options” or “Settings“.
3. Now, go for the “VIDEO” settings.
4. Here, look for the “Resolution” of the game video.
5. Just, set it to the maximum resolution possible.
Now, save the game settings. Now, you won’t notice any black bars around the game screen. In some older games, you may have to relaunch the game to make sure it takes effect.
Fix 3 – Run the game in Fullscreen mode
If you have set the game to launch in Windowed mode, you have to run the game in fullscreen mode.
1. Launch the game and open the “Settings“.
2. On the Settings page, navigate to the “VIDEO” tab.
3. Here, go to the “GENERAL” tab. You may find additional settings like “Display Mode“.
3. Set it to “Fullscreen” from the drop-down menu.
Just save the game settings and check whether the black bars are appearing or not.
4. Now, in some games, you may find additional options that may help you resolve this issue.
5. In Valorant, there is an option called the “Aspect Ratio Method“. Setting it to “Fill” settings should adjust the aspect ratio dynamically to your screen.
6. Next, tap “Apply” to save the changes.
This way, the game will run without any black bars at all. This should have solved your problem.
Fix 4 – Set the game in maximized mode
You can additionally set the game to run in fullscreen mode.
1. Go to your desktop to locate the game shortcut.
2. Right-click on the game shortcut file and tap “Properties“.
3. When you have access to the game Properties page, navigate to the “Shortcut” tab.
4. Here, you will find the ‘Run:’ command. Set it to “Maximized” from the drop-down settings.
5. Don’t forget to tap “Apply” and “OK” to apply and save this change.
After that, launch the game once and check if this works out for you.
Fix 5 – Override the scaling mode
[FOR NVIDIA CARD USERS]
1. Search for the “NVIDIA Control Panel” using the search box.
2. Then, tap “NVIDIA Control panel” to tap it.
3. Once the NVIDIA Control Panel opens up, tap on the “Adjust desktop size and position“.
4. Then, on the right-hand pane, choose “Full-screen” as the default scaling mode.
5. Now, you have to tick on the “Override the scaling mode set by games and programs” box.
6. Finally, to apply this effect, tap “Apply” the modification.
Now, open the game and check whether the game is launching in full-screen mode and without the black bars on the screen.
Fix 6 – Change the scale settings
[FOR INTEL GRAPHICS CARD USERS]
1. Search and launch the Intel HD Graphics Control Panel on your laptop.
2. Once that opens up, go to the “General Settings” from the left-hand side pane.
3. Once you have opened it, click on the “Display” settings.
4. After that, tap the “General” settings on the left-hand pane.
4. Now, on the bottom side of the screen, check the “Scale Full Screen” box.
5. After that, tick the “Override Application Settings” box.
6. To save this change, tap “Apply” to save these settings.
After that, relaunch the game and check if this works.
Fix 7 – Update the graphics card driver
If you haven’t updated the graphics card driver in a while, try updating it, and then, try relaunching the game.
Using the Device Manager
1. Open the Run terminal by pressing the Windows key+R.
2. Write this and tap “OK“.
devmgmt.msc
3. Next, click the “Display adapters” section.
4. Here you will find the NVIDIA card. Then, right-tap it and click the “Update driver” option to update the driver.
5. Coming on to the next page, choose “Search automatically for drivers” to let it search and install the graphics card on the system.
Just wait for a while. If you see the “The best drivers for your device are already installed.” follow the next method to update the graphics card driver.
Close the Device Manager screen and restart the machine.
Using the NVIDIA GeForce Experience
If you can’t update the card using the Device Manager, try this approach.
1. At first, launch the GeForce Experience app.
2. Now, head on to the “DRIVERS” section.
3. It will now determine the latest version of the graphics card driver. Then, tap on “DOWNLOAD” to download the latest version of the driver.
This will commence the downloading process.
4. Once it is done, tap on “CUSTOM INSTALLATION“.
This will let you take full control over the installation process.
5. In the next step, just tick the “Perform a clean installation” tab and click “Next“.
NVIDIA wil now installs the graphics card on your system. After that, you have to restart your system once.
After restarting the system, launch the game and it will launch without the black bars.
Fix 8 – Run the hardware troubleshooter
If none of the solutions have worked for you, it can be a hardware issue and you should run the hardware troubleshooter to fix this black bar problem.
1. Press the Win key+R keys together.
2. Next, write down this line in the Run box and click on “OK“.
msdt.exe -id DeviceDiagnostic
This will open up the Hardware and Devices page.
4. You can find the “Advanced” option in the bottom left corner. Click it once.
5. On the next step, just tick the “Apply repairs automatically” box.
6. Then, tap “Next” to proceed to the next step of the solution.
Now, just follow the on-screen instructions to follow up and solve the hardware issues. Apply the fix Windows recommends. Once you have completed the steps, relaunch the game and test if this solution has worked.


