Microsoft keeps releasing different updates for its Widows 10 build every now and then, which includes feature additions or upgrades, updates in Windows Defender, security patches and more. These updates are important to keep your system running smoothly at all times and to keep it safe and secure from any malicious attacks.
However, there may be instances, when you get this unexpected error code: 0x800f0831 during the installation of the Window 10 update. It can be annoying because if you miss the update, it can slow down your PC. However, there are a couple of methods which can help you to fix the issue. Let’s see how.
Method 1: Using MSCONFIG
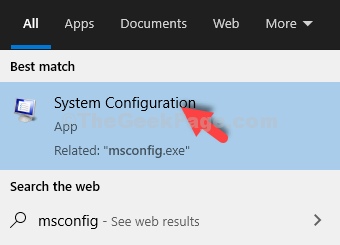
Step 1: Go to the Start button on your desktop and type msconfig in the search field. Click on System Configuration.

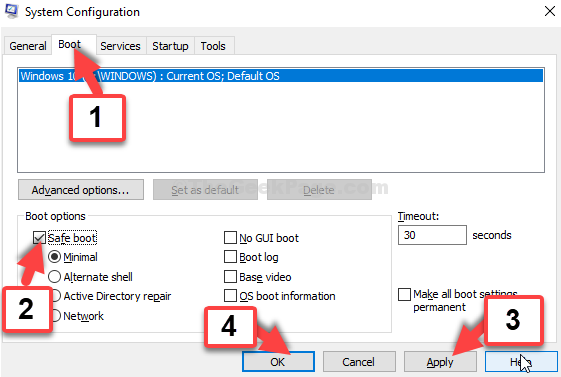
Step 2: In the System Configuration window, select the Boot tab. Go to the Boot options section and check the box next to Safe boot. Press Apply and then OK.

Step 3: Now, in the prompt that appears, click on Restart to reboot the system in Safe mode.
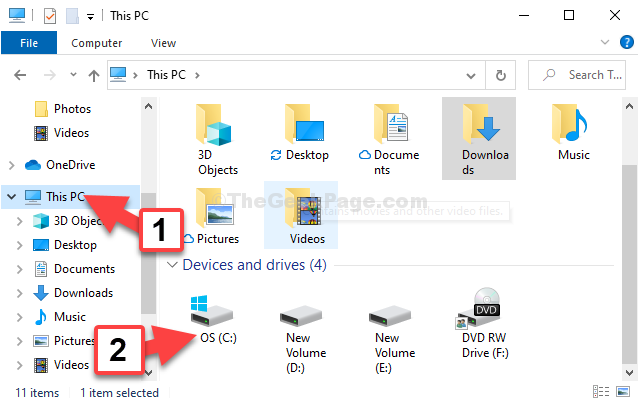
Now, in the as the system starts in safe mode, press the Windows + E keys together on your keyboard to open the File Explorer. Click on This PC shortcut on the left and then click to open C drive on the right.

Step 4: Now, navigate to the below path step by step:
- Go to the Windows folder
- Go to SoftwareDistribution
Now, right-click on the SoftwareDistribution folder and click on Delete in the context menu to delete the folder.

Step 5: Now, repeat the Step 1 to open the System Configuration window. Select the Boot tab, go to Boot options, and now, uncheck the box next to Safe boot.
Press Apply, then OK, and in the prompt click Restart, This will reboot the computer in normal mode.

Now, as your system reboots, the error should be gone and you can easily install the Window update. If it still shows the error, try the 2nd method.
Method 2: By Downloading ISO Installation Media
Step 1: Go to Google and search for Windows 10 ISO installation media and hit Enter. Click on the 1st result from Microsoft.

Step 2: In the Microsoft official download page, go down and under Create Windows 10 installation media section, click on Download tool now.
Click on the set up file to start with the upgrade.

Step 3: In the Windows 10 Setup window, select Upgrade this PC now and click on Next. Now, follow the instructions further to complete the Windows 10 upgrade.

That’s it. Now, your Windows 10 PC is upgraded and you would not see the error anymore.