While running the Intel Graphics Driver installer file on your computer, you have seen this error “Something went wrong. Your system has a driver that is locked to manufacturer specifications. Please try downloading the latest driver from the manufacturer’s website to update. Exit code 1”. This error appears when the existing graphics driver is locked to the manufacturer’s preset specifications. It is usually done due to security reasons. Don’t worry. There is a specific way you can fix the problem and install the graphics driver manually.
Fix 1 – Download the driver installer and install it
Download the graphics driver for your system, disconnect from the internet, and use the driver installer to install the latest driver.
Step 1 – Check the processor, OS version
Run a check for the system processor and the OS version so that you can get the right driver for your system.
[You can skip these steps if you have already downloaded the Intel Graphics driver, you can skip these steps. ]
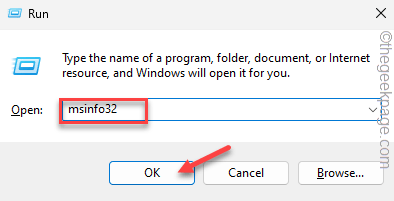
Step 1 – Open a Run panel using the Win key+R.
Step 2 – Then, type this and click “OK“.
msinfo32

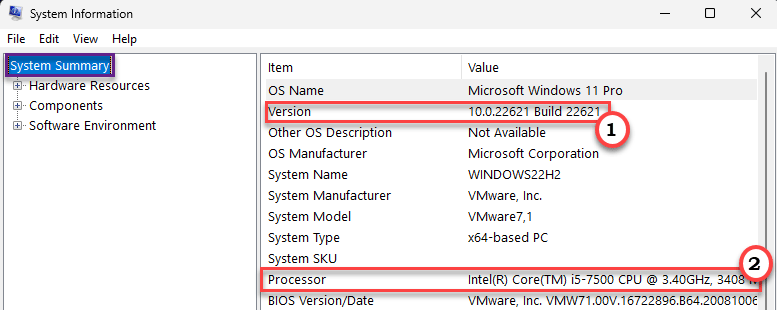
Step 3 – Let the “System Summary” be on the left-hand section.
Step 4 – Then, on the right-hand section, check the OS “Version” and “Processor” information.
[You must have Windows 10, 64-bit, version 1709 (also known as “Redstone 3”) or higher. The processor side requires Intel 6th generation or later processor.]
If your system specifications match these, you can proceed to download the latest Intel Graphics Driver.
Step 2 – Download the latest Intel Graphics driver
You can download the latest Intel Graphics driver according to your system specifications from the Intel website.
Step 1 – Now, based on the Intel processor generation or the Intel graphics card version, go ahead to these links –
Integrated graphics with the 6th generation to 10th generation Intel® Processors
Intel® Arc™ Pro discrete graphics
The driver package is quite large in size. So it may take a while to download it.
After downloading it, you can exit the browser.
Step 3 – Install the graphics driver
Now disconnect from the internet and run the driver package to install the latest Intel Graphics driver.
Step 1 – Disconnect the device from the internet.
This is a cautionary measure to ensure Windows doesn’t automatically start to download or install the graphics driver from the OEM.
Step 2 – Now, open the File Explorer using the Win key+E.
Step 3 – After this, head on to the location of the downloaded package file. There, double-tap it to start the process.
Step 4 – Now, click “Begin installation” on the first page.
Step 5 – After this, accept the agreements of the installation process.
Step 6 – Once you reach the Install phase, tap the “Customize” button to explore that.
Step 7 – Now, make sure not to check the “Execute a clean installation” checkbox.
Step 8 – Go ahead and finish the driver installation phase.
Step 9 – Finally, when the driver is installed on your system, you will be asked for an optional system restart. Click “Optional reboot“.
Your computer will restart automatically.
Step 10 – When the system boots up normally, use the Win key and the I keys together.
Step 11 – Then, select “Windows Update” from the left pane.
Step 12 – After this, click “Check for updates“.
If the graphics driver requires any OEM-fetched customization, it will receive those from Windows Update.
Fix 2 – Update the Intel graphics using Device Manager
You can use the Device Manager to update the Intel graphics card driver.
Step 1 – Type “device” in the search bar.
Step 2 – You can easily click “Device Manager” to open it up.
Step 3 – Wait for the Device Manager to load up all the drivers. Then, expand the “Display adapters“.
Step 4 – Then, right-click the Intel card and click “Update driver“.
Step 5 – On the next page, click on “Browse my computer for drivers“.
Step 6 – In the following step, click “Let me pick from a list of available drivers on my computer“.
Step 7 – A list of display drivers will appear. There, select the “Intel HD graphics driver“.
Step 8 –Then, click “Next” to install that graphics driver.
Wait until Windows install the latest driver on your computer. After this, you can go ahead and exit Device Manager, and restart your system.
This should have installed the latest driver.
Fix 3 – Directly download from the OEM
The final solution for this issue is to directly download the graphics driver from OEM (device manufacturer’s) website and install the graphics driver.
Usually, all the OEM websites have a driver repository for all the device models.
Step 1 – Go to the OEM manufacturer’s website. We have given direct links to
Step 2 – Head on to the Drivers section. There, specify the device model you have.
Step 3 – Find out the Intel HD graphics driver for your system. Download the latest graphics driver for your device.
Step 4 – Finally, just run this driver installer to update the graphics card to the latest version.
When it is done, it will prompt you to restart your computer. Do restart it.
This way, you won’t see the “Something went wrong. Your system has a driver that is locked to manufacturer specifications.” error again.

