Windows 10 & Windows 11 has in-built settings with which you can easily project your desktop screen to another external screen. But sometimes while doing so, you may notice that ‘Your PC can’t project to another screen’. Try reinstalling the driver or using another video card’ has appeared on your screen. This problem actually happens due to a corrupted graphics driver on your device.
We have discussed some easy solutions to solve this issue.
Fix 1 – Uninstall the existing graphics driver
Uninstalling the bad graphics card from your system should fix this issue.
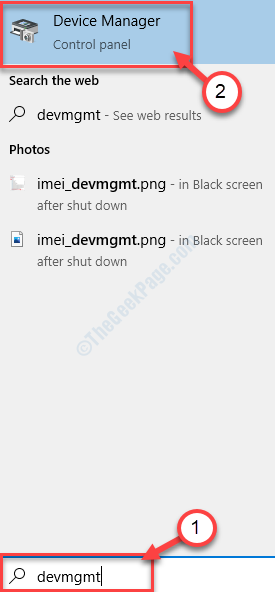
1. Search for “devmgmt” from the search box.
2. After that, click on the “Device Manager“.

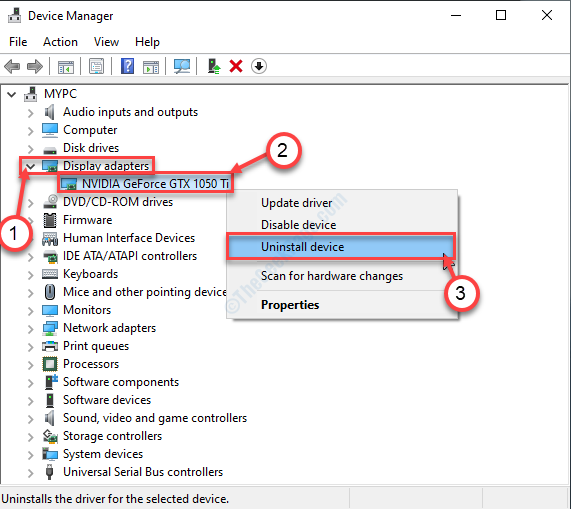
3. When the utility window appears on your screen, click on the “Display adapters“.
4. After that, right-click on the problematic graphics adapter. Then, click on the “Uninstall device“.

5. If you encounter an additional prompt for confirmation, click on “Uninstall“.

Once the driver is uninstalled from your system, close the Device Manager.
Then, restart your device.
This should fix the issue.
Fix 2 – Update graphics driver
Updating the graphics driver should solve this issue.
1. Press Windows key+X.
2. After that, click on “Device Manager“.

3. As the Device Manager will appear, expand ‘Display adapters’ again and then right-click on the graphics adapter.
4. After that, click on “Update driver“.

5. Then, choose the “Search automatically for updated driver“.

Just wait for the installation process to be complete.
Fix 3 – Manual Installation of your graphics driver
If the above fixes didn’t work out for you, manually installation
1. At first you need to search “Nvidia drivers“.
2. Once the search results appear, click on “Download Drivers|NVIDIA“.

3. Then, you need to choose the exact specification of your graphic driver. Simply click on the drop-downs of the particular settings like ‘Product Type’, ‘Product series’, etc, and choose according to your graphics driver.
4. After setting those, click on “SEARCH“.

5. You will notice that the latest version of the driver has appeared.
6. After that click on “Download“.

6. After the driver is downloaded on your device, close the browser window.
7. Then, double-click on it to start the installation process of the driver.

8. Then click on the radio button beside the “NVIDIA Graphics Driver and GeForce Experience” option.
9. Then, click on “Agree and continue“.

10. In the Installation Options screen, click on the “Express (Recommended)”
11. Finally, click on “Next” to start the installation process.

12. Once the installation is done you will notice ‘NVIDIA Installer has finished’ message.
13. Click on “Close” to close the window.

Reboot your computer to complete this installation process.
Try projecting your screen to the external monitor.
Fix 4 – Install the latest graphics driver
Installing the latest graphics driver on your device should work out for you.
1. Search for the “GeForce Experience” from the search box.
2. After that, click on “GeForce Experience” in the search results.

3. When the GeForce Experience appears, click on the “Drivers” tab.
4. Now, click on “CHECK FOR UPDATES“.

5. To download the latest version of the driver, click on “Download“.

Let this download the driver on your computer. Wait patiently for a few minutes.
6. Once the downloading process has finished, you will see two options “Express Installation” and “Custom Installation”.
7. Simply choose “Express Installation“.

Now, GeForce Experience will install this latest driver on your device.
This should take up to 5-10 minutes.
7. In a few minutes you will notice that the “Installation Complete” message has appeared.
8. Then, click on “Close“.
Reboot (if required) your computer to save the changes. Then try to project your screen to the external one.