The updates are the most important part of any operating system because updates make the computer more secure and up to date.
Many users have reported that they could not update their computer because the update package does not start to download and rather gives an error 0x80070542. The error is caused by some misconfigured files on the computer, we have found some solutions that will work for you and you can download your windows update again.
Solution 1 – Windows components service console
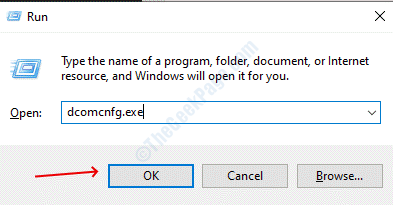
STEP 1 – Press Windows and R keys at the same time to open the run dialogue box. Type dcomcnfg.exe in the textbox of the run dialogue box and then hit the enter button. The command will open up the component services once you press yes to the user account control prompt.

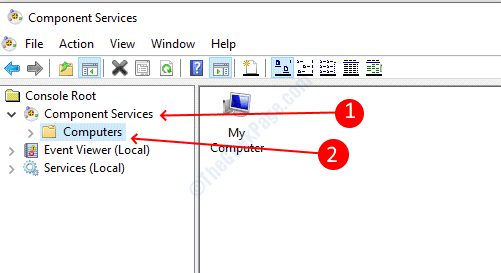
STEP 2 – Expand Component services from the left pane, under that select Computers.

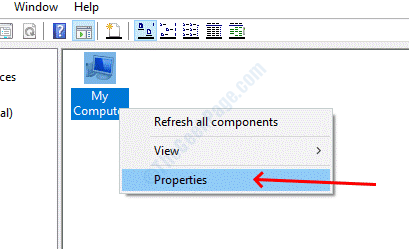
STEP 3 – Once you select computers you will find My computer in the middle pane. Select My Computer, right click on it and then select properties.

STEP 4 – Head to the Default Properties tab and Choose connect from the drop down menu on the Default authentication level option.

STEP 5 – In the Default Impersonation Level, select identify option from the drop down.

Click Ok to save the settings and then close the component services window. Restart your computer to apply the changes and check that you can update your windows or not.
Solution 2 – Run Deployment Imaging and Servicing Management service
The Deployment Imaging and Servicing Management (DISM) is a service that can be invoked in the command prompt which helps to restore the corrupted files. Follow the steps below to run the DISM tool.
STEP 1 – Open Run dialogue box pressing Windows + R, type cmd in the textbox and then press enter. The command will open the command prompt window.

STEP 2 – In the command prompt window, type the following command and then press enter to execute the command.
Dism /Online /Cleanup-Image /RestoreHealth

It will take some time according to the size of your disk and corruption level, wait for it to complete and then restart the computer once it finishes.
Solution 3 – Run Background Intelligent Transfer Service Troubleshooter
Background Intelligent Transfer Service (BITS) is one of the main service responsible for the updates of the Windows operating system. Windows is aware that sometimes the service does not as it should and hence they have made a special troubleshooter for the BITS. The troubleshooter will help if there is an issue with the BITS service.
STEP 1 – Download Background Intelligent Transfer Service Troubleshooter from the Microsoft website.
STEP 2 – Double click on the downloaded file to run the troubleshooter program
STEP 3 – Follow the on screen instruction and it will automatically fix them if it finds any corruption in your operating system.
Solution 4 – Perform System File Checker
System file checker checks for corruption in the file system and if it finds any corruption in the system it removes it and replaces it with the original version. So, if your files get corrupted system file checker can solve your issues.
STEP 1 – Press the Windows button and search for command prompt, right click on the first result and then select run as administrator.

STEP 2 – Press Yes on the user account control prompt.
STEP 3 – Type the following command in the command prompt windows and then press enter to execute the command.
sfc /scannow

Wait for the scan to complete, it will take some time to scan the whole system for corruption. Once the scan gets completed close the command prompt window and reboot the system.
Solution 5 – Update Windows in Clean Boot
Many users could download the update after booting into the clean boot state. In clean boot state the computer boots with minimal services and drivers so it would be easy to windows. Follow the procedure below to boot in the clean state.
STEP 1 – Press Windows and search for msconfig and then hit enter to open the system configuration utility.

STEP 2 – Select Selective startup, check load system services under it and uncheck the load startup items.

STEP 3 – Switch to the services tab, check the checkbox titled hide all Microsoft services and then click on disable all button. Click Ok to save the Settings

STEP 4 – Restart your computer, It will boot into the clean boot state. Download update from the Windows Update and again reboot your computer you will boot into the normal mode.