While working on a Local Area Connection (LAN) network, you try to share a specific folder or drive on your computer and you encounter an error “Windows Cannot Access \\ Computer Name“, it’s either due to missing network permissions, incorrectly installed Network Drivers, or simply due to a fault in Windows Registry. It has been noticed that the error usually arises just after you have created a new LAN connection in your network. So, whenever you try to open the the shared folder or drive, the error shows up.
Moreover, this error can occur even when you try to open network files. While, this is an annoying error, fortunately, it can be fixed. Let’s see how.
Method 1: Enable Share Folder Option Through File Properties
Check the sharing settings of the file or the folder you want to open in its Properties.
Step 1: Right-click on the folder and click on Properties.

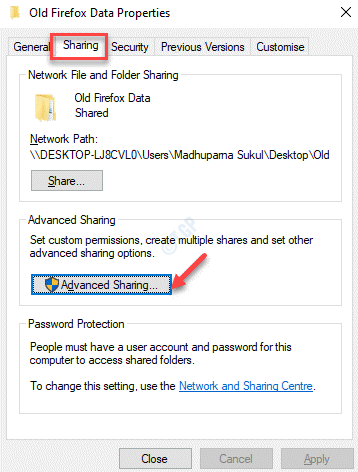
Step 2: In the folder Properties window, select the Sharing tab and click on the Advanced Sharing button.

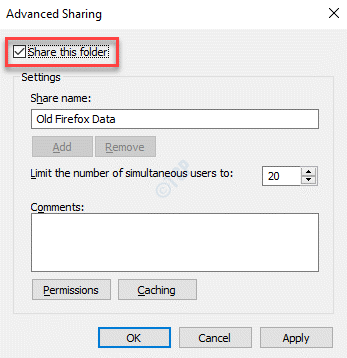
Step 3: In the Advanced Sharing dialogue box, check the box next to Share this folder option.
Press Apply and then OK to save changes and exit.

You can now try and open the folder or the drive and it should open normally.
Method 2: Set the Folder Permissions for Everyone
Changing the sharing permissions to Everyone can also fix the issue with the LAN connections.
Step 1: Right-click on the problem folder and select Properties from the right-click menu.

Step 2: In the Properties dialogue box, this time, select the Security tab and press the Edit button.

Step 3: In the Permissions for folder, click on Add.

Step 4: It opens the Select Users or Groups window.
Go to Enter the object names to select field and type Everyone in the box.

Step 5: Click the Check Names button next to it and the text (Everyone) gets underlined.
Press OK to save changes and return to the Permissions window.

Step 6: In the Permissions window, go to the Group or user names field and select Everyone.

Step 7: Now, go to the Permissions for EVERYONE section and check all the boxes under the Allow column (Full control, Modify, and Write).
Press Apply and then OK to save the changes and return to the Properties dialogue box.

Step 8: Hit the Apply button and then OK again to save the changes and exit.
Now, go to the folder you were trying to open and it should open now. without showing any error.