Is the webcam on your computer stuttering or freezing up every few minutes? Don’t worry. If you are facing this issue, just enact these easy fixes to solve the problem on your computer.
Fix 1 – Edit the registry
You have to edit the registry to fix this issue.
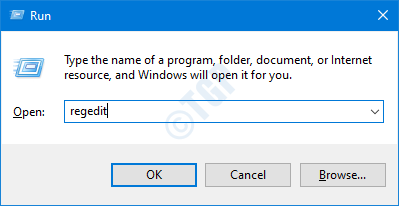
1. At first, just press the Windows key+R keys together.
2. Then, type “regedit” and click on “OK“.

Important– Registry Editor is a very delicate location on your system. Before heading on to modify the registry, we request to make a backup of the registry on your computer.
If you haven’t backed up the registry, after opening the Registry Editor, click on “File“. Then click on “Export” to make a new backup on your computer.

3. After taking the backup, go to this location-
HKEY_LOCAL_MACHINE\SOFTWARE\Microsoft\Windows Media Foundation\Platform
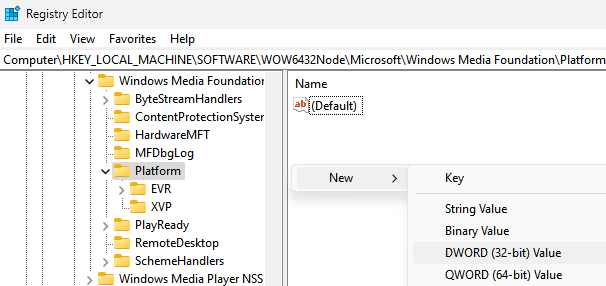
4. On the right-hand side, right-click on the space and click on “New>“.
5. Choose the “DWORD (32-bit) Value” from the list.

6. Then, name this new value as “EnableFrameServerMode“.
7. After that, double click on this value to edit it.

8. Then, set the value to “0“.
9. After that, click on “OK“.

[
NOTE –
These steps are only for Windows 64 bit users.
1. In the Registry Editor, go here –
HKEY_LOCAL_MACHINE\SOFTWARE\WOW6432Node\Microsoft\Windows Media Foundation\Platform
2. The same way as before, right-click on the space and click on “New>” and further choose the “DWORD (32-bit) Value” from the list.

3. Just name this value as “EnableFrameServerMode“.
4. After that, double click on this value to edit it.

5. Then, set the value to “0“.
6. After that, click on “OK“.

]
Now, close the Registry Editor. Restart your computer.
This should fix the problem with your computer.
Fix 2 – Make sure the Camera access is enabled
Check if your computer allows access to the camera.
Cae1 1 – For Windows 11
1 – Search Camera Privacy settings in Windows search box and click on it.

2 – Now, turn on Camera acess.
also , turn on Let apps access your camera.

Cae1 2 – For Windows 10
1. Press the Windows key+I keys together.
2. Then, click on “Privacy” settings to access it.

3. In the Privacy settings, click on the “Camera” settings on the left-hand side.
4. Then, on the right-hand side, under the ‘Allow access to the camera on this device’ option, click on “Change“.
5. Set the ‘Camera access for this device’ to “ON“.

Close the Settings window, use the Camera again.
Fix 3 – Uninstall the camera driver
Uninstalling and re-installing the camera driver should fix the problem.
1. First of all, press Windows key+R to open the Run window.
2. Once the Run window, type “devmgmt.msc” and then hit Enter.

3. Next, extend the “Cameras” section in the Device Manager window,
4. After that, you need to right-click on “Integrated Webcam” and then click on “Uninstall device” to uninstall the camera from your computer.

5. Finally, click on “Uninstall” to confirm the camera device uninstallation.

Wait till the computer uninstalls the webcam driver.
Follow these steps to install the webcam driver again.
Process 1–
At first, reboot your computer. Windows will install the uninstalled webcam driver itself.
Process 2–
If rebooting your computer didn’t install the camera driver then you have to install the driver yourself. Just follow these instructions to install the driver manually-
1. At first, open the Device Manager.
2. Now, click on “Action“. Then you need to click on “Scan for hardware changes“.

Switch ON the camera and check if the webcam is still disconnecting repeatedly.
Fix 4 – Run Windows Apps troubleshooter
If you are facing this issue with a Store app, try running the Windows Apps troubleshooter.
1. Just open up the Settings on your computer.
2. Once it is opened, click on the “Update & Security” settings.

3. Here, you have to click on the “Troubleshoot“.
4. Thereafter, click on the “Additional Troubleshooters“.

5. Next to that, click on “Windows Store Apps“.
6. Then, click on “Run the Troubleshooter“.

Windows Store Apps troubleshooter will now detect if there is any problem with the MS Store.

This will solve the problem you are facing. Test the webcam again.