Many Windows users have reported seeing an error that says “The User Profile Service Failed the Logon. User Profile cannot be loaded.” during the system startup. As soon as you type the password and hit the Enter key on the Windows log-on screen, this error message is displayed to you and you are not able to launch your default Windows user profile. You are redirected back to the log-on screen after seeing this message. This error is seen due to the default user profile being corrupted. You are not able to sign in to your PC as the corrupted user profile has taken over and the correct user profile is not able to load.
Are you one such user who is annoyed with this error message on your Windows 11/10 PC and is not able to log in to your user profile? Then, go ahead and dive into this article. By reading ahead, you will find some solutions that can help you repair the corrupted user profile and in turn overcome this problem on your PC.
Fix 1 – Restart Windows From the Lockscreen
One of the simplest solutions to fix the issue is to perform a restart or system shutdown from the logon screen.
1. Make sure you are on the Windows lock screen.
2. If you were using a guest profile to log in previously, then make sure to select the administrator profile.
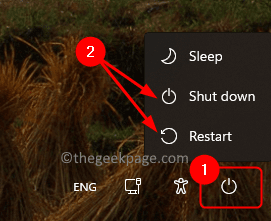
3. Click on the Power button at the bottom right corner of the lock screen.
Select either the option Shutdown or Restart.
4. After system startup, make sure that you sign in using the administrator profile.
Check if you are able to log on to your Windows PC.
Fix 2 – Modify Windows Registry in Safe Mode
You will need to go into the Safe mode to make use of this troubleshooting method to make changes in the Windows Registry.
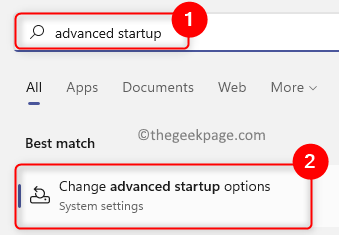
1. Hit the Windows key on your keyboard and type advanced startup in the Windows search bar.
Click on Changed advanced startup options in the search result.
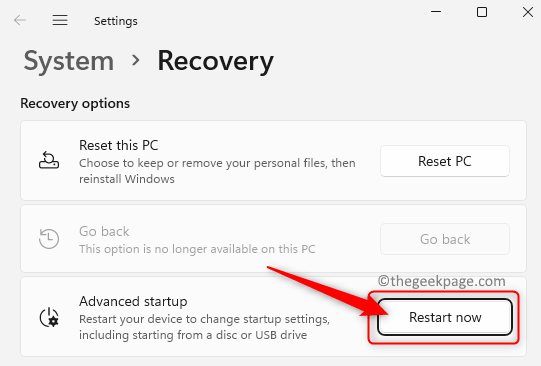
This opens up the Recovery page in system settings.
2. Click on the Restart now button in the box labeled Advanced startup.
This initiates an advanced system restart.
3. You will now see a blue screen after the restart.
On this page, click on the option Troubleshoot.
4. In the list of options in Troubleshoot, choose Advanced options.
Then, select Startup Settings in the Advanced options list.
Finally, click on the Restart button to initiate a system restart again.
5. Now, when the system restarts a list of startup settings will be displayed that can be selected using the Function keys (F1 – F9) or the number keys (1 – 9).
Choose the option by pressing the key (4 or F4) corresponding to Enable Safe Mode.
6. You need to sign in with your administrator account to start Windows in safe mode.
Now, press the Windows + R key to open the Run box.
Type regedit and hit the Enter key to open the Registry Editor.
Click on Yes when prompted by UAC.
7. Go to the location below or copy and paste it into the Registry Editor’s navigation bar.
HKEY_LOCAL_MACHINE\Software\Microsoft\Windows NT\CurrentVersion\ProfileList
8. Under the ProfileList key, look for entries to check if you can find any duplicates among them.
For example, similar names for the entries in the list but one of them has a .bak extension.
When you find such two entries, rename the entry with .bak extension to just .ba extension. Right-click on it and choose Rename.
Rename the other matching entry with a .bak extension.
Go back to the entry that you renamed to “.ba” extension and delete the extension here.
9. Make sure to select the entry in which you just removed the .bak extension.
Move over to the right side and look for the State key here.
Right-click on State and choose Modify.
In the Edit DWORD window, change the Hexadecimal Value Data field from a numeric value to 0.
Click on OK.
Right-click on the key RefCount and select Modify.
Change the Value Data field to 0 and click on OK to save the changes.
10. Close the Registry Editor.
Restart your computer in normal mode.
You must not be seeing the User Profile Service failed the logon error after the system startup.
Fix 3 – Delete the Local User Account
1. Once you log in using the incorrect user profile, press the Windows + R key combination to open Run.
Type netplwiz and click on OK to open the User Accounts window.
You will see an Advanced User Account Control window where you need to enter the admin password to continue with this process.
Note: If you see any error after entering the administrator password, then use Steps 1 – 5 in Fix 2 above to boot Windows in Safe mode.
2. In the User Accounts window, select the guest/user account in the list of users for your computer.
Click on the Remove button.
If you are logged in using the local account, the local profile will be removed.
Click on OK.
3. Press the Windows + L keys to come out of the local account log-on window.
Restart your PC in the normal mode.
Login back using your regular Microsoft account and check if the error is fixed.
Fix 4 – Move NTUSER.DAT File to Default Username Folder
NTUSER.DAT is a file created by Windows for each of the user profiles on your computer. This .dat file has all the information related to the user profile personalized settings. You will find the user profile folder inside C:\Users. If you are not able to log in to the system, make sure that you start your PC in safe mode using Steps 1 – 5 mentioned in Fix 2 above.
1. Open the File Explorer using the Windows + E key combination.
Type C:\Users in the navigation bar.
2. In the Users folder, find the required local account folder.
Double-click on this local account folder to open it.
Here, look for the NTUSER.DAT file.
Select this file and click on the Cut icon in the File Explorer command ribbon. Alternatively, you can press the Ctrl + X key combination.
3. Go back to C:\Users and open the folder with the Default username.
Now, tap on the Paste icon at the top to paste the .DAT file which was previously cut from the local account folder.
4. Back in the Users folder, select the local account folder and tap on the Delete (bin) icon at the top.
Reboot your computer and check if you are able to load the correct user profile without seeing any error message.
Fix 5 – Repair Windows User Profile Using Command Prompt
If the above methods failed in resolving the User Profile Service cannot be loaded error on your Windows PC, then you can try using the System File Checker (SFC) Scan and the Deployment Image Servicing and Management Tool (DISM) scan.
1. Hit the Windows key and type command prompt in the Windows search box.
Right-click on Command Prompt in the search result and choose the Run as administrator option.
2. Run the SFC command to repair the files that are corrupted in Windows as well as the user profile settings.
sfc /scannow
Wait for the scan to complete and fix any corrupted file on your PC.
Restart your PC and check if the problem is resolved.
3. If the error still persists, perform a DISM scan by executing the command below in the Command Prompt.
DISM /Online /Cleanup-Image /RestoreHealth
After the command execution, reboot your system and check if the problem is solved.
If even after trying all the above fixes, you are not able to log in to the system and the error message is being displayed then you will need to reset your PC to get back to the factory reset of your Windows OS. To perform a Reset of your Windows 11 PC, follow the steps given in this link.
Thanks for reading.
We hope that the troubleshooting methods in this article have helped you fix this error on your computer. Did you find this article informative? Please comment and let us know your thoughts and opinions on the same.


