While installing and using a few Windows apps from the Store, you may notice this error message – ‘The specified user does not have a valid profile error‘. This problem usually occurs due to a lack of proper permission of the WindowsApps folder or there are any third-party application is conflicting with the app process.
Preliminary checks-
1. Just reboot your computer once and then check the app once again.
2. Disable the antivirus (if any) and try to access the app once more.
Fix 1 – Update and Restart your PC
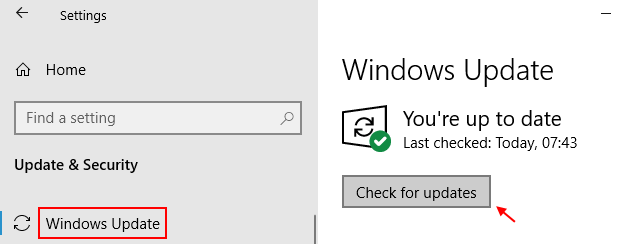
1. Click on start button and then settings icon to open settings.
2. Click on update & security.
3. Now, check for updates and update your PC , if there are any updates.

4. Restart your PC.
Fix 2 – Uninstall conflicting third-party apps
You can uninstall the conflicting third-party apps from the system to fix the issue.
NOTE –
According to the user reports, these are the two culprits causing this issue.
a. CloudPaging Player
b. Creo Trial (3D CAD software)
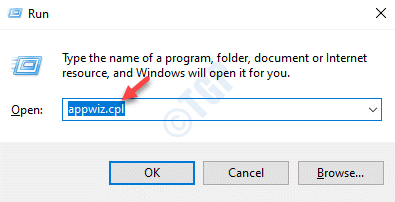
1. At first, press the Windows key+R.
2. Then, write “appwiz.cpl“. After that, hit the Enter key.

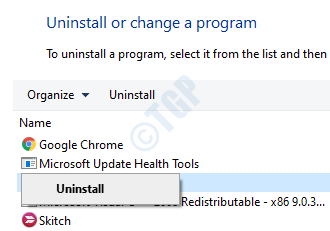
3. Right-click on the problematic application and click on “Uninstall“.

Once you have uninstalled this softwares, close the Control Panel window. Try to access the app once again. You can also use any other way to uninstall these apps.
Fix 3 – Uninstall and re-install the app
If nothing so far has helped you resolve the problem, try uninstalling the app from your device. Restart your machine. Then, install the application on your computer and again.
A fresh install of the application should solve the problem.
Fix 4 – Own the WindowsApps folder
As we have discussed, one of the main reasons behind this issue is the lack of proper permission of the WindowsApps.
Steps to view hidden folders
1. Press the Windows key+E keys to open the File Explorer screen.
2. Next, click on “View” on the menu-bar.
3. Then click on “Options“.

4. In the Folder Options window, go to the “View” tab.
5. Henceforth, check the option “Show hidden files, folders, and drives“.

6. After that, click on “Apply” and then on “OK“.

Steps to own the WindowsApps folder
1. First of all, open File Explorer by pressing the Windows key+E keys together.
2. Then, go to this location –
C:/Program Files
3. Next, right-click on the “WindowsApps” folder and click on “Properties” to access it.

4. After that, click on the “Security” tab.
5. Next, click on “Advanced” to change the advanced settings.

6. You will notice that the current owner of the folder is designated to ‘TrustedInstaller’.
7. You have to modify it. Then click on “Change“.

8. After that, click on “Advanced“.

9. Just, just click on “Find Now“.
10. Here you will find a list of users and groups. Then, scroll down through the list of groups or users and select your user name.
(For me, it is “Sambit” as it is my account name. )
11. Click on “OK“.

10. Finally, click on “OK” to change the ownership.

11. Then, check the box beside “Replace owner on subcontainers and object“. and click on “Apply“.

12. Next, you have to give full control of the folder to your account.
13. Here, click on “Add” to choose a principal.

14. After that, click on “Select a principal“.

15. Again, click on “Advanced“.

16. Again, click on “Find Now“.
17. Next, scroll down and select your account name (For this computer it is “Sambit“.)
18. Save the change by clicking on “OK“.

19. Click on “OK” to add this object.

20. Next, check the box beside the “Full control” option.
21. Then, click on “OK“.

22. Finally, click on “Apply” and then on “OK“.

23. In the Advanced Security settings click on “Enable inheritance“.

24. Coming back to the Advanced Security settings, click on “Apply” and “OK” to save it.

Close File Explorer screen. Restart your computer.
This will give the ownership of the Appdata folder to your account. Try to access the app again.
Fix 5 – Move the WindowsApps folder
Try moving the Appdata folder from the default location to another location on your computer.
1. Just press the Windows key+E keys together.
2. When the File Explorer opens up, go to this location –
C:\Program Files\WindowsApps
3. Then, right-click on the “WindowsApps” folder and click on “Cut“.

4. Go to the “Documents” folder.
5. Press the ‘Ctrl+V‘ to paste the “WindowsApps” folder there.

Once you have pasted the folder there, start the problematic app again. Now, this time while you start up the application, WindowsApps under the Documents folder will now have sufficient permission.
This should you solve your problem.