One of the rarest problems of the File Explorer on your Windows 10 is when a user tries to access the Start menu, icons disappear from the desktop and this error message shows up – ‘Explorer.exe system call failed’. This problem may occur due to various reasons. To fix this problem just enact these easy fixes on your system.
Workarounds–
1. Restart your computer once and check further.
2. Disable or uninstall the antivirus on your system.
Fix 1 – End the process and start ‘explorer’
Some users have noted if the process is killed and the explorer process is started thereafter, the problem solves.
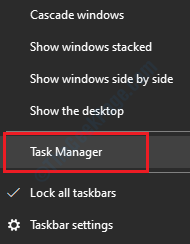
1. Press the Windows key + X keys together.
2. Then, click on the “Task Manager” to access it.

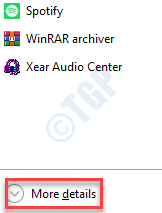
3. Once the Task Manager appears on your screen, click on “More details“.

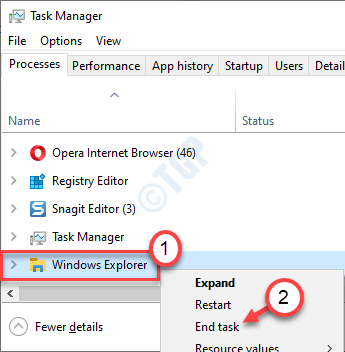
4. Right-click on the “Windows Explorer” process and click on “End task“.

5. Once you have done this, click on the “File” on the menu-bar.
6. Then, click on the “Run new task” to run a new task.

7. Write “explorer.exe” in the box.
8. Click on “OK“.

Explorer will open up. Restart your computer and further check if you are facing the issue again or not.
Fix 4 – Take care of IE errors
Sometimes the bugs of the Internet Explorer may cause this issue on your computer.
1. Go to any opened tabs on the Internet Explorer.
2. Try to close the Internet Explorer from the “X” button at the top on the menu-bar.

If you see an unresponsive tab on the Internet Explorer, do these steps –
a. Press the Ctrl+Shift+Esc keys together.
b. After that, right-click on the “Internet Explorer” process and click on “End task” to kill it.

c. Check out for more internet explorer processes in the same screen and end them.
Check if this helps you to resolve your problem.
Fix 3 – Run Error check
Run an error check process to fix the cause of this problem.
1. At first you need to press the Windows key and the ‘R‘ key from your keyboard.
2. When the Run window comes up, type “cmd” and press the Ctrl+Shift+Enter keys together.

3. To run a disk checking operation upon the next restart, paste this code into the terminal.
chkdsk c: /F
NOTE–
C: in the command line represents the drive where Windows is installed on your system. If Windows is installed on a different drive on your machine, change the drive letter of the drive containing Windows in the command and execute it.
Just close the CMD screen and reboot your computer once. Once your computer starts to restart, the disk checking process will begin.
Fix 4 – Run SFC scans
Try running the SFC scan on your system.
1. Click on the search box and start to write “cmd“.
2. Further, right-click on the “Command Prompt” and click on “Run as administrators“.

3. Paste this code in the terminal. Thereafter, hit Enter to run the scan.
sfc /scannow

SFC scan will commence.
4. To launch a DISM scan, write this command in the CMD terminal and then hit Enter.
DISM.exe /Online /Cleanup-image /Restorehealth

Let the scanning process to complete.
Fix 5 – Update the display driver
If the previous fixes don’t work out, try to update the display driver.
1. Press the Windows key+X keys together.
2. After that, click on the “Device Manager“.

3. Now, once the Device Manager opens up, expand the “Display adapter“.
4. Then, just right-click on your graphics card adapter and click on “Update driver“.

5. To search for the latest build of your graphics driver, click on the “Search for the updated drivers“.

This will allow your device to download and install the latest graphics card driver for your system.
Restart your computer once to let these changes take effect.
Fix 1 – Clean boot the machine
Clean booting the computer allows the system to boot without any third-party apps.
1. You need to press the Windows key+R keys together.
2. Then, type this code in the Run terminal. Click on “OK“.
msconfig

3. Simply go to the “General” tab.
4. In the second step, choose the radio button beside the “Selective startup” option.
5. Next to that, you have to tick the box beside the “Load system services.

6. Click on the “Services” section.
7. Next what you have to do is check the “Hide all Microsoft services“.
8. Finally, click on the “Disable all“.

This step will ensure that all third-party applications are disabled from starting up.
9. Just, click on “Apply” and then on “OK“.

If you see a prompt for restart, click on “Restart now” to restart your computer in clean mode.