Splwow64.exe is a system process that is created and managed by Windows. This process usually runs in the background, correlates with printer spooler services on your system, and manages printing operations. If you are facing any difficulties printing your documents and the error message contains “Splwow64.exe“, there is an issue, then you have to resolve the issue manually.
Workarounds –
1. The simplest form of workaround is to restart the system. Once the device boots up, sign in using your administrative account and retry printing.
Fix 1 – Check the Splwow64 timeout
You can manually modify the Splwow64 timeout value to manage it more efficiently.
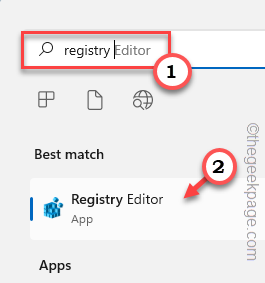
1. At first, you have to press the Win key from your keyboard and type “registry“.
2. You can just tap on the “Registry Editor” to access it.
3. When the Registry Editor opens up, you should create a backup. A single mistake in the registry and the system is done for!
So, to play on the safer side, do take a registry backup following these steps –
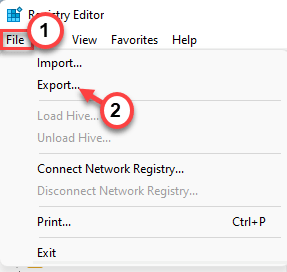
a. Once you are on the Registry Editor page, tap “File” and “Export“.
b. Now, store this backup file somewhere safe.
4. Once you have taken the backup, navigate to this place –
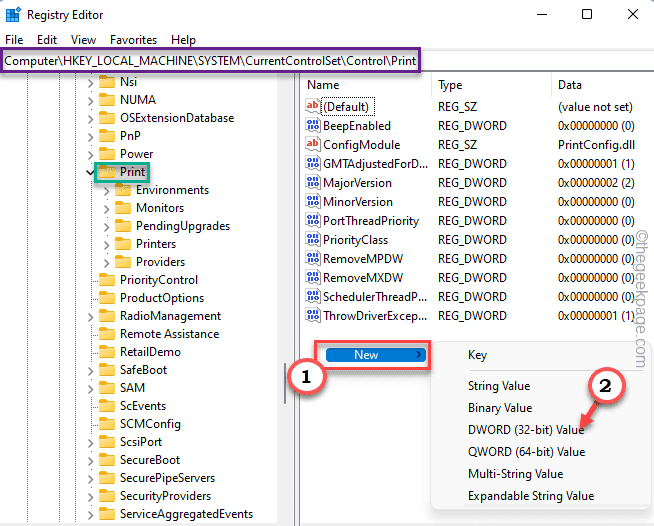
HKEY_LOCAL_MACHINE\SYSTEM\CurrentControlSet\Control\Print
5. Now, on the right-hand side, you have to create a new value.
6. Make sure that you have selected the “Print” key. Now, right-click on the space and tap “New>” and click on “DWORD (32-bit) Value“.
7. Now, name the word value exactly as this “SplWOW64TimeOutSeconds“.
8. Now, double-tap the value to modify it.
9. Now, set the value to “60” and click “OK” to save the changes.
After setting the value, close the Registry Editor screen. Then, you have to restart the system once to complete the process.
Once the machine boots up, try to print a test page and check if it is printing or not.
Fix 2 – Stop rendering print jobs
The printer connected to multiple computers may show up this error message as the client computer by default renders all the print jobs.
1. Just press the Windows key from your keyboard and the R key.
2. Then, type this line and click “OK“.
control printers
You will see the list of available printers and other devices connected to your system.
3. Now, just right-tap the printer and tap “Printer properties“.
4. When the printer properties page arrives, tap on the “Sharing” tab.
5. After that, in the ‘Share this printer’ section, uncheck the “Render print jobs on client computers“.
7. After that, to apply and save the changes, tap “Apply” and “OK“.
Now, just print a page using the printer and test if this works out for you.
Fix 3 – Clear Spooler files
Corruption in the Spooler cached folder may cause this problem.
1. Make sure that the printer is not printing anything before you
2. To do that, hit the Windows key from your keyboard and write down “cmd“.
3. Now, just right-tap the “Command Prompt” and tap on “Run as administrator“.
4. You have to halt the spooler service. So, execute this code.
net stop spooler
5. Now, press the Win key+E keys together.
6. Navigate to this section –
C:\Windows\system32\spool\PRINTERS
7. But, when you try to access the PRINTERS folder, you will see a warning message. Tap “Continue“.
8. Jus select all the contents inside the folder and press the “Delete” key to empty it.
You may close the File Explorer page after this.
Go back to the CMD terminal.
8. You may now start the spooler process. So, input these words and hit Enter.
net start spooler
Within seconds you will see this “The Print Spooler service was started successfully.” message has appeared on the terminal, you may close it.
Now, just reboot your computer. After that, you can print your
Fix 4 – Run the printer troubleshooter
Check if the printer troubleshooter can solve the issue.
1. Press the Win key and the I keys.
2. Now, click on the first option on the left pane “System“.
3. Now, on the left-hand side, click on the “Troubleshoot“.
4. This will lead you to the Troubleshooter settings screen.
5. On the right-hand side, click on “Other troubleshooters“.
5. In the list of troubleshooters, scroll down and find the “Printer” troubleshooter.
6. You can run the printer troubleshooter “Run” to run it on your system.
7. Now you will be asked to select the printer from the list of printers associated with your system.
8. After that, tap “Next” to proceed.
9. Next, choose the “Apply this fix” option.
The fix will be applied and the printer issue will be fixed for sure.
Fix 5 – Restart the Print Spooler service
Restarting the print spooler service can solve the printer problem.
1. Press the Win key and start to type “services“.
2. Once you see the “Services” in the search results to access it.
3. Once the Services page opens up, look for the “Print Spooler” service there.
4. After that, double-tap it to access it.
5. Now, just tap “Stop” to stop the service. It will take a few seconds to stop the spooler service.
6. Then, click on “Start” to start the service as well.
7. You can automate the service as well. So, set the ‘Startup type:’ to “Automatic“.
8. After that, tap “Apply” and “OK” to save the modifications.
Once done, close the Services page. Now, try to print your important documents. Test if the issue still persists.
Fix 6 – Reinstall every printer port
Some users have fixed this issue by uninstalling the faulty printer ports.
1. You have to open the Device Manager.
2. So, just press the Win key and the X keys together.
3. Then, tap “Device Manager” to access it.
4. When you have access to the Device Manager page, you can expand the “Print Queues” area to see the list of printers.
5. Now, just right-click on the printer driver and tap “Uninstall device“.
6. Tap “Uninstall” once more to confirm your action.
7. This way, uninstall all the printer drivers from your system.
8. Once you have uninstalled it, expand the “Universal Serial Bus controllers“.
9. Then, look for a printer port. Once you have found it, right-click that and tap “Uninstall device” to remove it from your system.
10. Again, tap “Uninstall” to confirm.
10. This way, uninstall all the printer ports from your system.
After that, just restart your machine. All the ports and drivers that you have uninstalled will be reinstalled during system startup.
So, you can easily print your files without any more issues.


