It’s natural for humans to make mistakes while using electronic devices such as mobile phones, laptops, etc. The most common mistake usually users commit is deleting any files like images, videos, etc. Recently many iPhone users have expressed their disappointment about this matter. They said they deleted some of the photos from their iPhone unknowingly and they are not sure how to get them back.
Many users are not aware that there are quite ways using which any person can get the deleted photos back. If you are also looking for a convenient and efficient way to recover photos on your iPhone, you have arrived at the right post. This article will surely guide you on how to restore the photos using the best two ways without any cost.
How to Recover Deleted Photos on your iPhone From the Recently Deleted Album
NOTE – All the photos that get deleted by the user always go to the Recently Deleted album and it will stay there only for the next 30 days. After which the photos will get deleted permanently.
Step 1: After unlocking your iPhone, go to the Photos app by tapping on its icon from the home screen.
Step 2: Once the Photos app opens, tap on the Albums option at the bottom of the Photos app window as shown below.
Step 3: Now scroll down to its bottom and you will find the Recently Deleted album under the Utilities section as shown.
Step 4: Just tap on the Recently Deleted option.

Step 5: It will prompt you to authenticate using the FaceID.
Step 6: After successfully verifying the FaceID, it opens the recently deleted album on your iPhone.
Step 7: Here you will find all the deleted photos and it will also show how many days ago it was deleted.
Step 8: It will be shown until 29 days. Then it will automatically get deleted permanently.
Step 9: Go search for the photo by scrolling up or down.
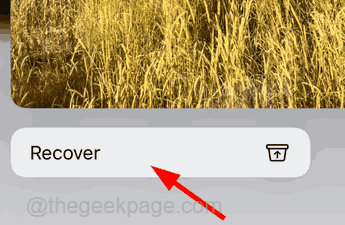
Step 10: Long tap on a particular photo and then tap on the Recover option as shown below.

Step 11: If you want to recover many photos at once, then tap on the Select option at the top right side of the Recently Deleted album.

Step 12: Tap on all the photos you want to recover at once.
Step 13: After selecting the photos, tap on the Recover option at the bottom as shown below.

How to Recover Deleted Photos on your iPhone from iCloud web
This method is only for those who had their photos, videos, and other files backed up on the iCloud storage from their iPhones. If you have not backed up the iCloud storage, this method will also explain how to enable it with the steps below.
Step 1: Open the Settings page on your iPhone.
Step 2: Scroll down the Settings page and tap on the Photos option as shown below.

Step 3: On the Photos page, make sure the iCloud Photos are enabled.

Step 4: After enabling it, you need to enable the iCloud sync every time a new file appears on your iPhone.
Step 5: Now go back to the Settings page and tap on the Profile Name on top.

Step 6: Then select the iCloud option by tapping on it as shown below.

Step 7: On the iCloud page, tap on the Photos option and make sure Sync this iPhone is enabled by tapping on its toggle button.

Step 8: Now visit the iCloud webpage and tap on the Sign In option as shown in the below screenshot.

Step 9: Enter the Apple ID and click on the right arrow button at the end as shown below.

Step 10: On success, it will ask for the password and you need to enter the Apple ID‘s password and click the right arrow button again for authentication.

Step 11: Enter the verification code received to pass the two-factor authentication process.

Step 12: After that, tap on the Trust button to continue if you are browsing the iCloud from the Windows system or other devices.

Step 13: Once you have reached the dashboard of iCloud, tap on the Photos section at the top as shown below.

Step 14: It might take some time to load all the photos from iCloud if the files are very large.
Step 15: When all the photos are loaded, press and hold the Ctrl button while clicking all the photos that you want to download to select them.
Step 16: After you are done selecting the photos, go to the top and click cloud shaped download button as shown in the below screenshot.

Step 17: This will start downloading all the photos in a zip file and you can go to the Downloads folder to access it.
