When it comes to Excel, sorting is important, very very important. We all want our data to be sorted in multiple ways to get the desired result that we are looking for. Sorting based on a single column is straight forward and easy, but what if you want your data to be sorted based on multiple columns? Though it might sound impossible, for Excel, this is just a piece of cake. You don’t need any coding, you don’t need to be an Excel Guru, all you need is just this Geek page article to sort out all your multi-level sorting issues!
In this article, we explain through 2 different methods how you can easily sort data in your Excel file based on multiple columns. The first method uses the inbuilt sort window, whereas the second method uses the 2 sort icons available in Excel. Whatever be the method, the results are going to be the same. It’s just that you have to pick your favorite method! So what are you waiting for? Let’s straight away jump into the article!
Example Scenario
In this article, we have created a sample table to explain the multiple-level sorting technique. In the following table, I have 3 columns namely Name, Subject, and Marks.
I want the table to be sorted based on Name and Marks in such a way that the Names are sorted from smallest to largest and the Marks are sorted from largest to smallest. So the final result should show me the names sorted in ascending order and I should be able to view the highest marks obtained by the person first. Please refer to the screenshot below to understand the scenario better.
Solution 1: Perform Multi-Level Sorting Using Sort Window
This method uses the sort window that is readily available in your Excel.
Let’s see how you can easily sort your data based on multiple columns using this simple method, in the coming steps.
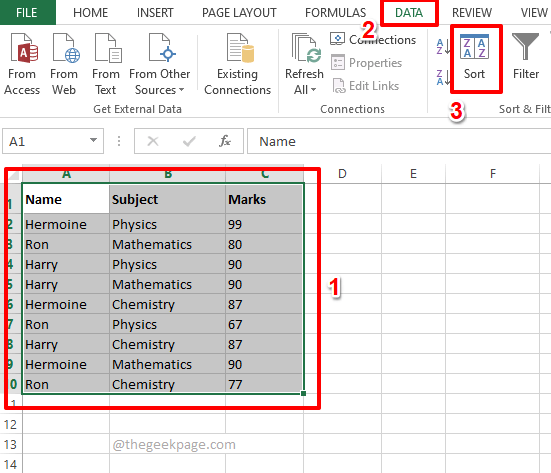
Step 1: Firstly select the data that you want to sort.
Now hit the Data tab at the top ribbon and click on the Sort button.
Step 2: Now in the Sort window, set your first sort criterion.
Choose the first column based on which you want your sort to happen. You can choose the column name from the Sort by dropdown menu.
As next, set the order in which you want the data to be sorted. Choose A to Z from the Order dropdown menu.
Once the first sort criterion is set, click on the Add Level button at the top.
Note: For this method to work, you have to sort the columns from smallest to largest order. That is, as the first criterion, you need to give the column that you want to sort from smallest to largest. As the second criterion, you need to give the largest to the smallest column. Also, you can add as many levels as you want.
Step 3: As next, set the second criterion the same way. Choose the column from the Then by dropdown menu and set the order as Largest to Smallest in the Order dropdown menu.
Hit the OK button.
Step 4: That’s it. Your data is now multi-level sorted. Enjoy!
Solution 2: Perform Multi-Level Sorting Using Sort Icons
This method is also simple. In the previous method, you had to sort the smallest to largest column first. This method is just the opposite. In this method, you have to sort the largest to smallest column first. Let’s see how to perform multi-level sorting based using sort icons.
Step 1: Firstly, select the column that needs to be sorted from largest to smallest. In the example scenario, I want the Marks column to be sorted from largest to smallest, hence I have selected the Marks column.
Now, click on the DATA tab at the top.
As next, under the DATA options, click on the Z –> A sort icon.
Step 2: When you get the Sort Warning dialog box, click on the radio button corresponding to Expand the selection and hit the Sort button.
Step 3: If you look at the Excel sheet now, you can see that the Marks are sorted from largest to smallest. Let’s now go ahead and sort the Name column.
Select the Name column next. Hit the Data tab at the top and then click on the A –> Z sorting icon.
Step 4: In the Sort Warning dialog box, once again, select the radio button corresponding to Expand the selection option and hit the Sort button.
Step 5: That’s it. Both the sorts together have resulted in multi-level sorting and your table is now well sorted!
We are so excited to find out which method you picked as your favorite. Our favorite is the first method as it is more straightforward and is a one-step solution.
Please stay tuned for more amazing and super cool articles on your favorite technical topics.


