Let’s say, you want to perform a clean boot of the system. You open the MSconfig utility and make the desired changes. After making the changes, you click on the OK button. Ideally, you should be prompted with a window asking permission to Restart the System.
Many users reported that they aren’t prompted with a window asking to Restart the system. Also, the changes that were made are not saved despite clicking on Apply and OK in the System Configuration window.
Although, we aren’t sure what is causing this issue. It might be because of some third-party Antivirus application interfering with the working of MSConfig or because of lack of permissions.
If you are encountering this problem on your system, don’t worry. In this article, we’ve curated some fixes to help you get rid of this problem.
Fix 1: Boot Windows in Safe Mode.
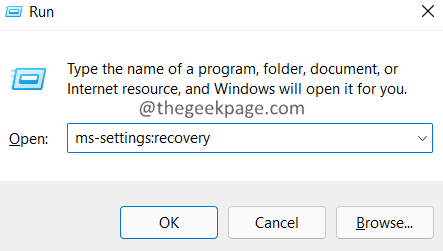
1. Open the Run Dialog using the keys Windows+R.
2. Enter the command ms-settings:recovery, and press Enter.
3. In the opening window, click on the Restart no button next to Advanced startup.
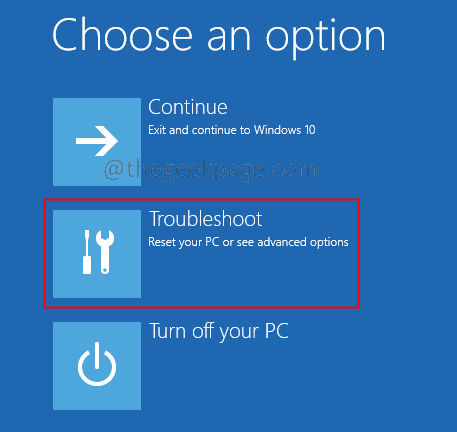
4. You can see the Choose an option window. Locate Troubleshoot using the arrows on the keyboard.
5. Now, click on Advanced Options.
6. Click on the Startup Settings option.
7. Click on the Restart button.
8. Press the F4 key from your keyboard and hit Enter.
9. Open the Run Dialog using the keys Windows+R.
10. Enter msconfig and hit Enter.
11. Make all the changes. Click on Apply, and then click on OK.
12. Ideally, you will see a System Configuration Dialog asking if you want to Restart the system.
13. Click on Restart.
14. Once you restart your system normally, check if the issue has been fixed.
If you still see the issue, check out the next fix.
Fix 2: Try to make changes from the New Admin account.
1. Open Run Dialog using the keys Windows+R.
2. In the Dialog window, enter the below command and press enter.
ms-settings:otherusers
3. In the appearing windows, scroll down and locate the Other users section and click on the Add account button.
4. In the appearing window, click on I don’t have this person’s sign-in information.
5. Click on Add a user without a Microsoft account.
6. You will be prompted to enter a Username, Password, and Security Questions. Enter the details carefully.
7. In the appearing window, click account, and then click on Change account type.
8. In the appearing window, choose Administrator from the drop-down.
9. Now, close the settings window.
10. From the taskbar, click on the windows icon.
11. Click on your User Account.
12. Click on the newly created account to sign into that account.
Check if this helps. If not, try the next fix.
Fix 3: Remove Third-party Antivirus/Malware apps from your system.
1. Open the Run Dialog with Windows+R.
2. Type the command appwiz.cpl, and press Enter.
3. In the appearing window, locate the third-party Antivirus/malware, and click on the three dots.
5. Select Uninstall.
That’s all.
We hope this has been informative. Kindly comment and let us know the fix that helped you resolve the issue. This will help the future readers as well.
Thank you for reading.


