On many occasions, you might want to convert a negative number to a positive one in MS Excel. Whatever be the requirement, there are many different ways using which you can achieve this task; quick and easy. You can use simple formula functions like If() and Abs() for the same, or you could make use of the paste special functionality, or you can rely on the flash fill feature which is considered as a magic feature of Excel. You can even write a simple VBA script of your own, to convert negative numbers to positive numbers in a single click.
Dive into the article to explore all the solutions mentioned above! Hope you enjoy reading the article.
Solution 1: By Multiplying the Negative Number by -1 Using the IF() Formula Function
Let’s say you have your negative numbers in the column named Source and you want only their positive converted values in the column Result. Let’s see how this can be done.
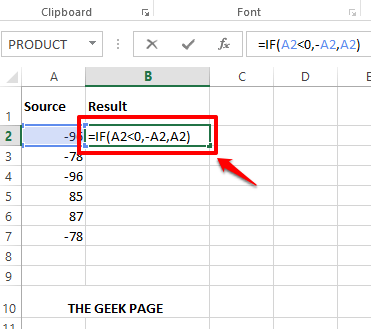
Step 1: Double click on the first cell of the Result column to enter the edit mode. Now, copy and paste the following formula onto it.
=IF(A2<0,-A2,A2)
If your first negative value is on a different cell than cell A2, then you need to replace the corresponding cell’s id instead of A2 in the formula.
Formula Explanation:
=IF(A2<0, -A2, A2) instructs Excel to check whether the value in cell A2 is less than 0 (zero) or not. If it is, then the value should be multiplied by -1. Else, the number should be left as such. So in effect, negative numbers are made positive by multiplying them by -1 and positive numbers are left as such.
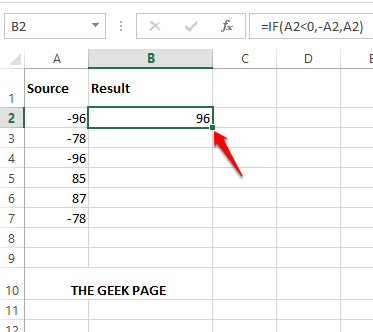
Step 2: Hit the Enter key or click elsewhere to view the result.
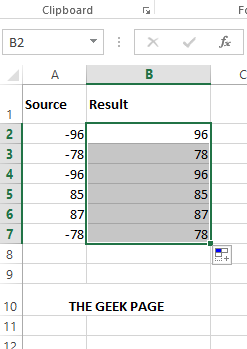
Now to apply the same formula throughout the column, click on the small square shape present at the bottom right corner of the formula applied cell and drag it down.
Step 3: That’s it. You now have successfully applied the formula across your column. Well done!
Solution 2: By Using the ABS() Formula Function
This is a different function, though it gives the same result. It takes in any number as an argument and returns its absolute value as its result. Remember that this function will give a VALUE error if you give any character other than a number as its argument.
Step 1: Once again, double click on the first cell of the Result column and copy and paste the following formula.
=ABS(A2)
If your data is not on cell A2, you should replace A2 with the correct cell id where the data resides.
Step 2: Hit the Enter key to see the result that the ABS function returned.
Step 3: Just like in the previous section, you can click and drag the small square shape present at the bottom right corner of the formula applied cell, to apply the same formula to all the cells underneath it.
Solution 3: By Multiplying the Negative Number With -1 Using Paste Special
This method uses the same logic as the method described in Solution 1. However, in this solution, we don’t use the IF() function, instead, we make use of the Paste Special functionality to achieve our results.
Step 1: Double click anywhere on the Excel sheet and enter -1. Now click on the cell and hit the CTRL + C keys together to copy the cell.
Step 2: As next, select the entire range of cells containing the negative values that you want to convert to positive numbers.
Note: The selected range of cells could contain both positive and negative values. But we need to multiply only the negative values by -1. If we select the entire range of cells, positive values will also be multiplied by -1 and they would become negative, which is not desirable. So, let’s select only the negative values from the range of cells selected. Let’s see how the selection can be done and how we can successfully convert only the negative numbers in the steps below.
Step 3: Hit the CTRL + F keys simultaneously and bring up the Find and Replace window.
Make sure you are at the Find tab. Now under the Find what field, type in – (minus) and hit the Find All button.
Step 4: Now, the Find and Replace window would list out all the negative numbers in your selected range of cells.
Simply press the keys CTRL + A together to select the entire result. Hit the Close button once you are done.
Step 5: If you now look at your Excel sheet, you can see that only the negative numbers are selected. Now, right click anywhere on the selected range of cells and click on the Paste Special option.
Step 6: On the Paste Special window, under the Paste section, choose the radio button corresponding to Values.
Under the Operation section, choose the radio button corresponding to the option Multiply.
Hit the OK button once you are all done.
Step 7: Viola! Your negative numbers are all positive now! Enjoy!
Once you have the numbers all turned positive, you can simply delete the cell where you entered -1.
Solution 4: By Using Flash Fill Feature
The Flash fill method is a pretty simple method that teaches Excel the patterns that you want it to learn.
Step 1: Firstly double click on the first cell of the resultant column and manually type in the positive version of the corresponding negative number.
Now, simply click on the cell which has the manually typed result and press the keys CTRL + E together.
Step 2: Much to your surprise, Excel would learn the pattern, and instantly it would give the absolute values of all the numbers in your resultant column, converting all the negative numbers to positive ones in the process.
Also Read: How to Autofill Data Based on Patterns Using Flash Fill in Excel
Solution 5: By Using a Simple VBA Script
This method involves a simple VBA script, using which you can convert your negative numbers to positive in a single click.
For this method to work, firstly you need to enable the Developer mode. Let’s see how this can be done in Steps 1 to 3. If you have the DEVELOPER mode enabled already, you can straight away jump to Step 4.
Step 1: At the top ribbon for tabs, click on the FILE tab.
Step 2: On the left window pane, click on Options.
Step 3: On the left pane of the Word Options window, click on Customize Ribbon first.
Now on the right window pane, under the Customize the Ribbon section, scroll down, locate and check the checkbox corresponding to the option Developer.
Hit the OK button once you are all done.
Step 4: Once the Developer tab is enabled, click on the DEVELOPER tab at the top.
Now, under the DEVELOPER tab options, click on the button Visual Basic.
Step 5: Now, on the Visual Basic Editor window, click on the Insert tab and then click on the option Module.
Step 6: Now you need to copy and paste the following code onto the editor page that you have in front of you.
Sub theGeekPageChangeNegativeToPositiveMacro()
For Each Cell In Selection
If Cell.Value < 0 Then
Cell.Value = -Cell.Value
End If
Next Cell
End Sub
Once you have copied the code, you can click on the Close button and close the editor, saving is not mandatory. But if you choose to save the file, remember to save the file as a macro file with the .xlsm format.
Step 7: When you are back at the Excel window, firstly select all the cells that you want to convert from negative to positive.
Now, make sure you are at the DEVELOPER tab and then click on the Macros button.
Step 8: On the list of Macros available, click on our macro, which is theGeekPageChangeNegativeToPositiveMacro(). Hit the Run button to execute the macro.
Step 9: Well you don’t have to do anything anymore. Excel has done it all. If you haven’t noticed yet, your negative numbers are all positive now! Enjoy!
Please tell us in the comments section which method is your favorite. Our favorite, of course, is the last method as it involves a little bit of scripting. Of course, we, at The Geek Page, love geeky things.
Stay tuned for more amazing tricks and tips.


