If you are thinking to change the administrative status of an account but you don’t know how to do it, you are just in the right place. In this article, we are going to discuss the process following which you can add/remove an administrative account on your computer or how to change the status of an existing one.
In order to add or modify the status of an existing administrative account, you need to follow these 3 major steps-
a. Add a new local user account.
b. Set the new account as an administrator account.
c. Remove the administrative rights of the older account.
We are going to describe all of these major procedures step by step-
Step-1 Add a new Local User account-
In order to create a new standard local user account, follow these steps-
1. Press Windows key+I to open Settings window on your computer, click on “Accounts“.

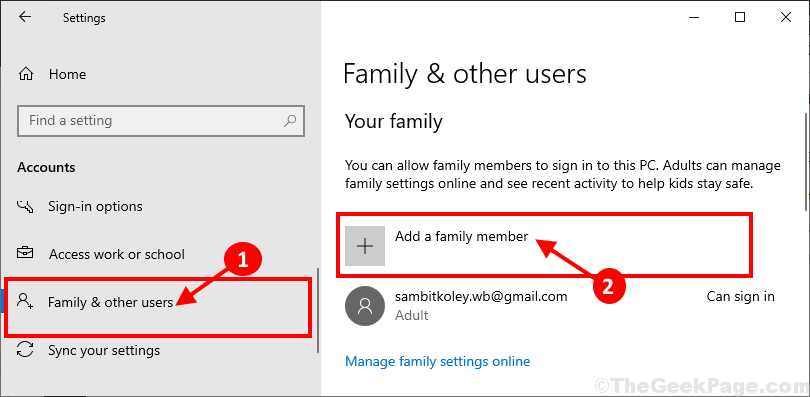
2. In Settings window, click on “Family & other users” on the left-hand side and then, on the right side of the settings window, click on “Add a family member” under ‘Your Family‘ to initialize the creation of an account on your computer.*

* NOTE- If you want to add an account for anyone outside of your family, simply scroll down in the same window, click on “Add someone else to this pc” under ‘Other users‘.
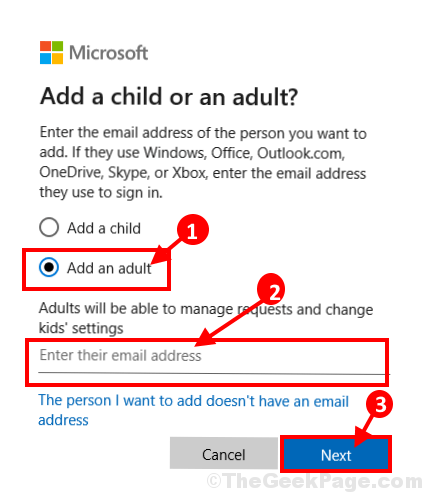
3. Now select “Add an Adult” as the account type and then put an email address and then click on “Next” to start the account creation process.

Now, follow on-screen instructions to complete the account creation process.
Step-2 Set this account as an administrator-
After creating the new account you have to set this account as an administrator of your computer.
1. Click on the search box beside the Windows icon and type “Control Panel” and then click on “Control Panel” in the elevated search result window.

2. On the top right side of the Control Panel window, click on the drop-down and click on to select “Category“. Now, click on “Change account type” under ‘User Accounts‘ in order to change the account status.

3. In the Manage Accounts window, you will see both the old account and the new account. Click on the new account.
[NOTE– For our computer, “sambit koley” is the new account and the “Sambit_Main” account is the old account”].

4. Now, click on “Change the account type” on the left-hand side of Change an Account window.

5. In the next window, click on “Administrator” to set this account as an administrator of this computer.
6. Finally, click on “Change Account Type” to complete the process on your computer.

Close Control Panel window.
The new account is a new administrator of your computer.
Step-3 Remove the administrative rights of the older account-
At the last stage, we will remove the administrative rights of the older account on your computer.
1. Press Windows key and the R key together will open the Run terminal.
2. Here, you need to type “control” and then click on “OK” to open the Control Panel.

3. When the Control Panel window opens, click on the drop-down at the top right side and click on to select “Category“.
4. Then, click on “Change account type” under ‘User Accounts‘ in order to change the account status.

5. In the next window, click on the older account to change its status.

6. Now, you have to click on the “Change the account type” on the left-hand side of Change an Account window.

7. In the older account, click on “Standard” to set the account as a standard user of the computer.
8. Now, click on “Change Account Type” to save the changes on your computer.

Close Control Panel window.
This way you can add/remove an administrative account on your computer or you can modify the status of an existing account.