Many users have complained of seeing an error on screen when trying to open a page in Google Chrome. The error message is read as follows :
He’s dead, Jim!
Either Google Chrome ran out of memory or the process for the web page was teriminated for some other reason. To continue, reload or go to another page.
This error shows up due to various reasons, the most common being the memory issue of Chrome. Sometimes, extensions may interfere with chrome or simply the pre-loaded page gets stuck in limbo. Now, that we have a basic idea for the occurrence of an error, Let’s go through this article to know the different troubleshooting methods that help in fixing the issue on Google Chrome.
The fixes are divided into two categories first related to Google Chrome and the second related to the system.
Troubleshooting Google Chrome
Fix 1: Close all the unused tabs
When more tabs are present in the browser, more memory gets used and this causes the error. Close all the unused tabs by clicking on “X” present on each tab. This clears the system memory the tabs were using.

Fix 2: Reload the Webpage
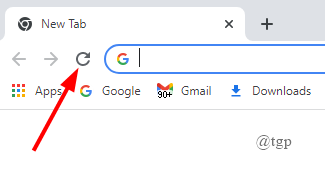
Simply click on the reload button present on the top-left corner of the webpage. This should restore the webpage and the error should be gone.

Fix 3: Disable the ScriptSave Extension
The problem may be mostly due to the third-party extension, ScriptSave. To disable this ,
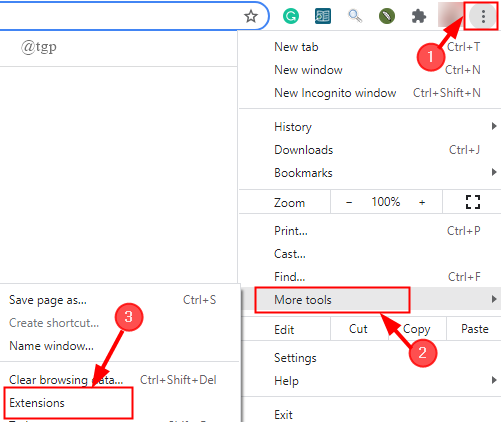
Step 1: Click on 3-dots >More tools > Extensions.

Step 2: Go to ScriptSave and disable the on / off toggle button of the extension.

NOTE: If you don’t use this extension and is still present, you can simply remove it instead of disabling it.
Step 3: Restart the browser and see if the error is resolved.
Fix 4: Disable App Container
Step 1: Right-click on Google Chrome’s shortcut, and open Properties
.

Step 2: Go to the Shortcuts tab and locate the target entry.

Step 3: Add “–disable-appcontainer” at the end of the target box. Now, click Apply.

Step 4: Finally, Restart your browser and the error should be gone.
Fix 5: Run Chrome Cleanup tool
Step 1: Open Chrome, click on 3-dots > Settings.

Step 2: Go to Advanced > Reset and Clean up.

Step 3: Click on Clean up Computer > Find.

Step 4: If you are asked to remove software, click Remove. ( I did not have harmful software).
Step 5: Reboot your system and see if the error is resolved.
Fix 6: Reset Chrome Settings
Step 1: Open Chrome, click on 3-dots > Settings.

Step 2: Go to Advanced > Reset and Clean up > Restore settings to original defaults.

Step 3: A pop-up window opens, click on Reset Settings.

Step 4: Once done, Reload Chrome.
Fix 7: Reinstall Chrome
Step 1: Open the Run window by pressing “Win +R” and type ” %LOCALAPPDATA%\Google\ Chrome\User Data\”.

Step2: Now, Rename or Delete the default folder. ( Here, I am renaming it from chrome to Chrome 1)

NOTE: The above two steps have to be done before uninstalling Chrome.
Step 3: Press ” Win+ I”, click on Apps, Select Chrome, Click on Uninstall.

Step 4: Reboot your PC and install Chrome again.

Fix 8: Disable Hardware Acceleration
Step1 : Click on 3-dots> Settings> Advanced > System.

Step 2: Disable the on/off toggle button ” Use Hardware Acceleration when available”.

Step 3: Once done, Reload Google Chrome.
Fix 9: Enable Strict Site Isolation in Chrome
Step 1: In the Chrome Browser, type ” chrome://flags”, in the address bar and hit Enter.

Step 2: Scroll down to select Strict Origin Isolation and click on Enable. A Relaunch button will appear on the screen.

Step 3: This will relaunch Chrome with all your tabs open and helps in resolving the issue.
PC Network Troubleshooting
If the error still persists, even after using the above fixes from Troubleshooting Google Chrome, the PC you are using may also be responsible. Let’s get down to see how to fix the issues.
Fix 1: Flush DNS Cache
Step 1: Press ” win+ R” to open the run window and type ” cmd”.

Step 2: In the command prompt window, type ” ipconfig/ flushdns” and hit Enter.DNS Cache is flushed out. This helps in fixing the error.

Fix 2: Reset Network Settings
Step 1: Press ” Win+I”, click on Network & Internet.

Step 2: Click Status and scroll down to select Network Reset.

Step 3: Now, click on Reset now and select YES.

Step 4: Reboot the system and see if the error is fixed.
Fix 3: Run System file checker
Step 1: Open Command Prompt window as an admin.

Step 2: Type ” sfc/scannow”. The process allows repairing any corrupted or damaged Windows system files. This also helps in fixing the error.

Step 3: Once done, restart the system and the error should be fixed.
Fix 4: Update Windows
Step 1: Press” Win+I”, click on Update and Security.

Step 2: Click Windows Update > Check for updates, Install if any pending updates are available.

Step 3: Once done reboot your system and see if the error is fixed.
Fix 5: Disable Antivirus and Firewall for a short period
To disable Antivirus Protection,
Step 1: Press ” Win+I”, Click Update and Security.

Step 2: Click on Windows Security, click Virus and Threat Protection.

Step 3: Click on Manage Settings and switch off the On/ Off toggle button.

To disable Firewall,
Step 1: Type Control panel in Run window to open it.

Step 2: Click System and Security > Windows Defender Firewall.

Step 3: Click on Turn Windows Defender Firewall on or off.

Step 4: Select the radio buttons near Turn off Windows Defender Firewall and click OK as shown.

Fix 6: Perform System Restore
If all the above fixes do not work, try performing a system restore.
Step 1: Press ” Win+I”, Click Update and Security.

Step 2: Click Recovery > Get Started.

Step 3: Choose an option and restore the system.

Once you reset the system, the error should be gone.
That’s all
Comment below and let us know which fix helped you.
Thanks for Reading.