Windows 11 allows users to roll back to Windows 10 if they don’t like the former. Windows stores an image of the older OS briefly on the system so that if users want then they can go back to the older version of the OS. But, what if the “Go back” button is greyed out or you can’t use that option at all?
Fix 1 – The time limit
Windows provides a specific time limit of 10 days after you have upgraded the system from Windows 10 to Windows 11. This entire time, Windows stores the older OS image on your computer. So, if you open the Settings and go this way –
System > Recovery
Then, check the Recovery options zone. If the time limit has been exceeded (you have used Windows 11 for more than 10 days), the ‘Go back’ feature becomes inaccessible. There are several ways you can extend this time limit, but only up to 60 days. So you can’t go back to your original Windows once this time limit expires.
Check whether your system can go back to Windows 10 following these easy steps –
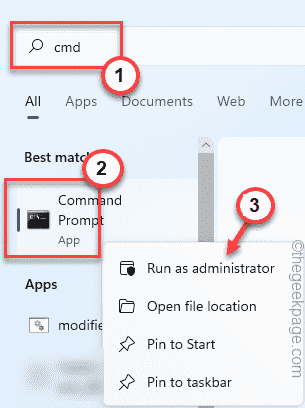
1. At first, press the Windows key and type “cmd” there.
2. Then, as you see the “Command Prompt” in the search results and tap “Run as administrator“.
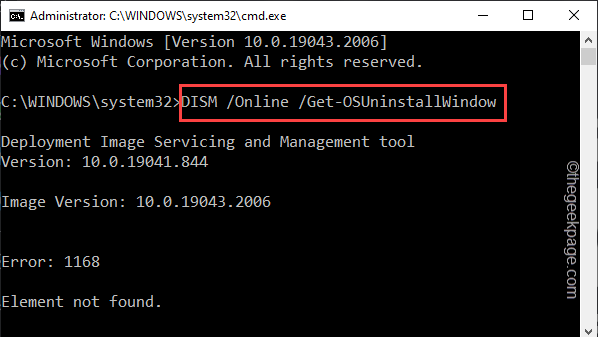
3. When you open the CMD in the administrative modes, copy-paste this code and hit Enter.
DISM /Online /Get-OSUninstallWindow
This will show whether your system has Windows.old folder and the time limit of the rollback process.
If it shows this in the message, you can’t use the ‘Go back’ feature as the time limit is over and you can’t roll back.
Error: 1168
Element not found
Fix 2 – Only if you have upgraded
There is another obvious criterion to use the feature ‘Go back’. You have to upgrade the system from Windows 10. If you have installed Windows 11 directly, then there is no question of going back to Windows 10. So, you can’t use the ‘Go back’ feature and it will be greyed out.
Fix 3 – Extend the Go back limit using the Registry Editor
You can use the Registry Editor to extend the time limit of the ‘Go back’ feature up to 60 days.
1. At first, press the Win key+R keys together.
2. After that, type “regedit” and click “OK” to open the Registry Editor.
NOTE – Creating a value in your registry is always risky. So, you should always create a registry backup before any modification. To do that, follow these easy steps –
a. At first, click on the “File” from the menu bar.
b. Later, tap “Export” to make a new registry backup.

Next, just name this backup and store it on your computer.
3. Once the Registry Editor page appears on the screen, head on to this point –
HKEY_LOCAL_MACHINE\SYSTEM\Setup\UninstallWindow
4. Once you have reached this specified location, look on the left-hand pane and check whether you can find the value “UninstallWindow“.
5. If you can find it, double-tap the value to edit it manually.
6. Next, set the ‘Base:’ to “Decimal“.
7. Now, you can put any number from 2 to 60 in the ‘Value data:’ box.
This number that you put in the box is the number of days till the ‘Go back’ option is available.
Put the maximum number which is “60“.
7. Then, click on “OK“.
Now, once you have modified this value, close the Registry Editor screen. Then, reboot your computer to let this change take effect.
After restarting the system, open Settings and check whether you can use the ‘Go back’ feature or not.
Fix 4 – Increase the time limit with PowerShell
If you can’t use the Registry Editor, you can use PowerShell to increase the time limit as well.
1. At first, press the Win key from your keyboard and start to write “powershell” in the search box.
2. Then, right-click the “Windows PowerShell” and tap “Run as administrator“.
3. Coming to the main PowerShell page, copy-paste this code and modify the value accordingly, and hit Enter.
DISM /Online /Set-OSUninstallWindow /Value:numberofdays
[
NOTE – Change the “numberofdays” in the code to the actual number of days that you want to extend the time limit. You can put any number between 2 and 60.
Example –
If you want to extend the limit to 60 days, you have to put “60” in place of “numberofdays“.
So, the code is –
DISM /Online /Set-OSUninstallWindow /Value:60
]
After running this PowerShell code, close the window. Restart your system after this.
Fix 5 – Uninstall Windows Updates
If you are facing this problem just after a recent Windows Update, you have to uninstall those updates.
1. At first, press the Windows key+I keys together to open the Settings page.
2. Once you are on the Settings page, tap “System” settings.
3. Next, find and tap “Recovery” on the right-hand pane.
4. In the various recovery options, go to the “Advanced startup” section. Click “Restart now“.
Just wait for a few minutes until Windows boots up in Recovery Mode.
5. When it does, tap the “Troubleshoot” option to go forward.
6. On the Troubleshoot page, click on the section option “Advanced options“.
7. Now, click on the “Uninstall Updates” option to explore more options.
8. Now, you will see two options. Such as “Uninstall latest quality update” and “Uninstall latest feature update“.
Next, according to the type of updates your computer has received, click on the particular option.
9. Going on to the next page, click “Uninstall feature update” to go forward.
Now, Windows will restart your system and uninstall the latest update package from your system.
You will see the “Restoring your previous version of Windows…” message while Windows does that. Once it is over, go forward and use the ‘Go back’ feature on the Settings page.
Fix 6 – Reset the PC
Resetting the PC also may work on your computer.
1. Resetting the PC is quite easy. Open the
2. Once you are on the Settings page, tap “System” settings.
3. Next, find and tap “Recovery” on the right-hand pane.
4. In the various recovery options, go to the “Advanced startup” section. Click “Restart now“.
5. Now, click on “Troubleshoot” to explore troubleshooting options.
6. In the troubleshooting window, you will find two distinct options.
7. Tap on “Reset this PC“.
8. Inside here, there are two more options.
9. Tap “Keep my files” to refresh the system while keeping the important files.
In the next step, Windows will automatically reset your system. Once the device is reset, check whether the ‘Go back’ option is available on the Settings page.
Fix 7 – Clean Install the Windows
If the time limit has crossed the boundary of 60 days, you should just perform a clean installation of Windows 10. Just use a Windows 10 bootable installation media (such as a USB drive or an installation DVD) and install Windows 10.
Even if the ‘Go back’ option is greyed out after the specified time limit, install Windows 10 on your computer.


